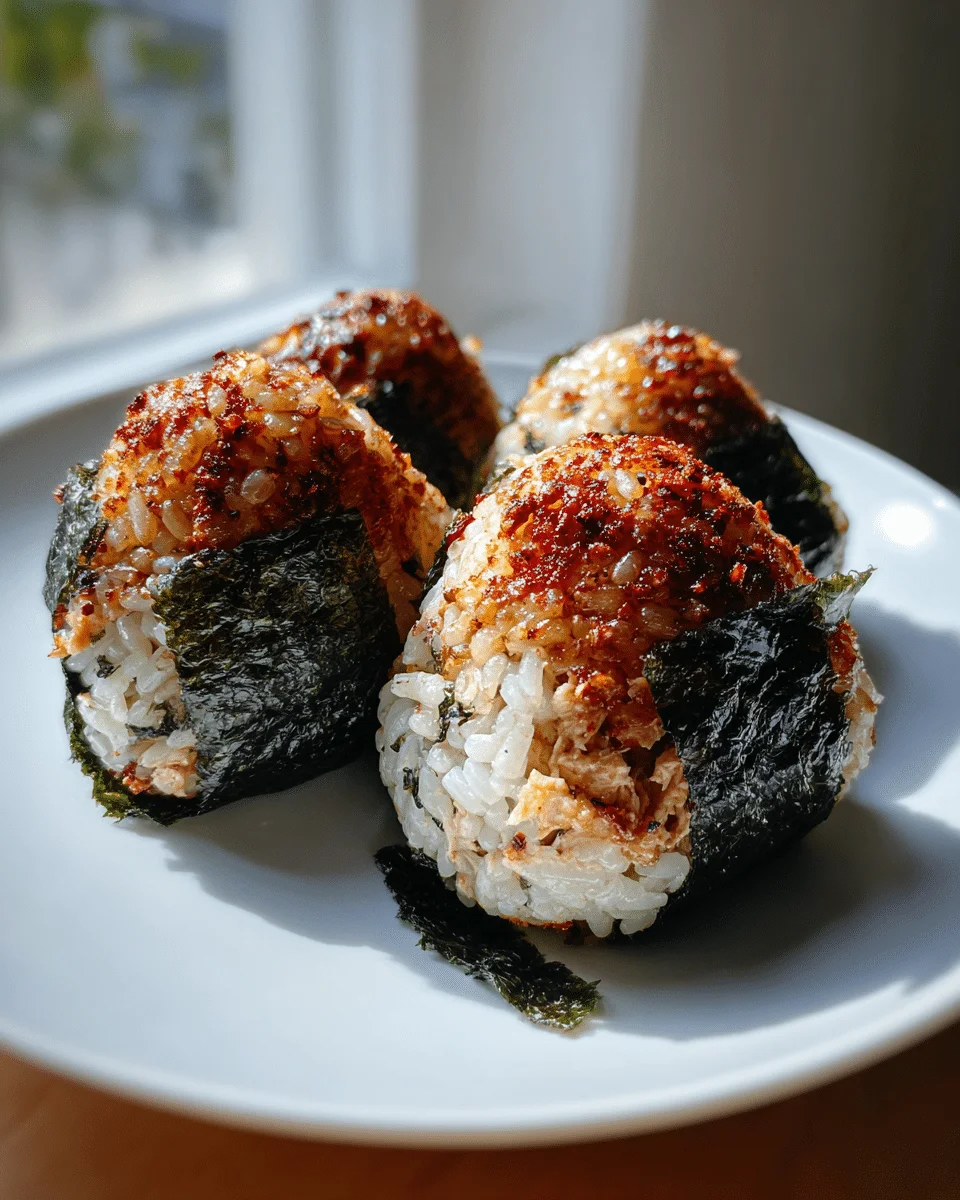
Let me tell you about my love affair with tuna mayo rice balls. It all started when I was raiding my nearly empty pantry one lazy afternoon, craving something quick but satisfying. That’s when these little flavor-packed gems saved the day! With just rice, tuna, mayo, and a few pantry staples, you can whip up these easy tuna mayo rice balls in minutes. They’re the perfect cross between comfort food and convenience – equally great for kids’ lunchboxes, picnics, or midnight snacks. The best part? They taste like you put way more effort in than you actually did. My Japanese friend Rina taught me her family’s trick for the perfect ratio of creamy tuna filling to sticky rice, and now I’m hooked!
Ingredients for Tuna Mayo Rice Balls
Here’s everything you’ll need to make these addictive little bites. Trust me – the simplicity is part of their magic!
- 2 cups cooked rice (freshly made and still slightly warm – this helps with shaping)
- 1 can tuna (about 5 oz, well-drained – I press mine between paper towels)
- 2 tbsp mayonnaise (Japanese mayo like Kewpie is dreamy here)
- 1 tsp soy sauce (just enough for that umami kick)
- 1/2 tsp salt (adjust to your taste)
- 1/4 tsp black pepper (freshly cracked is best)
- 1 sheet nori (cut into strips for wrapping)
Optional Extras: A sprinkle of toasted sesame seeds or a dash of rice vinegar mixed into the rice adds wonderful depth!
How to Make Tuna Mayo Rice Balls
Okay, let’s get our hands sticky! Making these tuna mayo rice balls is seriously simple, but I’ve got a few tricks to share that’ll take yours from “good” to “can’t-stop-eating-them” level.
Mixing the Tuna Mayo Filling
First, grab a bowl and dump in that well-drained tuna. Here’s my secret – I like to flake it with a fork first to break up any big chunks. Add the mayo, soy sauce, salt, and pepper. Now, mix gently! You want it creamy but still with some texture – think tuna salad’s cooler Japanese cousin. Taste it! Need more mayo? Go for it. Want it saltier? Add a splash more soy sauce. This is your moment to make it perfect for you.
Shaping the Rice Balls
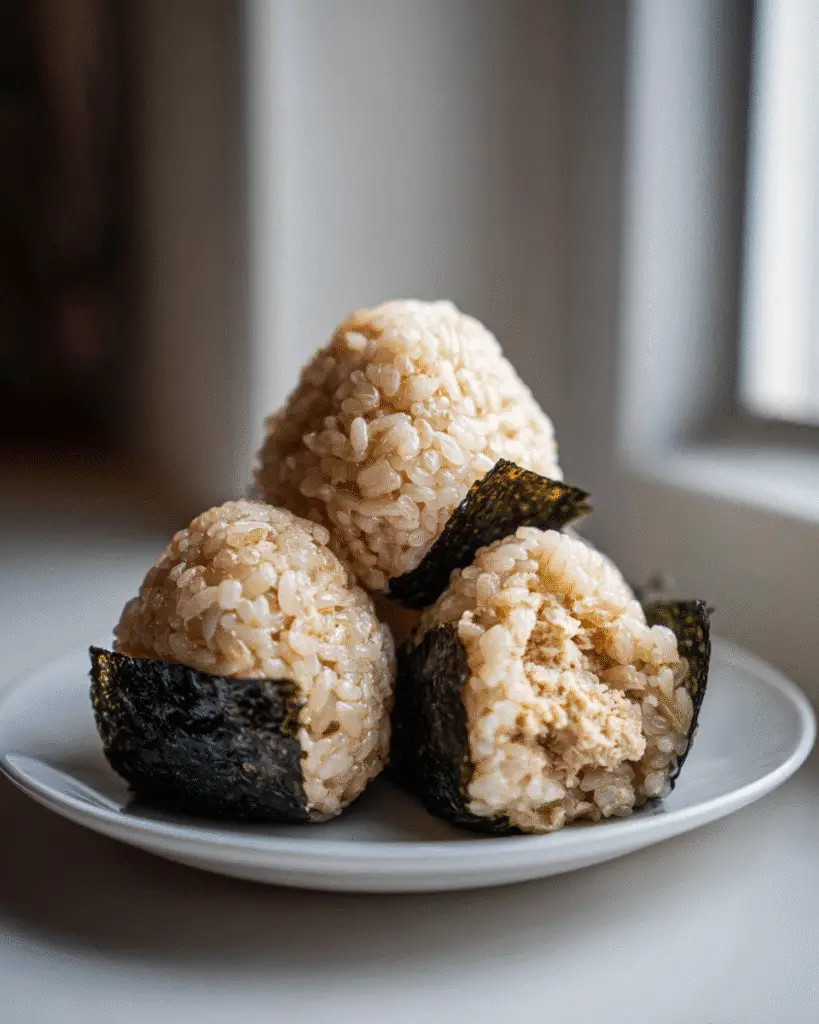
Wet your hands slightly – this keeps the rice from sticking everywhere. Take about 1/4 cup of warm rice and gently flatten it in your palm. Spoon a teaspoon of filling right in the center. Now, cup your hand and start bringing the rice up around the filling. Gently press as you go – but don’t squeeze too hard or you’ll end up with dense little hockey pucks! Rotate as you work to form a nice triangle or ball shape.
Adding the Nori Wrap
Those nori strips aren’t just pretty – they give you something to hold onto! Press a strip onto one side of your rice ball while it’s still slightly warm (the steam helps it stick). I like to wrap mine like a little belt around the middle, but you can get creative. Pro tip: If you’re packing these for later, wait to add the nori until right before eating so it stays crisp!
Tips for Perfect Tuna Mayo Rice Balls
After making these tuna mayo rice balls more times than I can count, I’ve picked up some foolproof tricks that make all the difference. Here’s what I’ve learned the hard way so you don’t have to!
- Rice temperature is key – Use rice that’s still slightly warm from cooking. Cold rice won’t stick together properly, and piping hot rice will burn your hands. That sweet spot where it’s just cool enough to handle makes shaping so much easier.
- Drain that tuna like your life depends on it – I press mine between paper towels until no more moisture comes out. Wet tuna filling equals soggy rice balls that fall apart. Nobody wants that!
- Chill before serving if you can wait – While they’re delicious right away, letting them sit in the fridge for 30 minutes helps them hold their shape better. The rice firms up just enough without losing that perfect tender texture.
- Keep a bowl of water nearby – Dipping your hands in water between shaping prevents sticking, but shake off excess drops. Too much water makes the rice mushy.
- Size matters – Aim for golf ball-sized portions. Too big and they fall apart; too small and you lose that perfect rice-to-filling ratio.
Ingredient Substitutions
Look, I get it—sometimes you’re staring into your fridge thinking, “I don’t have THAT ingredient!” No worries! Here’s how to tweak these tuna mayo rice balls when you’re in a pinch. Just remember—every swap changes the flavor a bit, so taste as you go!
Out of Mayo? Try These
That creamy mayo texture is hard to replace, but Greek yogurt works in a pinch—just expect a tangier bite. Avocado mashed with a squeeze of lemon makes a surprisingly good sub (and adds healthy fats!). For a dairy-free option, I’ve even used hummus thinned with a bit of water. It won’t taste the same, but it’ll still hold everything together!
Rice Alternatives
Brown rice works if you don’t mind a nuttier flavor and denser texture—just make sure it’s freshly cooked and extra sticky. Quinoa’s my favorite healthy swap; rinse it well to remove bitterness. For a low-carb version, cauliflower rice can work, but you’ll need to squeeze out ALL the moisture and add an egg to help it bind. Honestly? It’s not quite the same—stick to real rice when possible!
Tuna Troubles
No canned tuna? Canned salmon makes a delicious (if fancier) version. For vegetarians, mashed chickpeas with seaweed flakes mimic that oceanic flavor surprisingly well. Once, in desperation, I used leftover chicken mixed with extra mayo—not traditional, but still tasty!
Pro Tip: Whatever you substitute, always adjust seasonings to compensate. Less mayo? Maybe a pinch more salt. Different grain? A splash of rice vinegar can help balance flavors. Cooking’s all about adapting—have fun with it!
Serving Suggestions
Oh, the places these tuna mayo rice balls will go! I love how versatile they are—perfect for everything from fancy appetizer platters to quick desk lunches. Here are my favorite ways to serve them up!
Classic Japanese Pairings
For an authentic feel, I always serve mine with a small bowl of miso soup—the salty broth complements the creamy filling beautifully. A side of pickled ginger adds that bright, tangy contrast that cuts through the richness. If I’m feeling fancy, I’ll arrange everything on one of my bamboo trays with some edamame for popping between bites. It makes even a quick meal feel special!
Lunchbox Love
These are my secret weapon for packed lunches! I tuck 2-3 rice balls in a bento box with some cherry tomatoes, cucumber slices, and maybe a few tamagoyaki (Japanese omelet) pieces. The nori keeps everything neat, and they’re way more exciting than a sad sandwich. Pro tip: Pack the nori strips separately in a little baggie if you’re making these the night before—that way they stay crispy until you’re ready to eat!
Party Perfect
When friends come over, I make mini versions (about tablespoon-sized) and arrange them on a platter with dipping sauces. A simple mix of soy sauce and mirin makes an easy glaze, or serve with spicy mayo for dipping. They disappear FAST—last time I made them, my friend Mark ate six before I could blink! For kid parties, I sometimes shape them into little animals using nori cutouts—guaranteed to make everyone smile.
Really, the possibilities are endless. I’ve taken these hiking, served them at book club, even brought them to movie nights instead of popcorn. However you serve them, just be prepared for requests for the recipe—it happens every time!

Storage and Reheating
Okay, let’s talk about keeping these tuna mayo rice balls tasting fresh—because let’s be real, you might not eat all six at once (though I won’t judge if you do!). Here’s what I’ve learned after many batches and a few sad, soggy mistakes.
Fridge Storage: These keep beautifully in the fridge for up to 2 days if you store them right. I line an airtight container with parchment paper and layer the rice balls with more parchment between them—this prevents sticking and keeps the nori from getting too damp. Important: If you haven’t added the nori yet, wait to wrap until just before eating so it stays crisp!
Room Temp Tip: Taking them out of the fridge 15 minutes before eating helps bring back that perfect texture. Cold rice can get a bit hard, but a quick warm-up fixes everything.
Reheating Don’ts: Whatever you do, don’t microwave these! The rice turns gummy, and the mayo separates into weird oily pockets—trust me, I learned this the hard way. If you must warm them, I’ve had success wrapping them in foil and popping them in a toaster oven at 300°F for 5 minutes. But honestly? They’re best at room temp or slightly cool.
Freezer Option: You can freeze them without the nori for up to a month! Thaw overnight in the fridge, then add fresh nori strips. The texture changes slightly, but it’s still pretty good for a quick snack. My kids love finding these in the freezer on busy mornings—way better than toaster pastries!
Nutritional Information
Okay, let’s chat about what’s actually in these tasty tuna mayo rice balls! Now, full disclosure—these numbers are estimates since your exact ingredients might vary a bit. But here’s the general breakdown per rice ball to give you an idea of what you’re enjoying (or sharing… if you’re feeling generous).
Per Serving (1 rice ball):
- Calories: About 120 – perfect for a satisfying snack!
- Protein: 6g (Thanks, tuna! That’ll keep you full.)
- Carbs: 15g
- Sugar: Just 1g
- Fat: 4g (Mostly the good kind from mayo and tuna)
- Fiber: 1g
Now, here’s the thing—if you’re watching certain nutrients, you can tweak this. Less mayo cuts some fat. Brown rice adds fiber. But honestly? For how quick, tasty and filling these are, I think they hit a sweet spot nutritionally. My Japanese friend Rina always says “It’s about balance,” and these little guys deliver exactly that!
Remember: If you’re tracking strictly, always calculate based on your exact ingredients. But for most of us? This gives you a great ballpark so you can enjoy without overthinking it!
Frequently Asked Questions
I get asked about these tuna mayo rice balls ALL the time – turns out I’m not the only one obsessed! Here are the questions that pop up most often, along with all my hard-earned tips from making (and sometimes messing up) dozens of batches.
Can I use brown rice instead of white rice?
Absolutely! Brown rice works, but there are a few tricks. First, make sure it’s freshly cooked and still warm – brown rice tends to be less sticky, so the warmth helps it hold together. I sometimes add an extra tablespoon of water when cooking brown rice for this recipe. The texture will be slightly heartier and nuttier, which I actually love for a more substantial snack!
How do I prevent my rice balls from falling apart?
Oh boy, this was my nemesis when I first started making these! Here’s what works: 1) Use rice that’s slightly warm (not hot, not cold) – this is the golden rule. 2) Really press out all the moisture from your tuna – wet filling is the #1 culprit for disintegration. 3) Wet your hands before shaping to prevent sticking, but shake off excess water. 4) Don’t overfill them – a teaspoon of filling per rice ball is plenty. And if all else fails? Chill them for 30 minutes before serving – works like magic!
Are tuna mayo rice balls freezer-friendly?
Yes, with a few conditions! Freeze them without the nori (it gets weirdly soggy when thawed). Wrap each rice ball tightly in plastic wrap, then store in a freezer bag for up to a month. Thaw overnight in the fridge, then add fresh nori strips right before eating. The texture changes slightly – they’re a bit denser – but still totally delicious. My freezer stash has saved me from many a hangry moment!
Got more questions? Drop them in the comments below – I love hearing how you’re making these tuna mayo rice balls your own!
For more delicious recipes, check out our Pinterest page!
Print
Irresistible 10-Minute Tuna Mayo Rice Balls Recipe
- Total Time: 10 mins
- Yield: 6 rice balls 1x
- Diet: Low Calorie
Description
Simple and delicious tuna mayo rice balls, perfect for a quick snack or light meal.
Ingredients
- 2 cups cooked rice
- 1 can tuna, drained
- 2 tbsp mayonnaise
- 1 tsp soy sauce
- 1/2 tsp salt
- 1/4 tsp black pepper
- 1 sheet nori, cut into strips
Instructions
- Mix the tuna, mayonnaise, soy sauce, salt, and black pepper in a bowl.
- Take a spoonful of rice and flatten it in your hand.
- Place a small amount of the tuna mixture in the center of the rice.
- Shape the rice into a ball, enclosing the tuna filling.
- Wrap a strip of nori around each rice ball.
- Serve immediately or store in the refrigerator.
Notes
- Use freshly cooked rice for the best texture.
- Adjust the amount of mayonnaise to your taste.
- You can add sesame seeds for extra flavor.
- Prep Time: 10 mins
- Cook Time: 0 mins
- Category: Snack
- Method: No-Cook
- Cuisine: Japanese
Nutrition
- Serving Size: 1 rice ball
- Calories: 120
- Sugar: 1g
- Sodium: 200mg
- Fat: 4g
- Saturated Fat: 1g
- Unsaturated Fat: 2g
- Trans Fat: 0g
- Carbohydrates: 15g
- Fiber: 1g
- Protein: 6g
- Cholesterol: 10mg