Oh my gosh, you guys – Halloween baking is my absolute favorite time of year! There’s something so magical about turning ordinary treats into spooky masterpieces, and these Spooky Mummy Brownies are my go-to every October. I discovered this trick years ago when I needed a last-minute Halloween party dessert – and wow, did they steal the show! The best part? You probably have most of the ingredients in your pantry right now. Just imagine rich, fudgy brownies wrapped up like little mummies with white chocolate bandages – they’re almost too cute to eat (almost!). Every time I make these, the kids go wild, and honestly? The adults sneak seconds too. They’re perfect for classroom parties, neighborhood trick-of-treat bags, or just a fun family baking project. Trust me, once you see how easy these are to make, you’ll be wrapping up mummy treats all season long!
Why You’ll Love These Spooky Mummy Brownies

Listen, I’m not exaggerating when I say these brownies will become your new Halloween tradition! Here’s why everyone goes crazy for them:
- Super easy to make – We’re starting with a box mix (shh, our little secret!) so you can focus on the fun decorating part
- Total crowd-pleaser – Kids adore the cute mummy faces, while adults keep sneaking extra pieces because that chocolatey brownie base is irresistible
- Instantly festive – That white chocolate drizzle transforms ordinary brownies into the star of any Halloween party spread
- Super versatile – Wrap them up for classroom treats, pack them in lunchboxes, or serve them at your grown-up Halloween bash
The best part? You probably already have everything you need in your pantry right now. Just wait until you see how quickly these disappear – I always have to hide a few for myself!
Ingredients for Spooky Mummy Brownies
Okay, here’s the magic list – and I promise, it’s so simple you might already have everything in your kitchen! The beauty of these mummy brownies is how the most basic ingredients create such a fun transformation. I’ll share my favorite brands and some clever swaps too, because we’ve all had those “oops, I’m out of that!” moments mid-baking.
- 1 box brownie mix (plus whatever it calls for – usually eggs, oil, and water) – I’m partial to the fudge-style mixes because that rich chocolate base makes the white chocolate pop!
- 1 cup white chocolate chips – The good quality ones melt smoother, but honestly? Those store-brand chips work just fine in a pinch
- 2 tbsp coconut oil – This makes the chocolate drizzle perfectly pourable (vegetable oil works too, but coconut adds a hint of flavor I love)
- Edible candy eyes – About 32 small ones (16 brownies = 2 eyes each, simple math even I can handle at 10pm when inspiration strikes!)
Quick substitution notes from my many test batches: No white chips? Try almond bark or vanilla candy melts. Out of coconut oil? Any neutral oil will do – just use a smidge less. And if you can’t find candy eyes, mini marshmallows with chocolate chips pressed in make adorable makeshift eyes (kids love helping with this version!).
See? Told you it was simple. Now let’s make some magic!
Equipment You’ll Need
You know what I love about these mummy brownies? You don’t need any fancy gadgets to make them look amazing! Just grab these basic kitchen tools – I bet you’ve got most of them already. Here’s my no-fuss list:
- Mixing bowl – Any decent-sized one will do (I’ve used everything from my grandma’s ceramic bowl to a plastic takeout container in a pinch!)
- 9×9 inch baking pan – Or whatever size your brownie mix calls for – just adjust the baking time if you go bigger or smaller
- Piping bag or ziplock bag – For those perfect mummy bandage lines (snip just a tiny corner off – I learned the hard way that bigger isn’t better here!)
- Rubber spatula – For scraping every last bit of that delicious batter into the pan
- Oven – Obviously! Just make sure it’s preheated – cold ovens make sad, flat brownies
Pro tip from my many Halloween baking disasters: If you don’t have a piping bag, a plastic sandwich bag with the tiniest corner snipped off works just as well. And that “extra” spatula? Perfect for sneaking tastes of the batter when no one’s looking. Not that I’d ever do that… okay, maybe just a little!
How to Make Spooky Mummy Brownies
Alright, let’s get spooky! I’ll walk you through each step so your mummy brownies turn out perfectly cute and delicious. Don’t worry – even if you’re new to baking, these are foolproof. Just follow along and channel your inner pastry artist!
Preparing the Brownie Base
First things first – we need that rich chocolate foundation for our mummies to wrap around!
- Preheat your oven to 350°F (175°C). This gives it time to reach the perfect temperature while you mix.
- Prepare the brownie batter according to your box mix instructions. Pro tip: I always add an extra tablespoon of water to make them extra fudgy!
- Pour into a greased 9×9 inch pan and smooth the top. I like to tap the pan gently on the counter to remove air bubbles.
- Bake for 22-25 minutes until a toothpick comes out with just a few moist crumbs (not wet batter). Watch carefully – overbaked brownies won’t be as cute!
- Cool completely on a wire rack. I know it’s tempting, but don’t decorate warm brownies or the chocolate will melt right off!
Creating the Mummy Effect
Now for the magical transformation – watch how simple it is to turn basic brownies into adorable mummies!
- Melt white chocolate chips with coconut oil in 30-second bursts in the microwave, stirring between each. Stop when it’s almost melted – the residual heat will finish the job.
- Transfer to a piping bag (or ziplock with tiny corner snipped off). The opening should be about 1/8 inch – trust me, smaller is better for control!
- Drizzle chocolate in random “bandage” patterns across each brownie. Don’t overthink it – imperfect lines look more mummy-like! Leave small gaps for the eyes.
- Work quickly before the chocolate starts to set. If it thickens, just microwave for 5 more seconds to loosen.
Adding the Final Touches
This is where the personality comes to life – those cute little faces will have everyone smiling!
- Immediately add candy eyes while the chocolate is still wet. Gently press them into place – two per brownie for classic mummy faces.
- Let set completely – about 30 minutes at room temperature. If you’re impatient (like me!), you can pop them in the fridge for 10 minutes.
- Use a toothpick to fix any chocolate lines or eyes that shifted. The beauty is that mummies are supposed to look a little messy!
And just like that – you’ve transformed simple brownies into Halloween magic! The hardest part now? Waiting for the chocolate to set before digging in. I may or may not have “tested” a few pre-set brownies in my day… purely for quality control, of course!
Tips for Perfect Spooky Mummy Brownies
After making these adorable mummy brownies more times than I can count (and yes, learning from plenty of happy accidents!), I’ve picked up some tricks to make them foolproof. Here are my best tips to guarantee your brownies turn out spook-tacular every time:
- Toothpick magic – If your chocolate lines go rogue (and mine often do!), just dip a toothpick in the melted chocolate and use it to “draw” extra bandages or fix wonky lines. It’s like an edible glue gun for your mummy repairs!
- Cooling is key – I know it’s hard to wait, but decorating warm brownies is a recipe for melted mess. The chocolate will just slide right off. I set a timer for 1 hour of cooling time – perfect for cleaning up or making another batch!
- Storage smarts – Keep these in an airtight container with parchment between layers. They’ll stay fresh for 3 days, but let’s be real – they never last that long in my house! The white chocolate might sweat in the fridge, so room temp is best.
- Allergy alert – For nut-free versions, check your brownie mix ingredients (some contain almond flour). You can also swap the coconut oil for vegetable oil if needed. And those candy eyes? They’re usually allergen-friendly, but always double-check the package.
One last secret from my kitchen to yours: If the chocolate starts setting too fast while you’re decorating, just microwave the piping bag for 5-second bursts to keep it fluid. Works like a charm! Now go make some mummy magic – I can’t wait to see your creations.
Variations for Spooky Mummy Brownies
Okay, here’s where we get really creative! Once you’ve mastered the basic mummy brownies (which are adorable as-is, don’t get me wrong), try these fun twists to mix things up. I’ve tested all of these over the years – some were hits, some were… well, let’s call them learning experiences!
Switch Up the Chocolate
Who says mummies have to wear white? Sometimes I like to change their bandages for extra Halloween flair:
- Dark chocolate drizzle gives a spookier, ancient mummy vibe (plus it’s delicious with the sweet brownie base)
- Orange-tinted white chocolate – Just stir in a drop or two of orange food coloring for that perfect Halloween pop
- Peanut butter chips melt into a creamy drizzle that kids go crazy for (just check for allergies first!)
Fun with Eyes
Those candy eyes are adorable, but why stop there? Get playful with different looks:
- Different sized eyes – Try one big and one small for a goofy monster effect
- Colored candy eyes (the red ones look especially creepy-cute!)
- DIY eyes – Mini marshmallows with chocolate chips or mini M&Ms pressed in make great homemade versions
Spooky Flavor Twists
Want to really surprise your Halloween guests? Try these tasty variations:
- Mint chocolate – Use mint chocolate chips in the brownie batter for a refreshing twist
- Peanut butter swirl – Drop spoonfuls of peanut butter into the batter before baking
- Pumpkin spice – Add 1 tsp pumpkin pie spice to the brownie mix for fall flavors
My favorite thing about these variations? They let you create different personalities for your mummy crew. Last year I made a whole batch where each brownie had its own “expression” – some happy, some scared, some just plain silly. The kids at the party had a blast picking their favorites! So don’t be afraid to experiment – after all, the best Halloween treats are the ones that spark joy (and maybe a little mischief).
Serving and Storing Spooky Mummy Brownies
Okay, confession time – I’ve never actually managed to keep these mummy brownies around for more than a day! But just in case you have more willpower than I do (or maybe you’re hiding them from your kids), here’s how to keep them looking and tasting fresh.

Showtime for Your Mummies
These little guys are total showstoppers on any Halloween dessert table! I like to arrange them on a black platter for maximum spooky effect – it makes the white chocolate bandages really pop. For classroom parties, I’ll tuck each one into a cupcake liner so they travel well (and so no one fights over who gets the biggest piece!).
Pro tip: If you’re serving them at room temperature, the chocolate stays perfectly soft. But if you prefer a little crunch, refrigerate them for 15 minutes before serving. Just don’t leave them in too long – that coconut oil can make the chocolate sweat if it gets too cold.
Keeping Your Mummies Fresh
Here’s my foolproof storage method (for those rare times there are leftovers!):
- Airtight is right – Tuck them into a container with a tight lid. I layer them between sheets of parchment so the chocolate doesn’t stick together.
- Room temp wins – They’ll stay perfect for up to 3 days on the counter. The fridge can make the chocolate bloom (those white streaks aren’t very mummy-like!).
- Freezer trick – For longer storage, freeze them undecorated. Bake and cool the brownies, wrap tightly, then freeze. Add the chocolate and eyes when you thaw them – fresh decorations every time!
One last hot tip from my many Halloweens of brownie-making: If the chocolate does get a little sweaty, just give the brownies 10 minutes at room temperature before serving. Those little mummies will be good as new and ready to haunt your taste buds all over again!
Nutritional Information
Okay, let’s talk numbers – but don’t worry, I won’t judge if you eat two (or three… or four) of these adorable mummies! Just remember, these are rough estimates since ingredients vary by brand. Here’s what one of my test-kitchen-approved brownies clocks in at:
- Calories: 180 (but so worth every delicious bite!)
- Sugar: 15g (mostly from that irresistible chocolate combo)
- Fat: 8g (hey, it’s dessert – we’re here for a good time!)
- Saturated Fat: 3g (thank you, quality chocolate)
- Carbohydrates: 25g (fuel for all that trick-or-treating energy)
- Protein: 2g (those eggs in the brownie mix count for something!)
Important note from my nutritionist friend: These values can change based on your specific brownie mix brand or if you add extra goodies (no shame if you doubled the chocolate chips – I’ve been there!). For exact numbers, always check your ingredient packages. But let’s be honest – when those cute mummy faces are staring up at you, are we really counting? Happy Halloween, indeed!
Frequently Asked Questions
Over the years of making these spooky mummy brownies (and getting tons of texts from panicked friends mid-baking), I’ve answered every question under the moon! Here are the ones that come up most often – consider this your mummy brownie cheat sheet:
Can I use homemade brownie mix instead of boxed?
Absolutely! My from-scratch brownie recipe works beautifully – just make sure it’s not too cakey so the drizzle sticks well. Pro tip: Slightly underbake homemade brownies by 2-3 minutes for that perfect fudgy texture under the chocolate wraps.
How do I make these nut-free for school parties?
Super important question! First, check your brownie mix ingredients (some contain almond flour). For guaranteed nut-free, I love the Enjoy Life brand. Swap coconut oil for vegetable oil if needed, and always double-check those candy eyes – some brands process them in facilities with nuts.
My chocolate drizzle is too thick – help!
Been there! Just microwave the mixture for 5 more seconds and stir in ½ tsp more oil. The perfect consistency should ribbon off a spoon. If it’s already in the piping bag, pop the whole bag in the microwave for 10 seconds (no metal tips!).
Can I make these ahead of time?
You bet! Bake the brownies up to 2 days before and store them airtight at room temp. Add the chocolate and eyes the day of serving for freshest results. Undecorated brownies freeze beautifully for up to a month!
Help! My candy eyes keep sliding off!
Oh no – the great eye slide is real! Make sure your chocolate drizzle is still slightly wet when placing eyes. If they’re stubborn, dab a tiny dot of extra melted chocolate as “glue.” For emergency fixes, a dot of corn syrup works too (shh, our little secret!).
Share Your Spooky Mummy Brownies
Okay, I’ll confess – one of my favorite parts of Halloween is seeing all your amazing mummy brownie creations! There’s nothing more fun than watching how everyone puts their own spin on these little guys. Did you give yours crazy eyebrows? Maybe rainbow eyes? Or perhaps you went full monster mash with different colored drizzles? However they turned out, I want to see them!
Here’s how we can connect:
- Snap a pic of your mummy crew before they mysteriously disappear (we both know who the real cookie monster is!)
- Tag me on Instagram @SpookyBakerExtraordinaire – I feature my favorite creations every Friday!
- Use our hashtag #MummyBrownieMadness so we can all admire each other’s work
Pro tip: Natural lighting makes your photos pop! I love taking mine near a window with some cute Halloween props – mini pumpkins, plastic spiders, or even just fallen leaves make the perfect backdrop. And don’t stress if they’re not “perfect” – some of my favorite batches have been the ones where the mummies look extra messy and mischievous!
I can’t wait to see what spooky magic you create in your kitchen. Who knows – your version might just inspire next year’s batch in mine! Now if you’ll excuse me, I need to go “check” on my latest batch… purely for quality assurance purposes, of course.
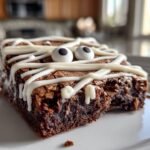
Spooky Mummy Brownies: 16 Irresistibly Cute Halloween Treats
- Total Time: 40 minutes
- Yield: 16 brownies 1x
- Diet: Vegetarian
Description
These spooky mummy brownies are a fun Halloween treat. They combine rich chocolate brownies with a white chocolate drizzle to create a mummy effect.
Ingredients
- 1 box brownie mix (plus required ingredients)
- 1 cup white chocolate chips
- 2 tbsp coconut oil
- Edible candy eyes
Instructions
- Preheat oven to 350°F (175°C)
- Prepare brownie mix according to package instructions
- Bake brownies as directed and let cool completely
- Melt white chocolate chips with coconut oil
- Drizzle melted chocolate over brownies to create mummy wraps
- Add candy eyes while chocolate is still wet
- Let chocolate set before serving
Notes
- Use a piping bag for cleaner chocolate lines
- Store in airtight container for up to 3 days
- For nut-free version, check brownie mix ingredients
- Prep Time: 15 minutes
- Cook Time: 25 minutes
- Category: Dessert
- Method: Baking
- Cuisine: American
Nutrition
- Serving Size: 1 brownie
- Calories: 180
- Sugar: 15g
- Sodium: 85mg
- Fat: 8g
- Saturated Fat: 3g
- Unsaturated Fat: 4g
- Trans Fat: 0g
- Carbohydrates: 25g
- Fiber: 1g
- Protein: 2g
- Cholesterol: 15mg