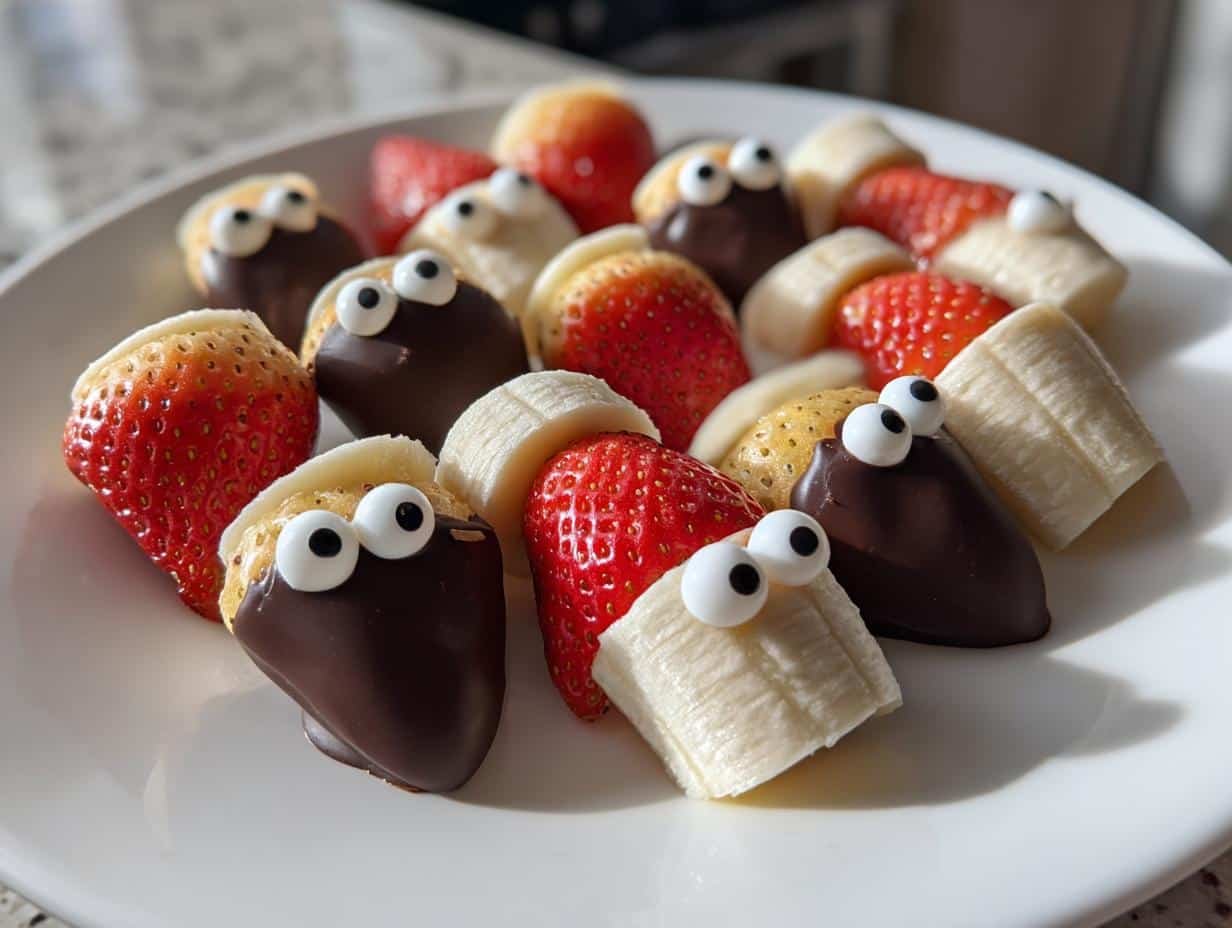
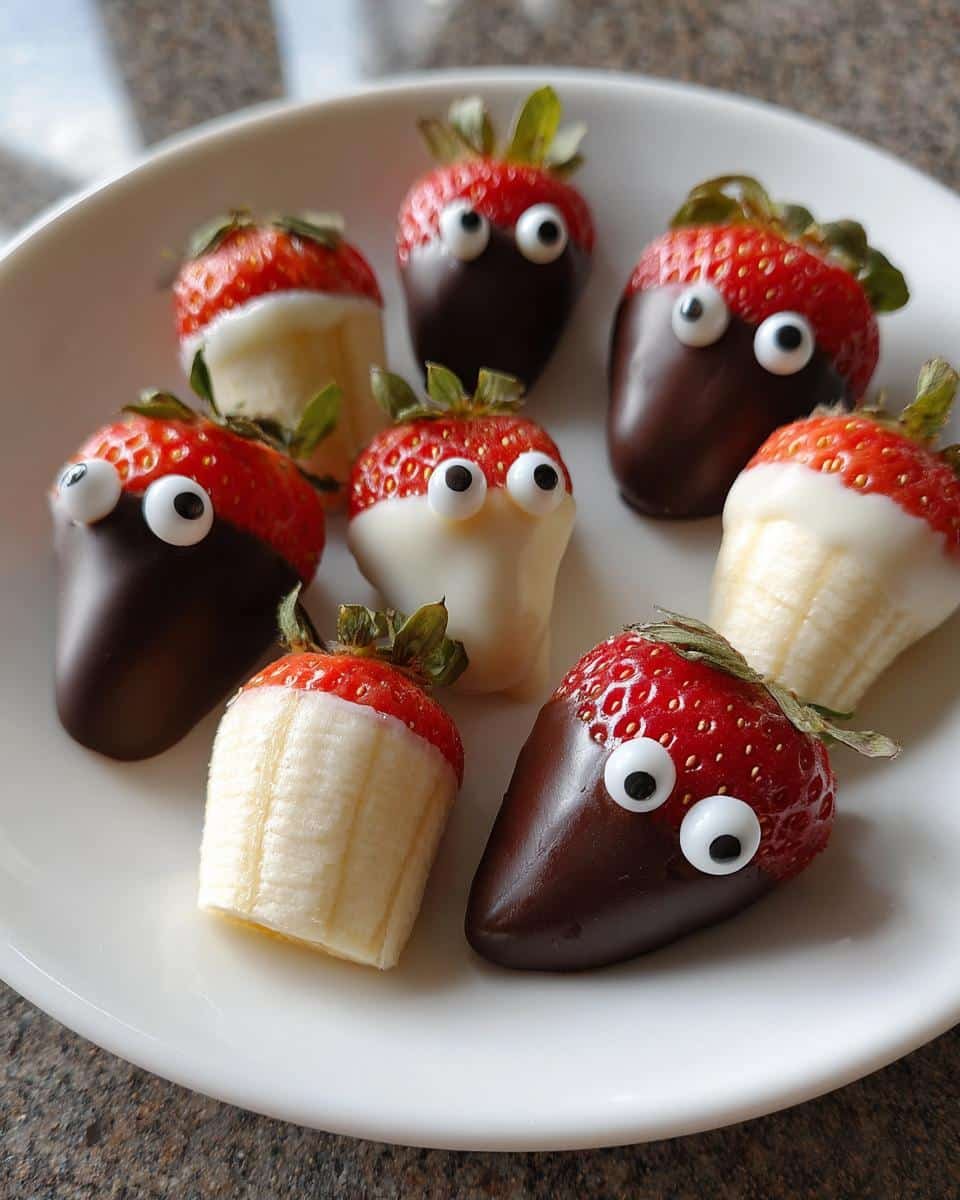
Oh my gosh, you should’ve seen the kids’ faces last Halloween when I brought out my spooky dipped fruits! These little chocolate-covered treats disappeared faster than ghosts at sunrise. What I love most is how ridiculously easy they are to make – perfect for when you’re scrambling to put together a last-minute Halloween party spread (we’ve all been there!).
My favorite part? Watching people’s reactions when they realize those “creepy” chocolate-dipped strawberries are actually delicious. The contrast between the sweet fruit and rich chocolate makes these spooky dipped fruits irresistible. Plus, they’re way more fun than regular fruit platters – edible googly eyes optional but highly recommended for maximum giggles!
Why You’ll Love These Spooky Dipped Fruits

Seriously, these treats are the easiest way to win Halloween! Here’s why they’re my go-to every year:
- Foolproof fun: Even if you burn toast regularly, you can’t mess these up (trust me, I’ve tried!)
- Kid-approved magic: My niece calls them “monster snacks” – the edible eyes make them instant party stars
- Customizable chaos: Go full spooky with black chocolate or keep it cute with pastel drizzles
- Time-crunched lifesaver: From fridge to table in 20 minutes flat – perfect for last-minute scares
- Secretly healthy(ish): Shh… we’ll just focus on the chocolate part when convincing picky eaters
Ingredients for Spooky Dipped Fruits
Here’s the fantastic part – you probably have most of these spooky dipped fruits ingredients already! I always raid my pantry before heading to the store. Here’s what you’ll need:
- 1 cup dark chocolate chips – or chopped baking chocolate (the higher quality, the smoother your dip will be)
- 1 cup white chocolate chips – perfect for creating ghostly effects
- 2 tbsp coconut oil – this little trick makes your chocolate perfectly dippable
- Assorted fresh fruits: strawberries (keep stems on for handles!), firm bananas (slice 1-inch thick), crisp apple wedges
- Edible googly eyes (optional but hilarious)
- Black food coloring gel (optional – for truly spooky chocolate)
Pro tip from my many Halloween fails: wash and thoroughly dry your fruits – water is chocolate’s worst enemy!
Equipment You’ll Need
Don’t worry – you won’t need any fancy gadgets for these spooky dipped fruits! Here’s what I grab from my kitchen:
- Parchment paper – your lifesaver for easy cleanup
- Double boiler or microwave-safe bowls – I use my trusty glass mixing bowls
- Sharp knife – for chopping fruits (and chocolate if needed)
- Baking sheet or tray – to hold all your creepy creations
- Spoon or fork – for drizzling that perfect spooky drizzle
That’s it! See? Told you this was easy-peasy.
How to Make Spooky Dipped Fruits
Alright, let’s get to the fun part! Making these spooky dipped fruits is so simple, you’ll be cackling with delight. Here’s exactly how I do it (learned from many sticky-fingered Halloweens!):
Step 1: Prep the Fruits
First things first – wash those fruits like you’re scrubbing away their sins! I’m serious about drying them thoroughly too – a salad spinner works wonders here. Water makes chocolate seize up into a grainy mess, and nobody wants that. For bananas, slice them about 1-inch thick – perfect bite-sized ghost material. Leave strawberry stems on for natural handles (and extra spooky vibes when they peek out of the chocolate!).
Step 2: Melt the Chocolate
Here’s my secret for silky smooth chocolate every time: use a double boiler or microwave in 30-second bursts, stirring between each. Add that coconut oil – it keeps the chocolate fluid and glossy. If you’re going full spooky mode, now’s when you’d mix black food coloring into the white chocolate. Watch it transform into the perfect witch’s brew!
Step 3: Dip and Decorate
The messy fun begins! Dip each fruit piece halfway, then gently shake off excess chocolate (tap your wrist like a pro pastry chef). Lay them on parchment paper before adding googly eyes – they stick best to wet chocolate. For extra creepy effect, drizzle contrasting chocolate over with a fork. My favorite? White chocolate “cobwebs” on dark-dipped strawberries!
Step 4: Chill and Serve
Pop your spooky dipped fruits in the fridge for about 15 minutes – just until the chocolate sets. The parchment paper prevents any tragic sticking incidents. They’re ready when the chocolate makes that satisfying “snap” when tapped. Arrange them on a platter and watch your little monsters go wild!
Tips for Perfect Spooky Dipped Fruits
After making these for more Halloween parties than I can count, here are my can’t-live-without spooky dipped fruit secrets:
- Room temp is best: Cold fruits cause chocolate to set too fast – leave them out for 20 minutes first
- The wrist tap: Gently shake dipped fruits to remove excess chocolate – saves you from puddles!
- Work fast: Chocolate starts setting quickly – decorate with eyes or sprinkles immediately after dipping
- Fridge magic: Store between parchment layers in an airtight container – they’ll keep beautifully for 2 days
- No-sweat serving: If they get shiny from condensation, just pat dry with a paper towel before your party
Trust me, these little tricks make all the difference between “spooky” and “spook-tacular!”
Spooky Dipped Fruits Variations
Oh, the possibilities are endless with these spooky dipped fruits! Here are my favorite ways to mix things up:
- Pumpkin power: Tint white chocolate orange and pipe little jack-o’-lantern faces with dark chocolate
- Boo-nanas: Turn banana slices into cute ghosts with two chocolate dot eyes
- Witchy fingers: Use almond slivers as “nails” on chocolate-dipped apple slices
- Midnight magic: Add black sprinkles or crushed Oreos for a graveyard crunch
- Vampire bites: Drizzle “blood” (raspberry jam) over white chocolate-dipped strawberries
See? One basic recipe, a million ways to scream “Happy Halloween!”
Serving and Storage
Here’s the best way to handle these spooky dipped fruits – serve them straight from the fridge for that perfect chocolate snap! I always arrange them on a chilled platter to keep that glossy finish. For storage, layer them carefully in an airtight container with parchment between layers – they’ll stay fresh and terrifyingly tasty for up to 2 days. Just resist sneaking too many before the party!
Spooky Dipped Fruits FAQs
Over the years, I’ve gotten all sorts of questions about these spooky dipped fruits – here are the ones that pop up most often!
Can I use milk chocolate instead of dark chocolate?
Absolutely! I sometimes use milk chocolate when making these for kids – it’s sweeter and less intense. Just know it won’t have that dramatic dark contrast against the white chocolate decorations. Semi-sweet works great too if you want a middle ground.
Why does my chocolate sometimes get those white streaks?
Ah, chocolate “bloom” – happens when moisture gets in or the temperature changes too fast. To prevent it, make sure your fruits are bone-dry before dipping, and don’t refrigerate until the chocolate’s mostly set at room temperature first.
Can I make these vegan?
You bet! Just use dairy-free chocolate chips and skip the googly eyes (or find vegan ones). The coconut oil already makes this recipe plant-based friendly. I’ve used it with dark chocolate-dipped pineapple ghosts that disappeared faster than you can say “Boo!”
How far in advance can I make these?
They’re best within 24 hours, but I’ve successfully made them two days ahead. The fruits stay fresh under that chocolate coating! Just keep them refrigerated in an airtight container with parchment between layers.
Nutritional Information
Just FYI – these spooky dipped fruits are treats meant for fun, not dieting! Nutritional values are rough estimates and will vary based on your chocolate choices and fruit sizes. Each piece typically contains about 80 calories.
For more fun recipes and inspiration, check out our Pinterest page!
Print
“Spooky Dipped Fruits: 5 Easy Steps to Frightful Fun”
- Total Time: 20 minutes
- Yield: 20 pieces 1x
- Diet: Vegetarian
Description
A fun and spooky treat perfect for Halloween or themed parties. These dipped fruits are easy to make and customizable with different coatings.
Ingredients
- 1 cup dark chocolate (melted)
- 1 cup white chocolate (melted)
- Assorted fruits (strawberries, bananas, apples)
- 2 tbsp coconut oil
- Edible googly eyes (optional)
- Black food coloring (optional)
Instructions
- Wash and dry the fruits thoroughly.
- Cut larger fruits into bite-sized pieces.
- Melt dark and white chocolate separately with coconut oil.
- Dip fruits halfway into melted chocolate.
- Place dipped fruits on parchment paper to set.
- For a spooky effect, drizzle contrasting chocolate or add edible eyes.
- Chill for 15 minutes until chocolate hardens.
Notes
- Use firm fruits for best results.
- Add food coloring to white chocolate for extra spooky colors.
- Store in the fridge if not serving immediately.
- Prep Time: 15 minutes
- Cook Time: 5 minutes
- Category: Dessert
- Method: No-Bake
- Cuisine: American
Nutrition
- Serving Size: 1 piece
- Calories: 80
- Sugar: 6g
- Sodium: 5mg
- Fat: 5g
- Saturated Fat: 3g
- Unsaturated Fat: 2g
- Trans Fat: 0g
- Carbohydrates: 8g
- Fiber: 1g
- Protein: 1g
- Cholesterol: 0mg
