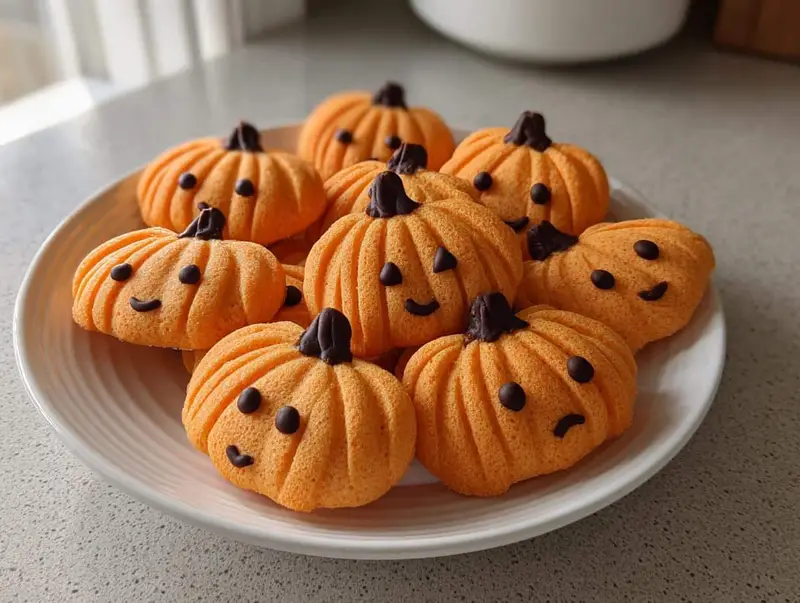
There’s something magical about turning simple cookie dough into adorable Pumpkin-Shaped Cookies—it instantly brings fall to life in my kitchen! Every year, my kids and I make these together, laughing as we shape the dough and debate whose pumpkin face is the silliest. These cookies aren’t just cute; they’re incredibly easy to whip up, and you can decorate them however you like—chocolate chip stems, royal icing grins, or even a sprinkle of cinnamon for extra warmth. Whether you’re baking for Halloween parties or just craving a cozy autumn treat, these little pumpkins are guaranteed to delight. Trust me, once you try them, they’ll become a seasonal tradition in your home too!
Table of Contents
Table of Contents
Why You’ll Love These Pumpkin-Shaped Cookies
Oh, where do I even start with these adorable little treats? These Pumpkin-Shaped Cookies are more than just a dessert—they’re a whole experience! Here’s why they’ve become a must-make in my house every fall:
- Festive & Photo-Worthy: Seriously, these cookies practically scream “autumn.” Their bright orange color and cute pumpkin shape make them the star of any dessert table. I’ve lost count of how many Instagram-worthy platters I’ve made!
- Kid-Approved Fun: My little ones go wild for these. Rolling the dough, shaping the ridges, and decorating the faces turns baking into a full-blown family activity—messy hands and all.
- Endless Customization: Feeling classic? Chocolate chip stems. Feeling fancy? Royal icing vines and leaves. You can even mix in spices or colored sugars to match your mood.
- Perfect for Every Occasion: Halloween parties, Thanksgiving dinners, or just a rainy afternoon—these cookies fit right in. They’re like edible fall decorations!
Trust me, once you bake a batch, you’ll understand why I’m obsessed. They’re happiness in cookie form!
Ingredients for Pumpkin-Shaped Cookies
Gather these simple ingredients, and you’re halfway to pumpkin-shaped perfection! Here’s what you’ll need:
- Wet Ingredients:
- 1 cup (2 sticks) unsalted butter, softened (not melted!)
- 1 cup granulated sugar
- 1 large egg, room temperature
- 1 tsp pure vanilla extract
- Orange gel food coloring (I use about 10 drops – liquid works too but gives less vibrant color)
- Dry Ingredients:
- 2 1/2 cups all-purpose flour (spooned & leveled)
- 1/2 tsp baking powder
- 1/2 tsp salt
- 1 tsp pumpkin pie spice (or 1/2 tsp cinnamon + 1/4 tsp each nutmeg and ginger)
Ingredient Notes & Substitutions
Don’t panic if you’re missing something – here are my tried-and-true swaps:
- Butter: Margarine works in a pinch, but real butter gives better flavor. For dairy-free, use plant-based butter sticks (not tubs – too soft).
- Flour: Gluten-free 1:1 baking flour works great – just don’t overmix the dough.
- Food coloring: No gel? Use liquid, but start with 5 drops – it takes more to get vibrant orange. For natural color, try 1 tbsp turmeric + 1 tsp paprika mixed in.
Pro tip: Measure flour correctly (spoon into cup, then level) – too much makes dry cookies. And whatever you do, don’t overmix after adding flour!
How to Make Pumpkin-Shaped Cookies
Ready to turn that dough into adorable pumpkin masterpieces? Here’s my foolproof method – I’ve made these so many times I could probably do it in my sleep!
- Prep Like a Pro: First things first – preheat your oven to 350°F (175°C). Trust me, you want that oven nice and hot before the cookies go in. Line your baking sheets with parchment paper – this prevents sticking and makes cleanup a breeze.
- Shape Your Pumpkins: Roll about 1 tablespoon of dough between your palms to form smooth balls. Gently flatten them slightly with your palm – not too thin! Now for the magic: use a butter knife to make 4-5 shallow vertical lines around each ball to create those signature pumpkin ridges. Don’t press too hard – just enough to make indentations.
- Bake to Perfection: Space cookies about 2 inches apart (they’ll spread a bit). Bake for 10-12 minutes until the edges just start turning golden. The tops should still look soft – they’ll firm up as they cool. This is KEY for that perfect soft-but-not-doughy texture!
- The Waiting Game: Let cookies cool on the baking sheet for 5 minutes before transferring to a wire rack. I know it’s tempting, but resist decorating until they’re completely cool – warm cookies make melty decorations!
Quick tip: If your dough gets sticky while working, pop it in the fridge for 15 minutes. And rotate your baking sheets halfway through for even browning!
Decorating Your Pumpkin Cookies
This is where the real fun begins! My family goes wild decorating these – here are our favorite ways to jazz them up:
- Classic Chocolate Chip: Press one mini chocolate chip upside-down at the top for an instant pumpkin stem. Simple but adorable!
- Royal Icing Faces: Pipe on silly or spooky faces using thick icing. Let kids go wild with their designs – crooked grins and cross-eyed pumpkins welcome!
- Sprinkle Magic: Brush cookies with light corn syrup and dip in orange sprinkles for extra sparkle. Add green sprinkles at the top for vine effects.
Remember: cooled cookies = crisp decorations. Hot cookies = melty mess (been there!). Store decorated cookies in single layers separated by parchment to prevent smudging.
Tips for Perfect Pumpkin-Shaped Cookies
After countless batches of these pumpkin cookies (some glorious, some… well, learning experiences), I’ve nailed down the secrets to absolute cookie perfection. Here’s what I wish I knew when I first started making them:
- Chill Out: If your dough feels sticky when shaping, don’t fight it—just pop it in the fridge for 15 minutes. Cold dough holds those pretty pumpkin ridges much better!
- Parchment is Your BFF: Skip the greased pans—parchment paper gives you perfect golden bottoms without any sticking disasters. (Ask me about the Great Pumpkin Cookie Tragedy of 2018…)
- Underbake for Softness: Take them out when the edges just start turning golden—the centers should still look slightly underdone. They’ll firm up perfectly as they cool.
- Go Gel for Color: Gel food coloring gives that vibrant orange without thinning your dough. If you must use liquid, reduce other liquids slightly.
Bonus tip: Make extra dough—these disappear FAST once decorated!
Storage & Serving Suggestions
These pumpkin-shaped cookies keep beautifully in an airtight container at room temperature for up to 5 days (if they last that long!). I like layering them between sheets of parchment paper to prevent decorations from smudging. For gatherings, arrange them on a wooden board with spiced apple cider – the warm cinnamon aroma makes them even more irresistible! They’re also perfect packed in lunchboxes or as edible party favors. Pro tip: The flavors actually deepen after a day, so don’t worry if you need to bake ahead!
Pumpkin-Shaped Cookies FAQs
I get asked these questions ALL the time when friends try my pumpkin cookie recipe—so here are the answers I always give while we’re baking together:
- “Can I freeze the dough?” Absolutely! Roll it into balls first, then freeze on a tray before transferring to a bag. They’ll keep for up to 3 months. When ready to bake, just add 1-2 extra minutes to the cooking time—no thawing needed!
- “How do I make these vegan?” Easy swaps: use a flax egg (1 tbsp ground flax + 3 tbsp water) and your favorite plant-based butter. The texture comes out nearly identical—my dairy-free friends never know the difference.
- “Why do my cookies spread too much?” Three likely culprits: 1) Butter was too soft (should indent slightly when pressed), 2) Didn’t chill sticky dough, or 3) Too little flour (always spoon & level your cups!).
Bonus tip: If ridges disappear while baking, try making deeper indentations and chill shaped cookies for 10 minutes pre-bake. Works like magic!
Nutritional Information
Just so you know, these nutrition facts can vary depending on your exact ingredients and brands—but here’s the general breakdown per pumpkin-shaped cookie: about 120 calories, 8g sugar, and 6g fat. They’re definitely a treat (I mean, look at all that butter and sugar!), but hey, everything in moderation, right? Especially when the cookies are this cute!
Share Your Creations
I’d love to see how your pumpkin cookies turn out! Tag me on Instagram when you post pictures of your decorated creations—nothing makes me happier than seeing all the adorable (and sometimes hilarious) pumpkin faces you come up with. Happy baking!
Print
15 Irresistible Pumpkin-Shaped Cookies Your Kids Will Devour
- Total Time: 32 minutes
- Yield: 24 cookies 1x
- Diet: Vegetarian
Description
Fun and festive pumpkin-shaped cookies perfect for Halloween or fall gatherings. These treats are easy to make and customizable with your favorite decorations.
Ingredients
- 1 cup unsalted butter, softened
- 1 cup granulated sugar
- 1 large egg
- 1 tsp vanilla extract
- 2 1/2 cups all-purpose flour
- 1/2 tsp baking powder
- 1/2 tsp salt
- 1 tsp pumpkin pie spice
- Orange food coloring (gel or liquid)
- Chocolate chips or icing for decoration
Instructions
- Preheat oven to 350°F (175°C). Line a baking sheet with parchment paper.
- In a large bowl, cream butter and sugar until light and fluffy.
- Beat in egg and vanilla extract.
- In another bowl, whisk flour, baking powder, salt, and pumpkin pie spice.
- Gradually mix dry ingredients into the wet mixture until combined.
- Add orange food coloring until desired pumpkin shade is reached.
- Roll dough into small balls and flatten slightly. Use a knife to create pumpkin ridges.
- Bake for 10-12 minutes or until edges are lightly golden.
- Cool on a wire rack. Decorate with chocolate chips or icing for stems and faces.
Notes
- For softer cookies, slightly underbake them.
- Gel food coloring gives a more vibrant color than liquid.
- Store in an airtight container for up to 5 days.
- Prep Time: 20 minutes
- Cook Time: 12 minutes
- Category: Dessert
- Method: Baking
- Cuisine: American
Nutrition
- Serving Size: 1 cookie
- Calories: 120
- Sugar: 8g
- Sodium: 50mg
- Fat: 6g
- Saturated Fat: 3.5g
- Unsaturated Fat: 2g
- Trans Fat: 0g
- Carbohydrates: 15g
- Fiber: 0.5g
- Protein: 1.5g
- Cholesterol: 20mg