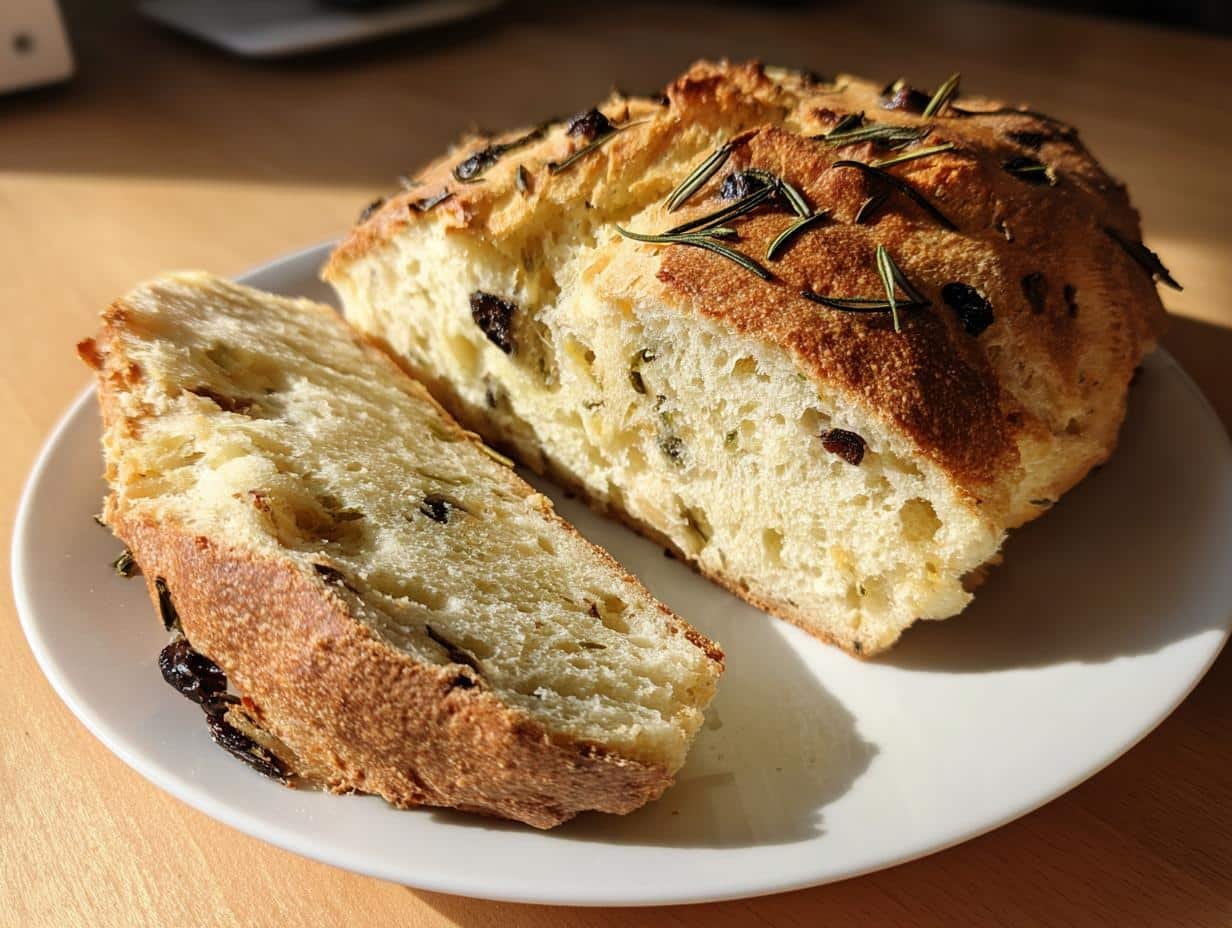
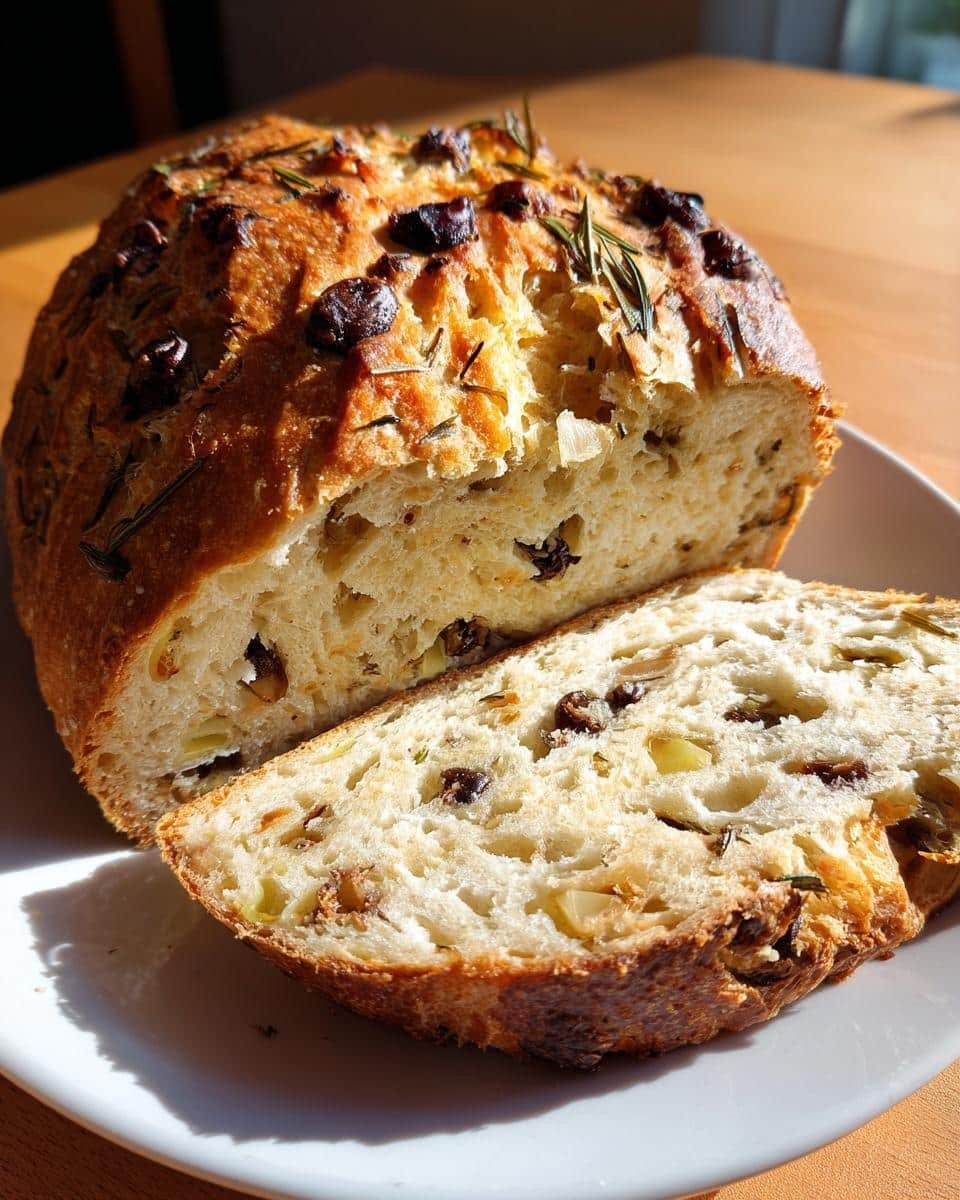
Oh, this olive and rosemary loaf – it’s one of those magical recipes that feels like it’s been in my family forever, even though I stumbled upon it just a few years ago. There’s something about the way the earthy rosemary and briny olives come together in this simple loaf that just sings of Mediterranean sunshine. I first made it on a whim for a last-minute dinner party, and now? It’s my go-to whenever I need a quick, flavorful bread that never fails to impress.
What I love most is how effortlessly versatile this olive and rosemary loaf is. Serve it warm with a drizzle of olive oil alongside a hearty soup, slice it thick for sandwiches, or just nibble on it plain while it’s still slightly warm from the oven (guilty as charged!). The aroma alone – that crisp rosemary mingling with the richness of the olives – will have everyone hovering around your kitchen, trust me. It’s the kind of bread that feels fancy but secretly couldn’t be easier to throw together, which is exactly my kind of recipe.
And here’s a little secret: the leftovers (if you have any!) make the most incredible toast the next morning. Just pop a slice in the toaster, slather it with butter, and suddenly you’ve turned breakfast into something special. That’s the beauty of this olive and rosemary loaf – it keeps giving, bite after delicious bite.
Ingredients for Olive and Rosemary Loaf
One of the things I love about this olive and rosemary loaf is how straightforward the ingredient list is. You probably have most of these staples in your pantry already, and the rest are easy to grab at the store. Let’s break it down – it’s all about quality here, so don’t skimp on the fresh rosemary or the good olive oil. Trust me, it makes all the difference!
Dry Ingredients
- 2 cups all-purpose flour – I always use plain, unbleached flour for this loaf. It gives the perfect texture – not too dense, not too crumbly.
- 1 tbsp baking powder – This is your leavening agent, so make sure it’s fresh for the best rise.
- 1/2 tsp salt – Just a pinch to balance out the flavors. I like using fine sea salt, but any table salt works too.
- 1/2 cup pitted olives, chopped – I usually go for Kalamata olives because of their bold, briny flavor, but you can use whatever you have on hand. Just make sure they’re pitted and chopped into small pieces.
- 1 tbsp fresh rosemary, chopped – Fresh is key here! Dried rosemary just doesn’t have the same punch. Chop it finely so it distributes evenly throughout the loaf.
Wet Ingredients
- 1 cup milk – Whole milk works best for richness, but you can use whatever you have in the fridge.
- 1/4 cup olive oil – This is where the Mediterranean magic happens. Use a good-quality olive oil – it really shines through in the final loaf.
- 1 egg – Just one egg binds everything together and adds a little richness. Crack it into a separate bowl first to make sure it’s fresh.
See? Nothing fancy, just wholesome ingredients that come together in the most delicious way. Now, let’s get baking!
How to Make Olive and Rosemary Loaf
Alright, let’s get into the fun part – making this olive and rosemary loaf! It’s so simple, you’ll wonder why you haven’t been baking this every week. Just follow these steps, and you’ll have a fragrant, golden loaf in no time. The key here is not to overmix the batter – we want it tender, not tough. Ready? Let’s go!
Mixing the Dry Ingredients
First things first, preheat your oven to 375°F (190°C). While that’s warming up, grab a large mixing bowl and toss in the flour, baking powder, and salt. Give it a good whisk to make sure everything’s evenly distributed. Then, add in those chopped olives and fresh rosemary. I like to mix them in with a spoon so they’re well coated in the flour – it helps keep them from sinking to the bottom during baking. Simple, right? Set this bowl aside for now.
Preparing the Wet Mixture
Next, in a separate bowl, whisk together the milk, olive oil, and egg. I like to crack the egg into a small bowl first, just to make sure it’s fresh (nothing worse than a bad egg ruining your batter!). Pour in the milk and olive oil, and whisk it all together until it’s smooth and slightly frothy. This is where the olive oil really starts to shine – you’ll get those gorgeous Mediterranean aromas right away.
Combining and Baking
Now, here’s the magic step. Slowly pour the wet mixture into the bowl with the dry ingredients. Use a spatula or wooden spoon to gently mix everything together until it’s just combined. Don’t overmix it – a few lumps are totally fine. Overmixing can make the loaf dense, and we want it light and tender.
Once the batter is ready, pour it into a greased loaf pan. I like to use a little olive oil to grease the pan – it adds extra flavor and helps the loaf release easily. Smooth the top with your spatula, and pop it into the preheated oven.
Bake for 30-35 minutes, or until a toothpick inserted into the center comes out clean. The top should be golden brown, and your kitchen will smell absolutely divine. Let it cool in the pan for about 10 minutes, then transfer it to a wire rack to cool completely (if you can wait that long!).
And there you have it – a perfect olive and rosemary loaf, ready to impress. Now, slice it up and enjoy!
Why You’ll Love This Olive and Rosemary Loaf
Oh, where do I even start with why this olive and rosemary loaf has stolen my heart (and my guests’)? It’s one of those rare recipes that checks every single box – easy, impressive, and downright delicious. If you’re still on the fence about making it, let me convince you!
- Quick prep with maximum flavor: From measuring ingredients to sliding the loaf into the oven, we’re talking under 15 minutes of hands-on time. The hardest part? Waiting for it to bake while your kitchen fills with that intoxicating rosemary aroma.
- Aromatic magic: The combination of fresh rosemary and briny olives creates this incredible fragrance that’ll have everyone asking, “What smells so amazing?” It’s like bottling up Mediterranean sunshine.
- Unbelievable versatility: This loaf plays well with everything! Serve it warm with soups, slice it for sandwiches, or toast it with avocado for breakfast. My neighbor even cubes leftovers for the best croutons you’ll ever taste.
- Forgiving recipe: Forget stressing over yeast or kneading – this quick bread is practically foolproof. As long as you don’t overmix the batter (seriously, resist the urge!), you’re golden.
- Leftovers that improve: If by some miracle you have leftovers, the flavors deepen overnight. Day-old slices toasted with a smear of creamy goat cheese? Absolute perfection.
Honestly, the real test is how often I catch myself making this loaf. Last month alone, I baked it three times – once for book club, once “just because,” and once when my sister begged me to bring it to her dinner party. That’s the mark of a truly special recipe!
Tips for Perfect Olive and Rosemary Loaf
After baking this olive and rosemary loaf more times than I can count (and eating even more slices!), I’ve picked up some foolproof tricks to guarantee bakery-worthy results every single time. These little nuggets of wisdom make all the difference between “good” and “oh-my-goodness-I-need-another-slice” amazing.
Fresh rosemary is non-negotiable
I know it’s tempting to reach for that jar of dried rosemary in your spice rack, but trust me – fresh makes all the difference here. The oils in fresh rosemary release this incredible fragrance and flavor that dried just can’t match. Look for bright green, flexible sprigs at your market. And here’s my chopping secret: strip the leaves by running your fingers down the stem (opposite how it grows), then chop them finely so they distribute evenly without any woody bites.
The toothpick test and beyond
Sure, the classic toothpick test works – insert it in the center and it should come out clean – but I’ve got a few more tricks up my sleeve. First, listen for faint crackling sounds when you pull the loaf from the oven (that’s moisture escaping the crust). Then gently press the top – it should spring back slightly. Finally, peek at the edges; they’ll pull away from the pan slightly when done. If you’re still unsure, bake for 2-3 more minutes. It’s better slightly overdone than underbaked and doughy!
Don’t rush the cooling
I know, I know – that aroma makes it nearly impossible to wait. But cutting into your olive and rosemary loaf too soon can make it gummy. Let it rest in the pan for 10 minutes (this helps set the structure), then transfer to a wire rack. The wait pays off – the texture firms up perfectly, and flavors settle into harmony. Pro tip: If you absolutely can’t resist, slice off just the very end – the sacrifice slice, I call it – to test while the rest continues cooling properly.
Grease your pan like a pro
Nothing’s sadder than a beautiful loaf stuck in the pan. I use olive oil and a pastry brush to get into every corner. For extra insurance, you can line the bottom with parchment paper – just cut it to fit after measuring your pan. And here’s my weirdest trick: after greasing, dust the pan with a tablespoon of semolina flour if you have it. It creates this incredible crisp crust while ensuring perfect release.
Follow these tips, and your olive and rosemary loaf will turn out perfect every time – golden crusted, fragrant, and begging to be devoured. Now go bake some magic!
Variations for Olive and Rosemary Loaf
One of the best things about this olive and rosemary loaf? It’s like a blank canvas waiting for your personal touch! Over the years, I’ve played around with so many delicious twists that I almost can’t decide which version I love most. Here are some of my favorite ways to mix things up – because sometimes you’re in the mood for something just a little different, right?
Swapping out your olives
While Kalamatas are my go-to, don’t be afraid to experiment with other olives! Green olives with pimentos add a pop of color and slightly milder flavor. For something truly special, try oil-cured black olives – their deep, almost wine-like complexity takes this loaf to another level. And if you’re feeling fancy, chop up some castelvetrano olives for their buttery texture and delicate taste.
Sun-dried tomato magic
Here’s one of my absolute favorite variations: replace half the olives with chopped sun-dried tomatoes (the oil-packed ones, drained well). The sweet-tart tomatoes play so beautifully with the rosemary, and the red flecks look gorgeous in the loaf. Sometimes I’ll even add a teaspoon of the tomato oil to the wet ingredients for extra richness – just reduce the regular olive oil slightly to compensate.
Cheese, please!
Fold in 1/2 cup of crumbled feta or grated Parmesan when you add the olives for a savory kick. The salty cheese creates little pockets of umami goodness throughout. For a creamier option, try cubed fresh mozzarella – it gets all melty and wonderful. Just know that cheesy versions are best eaten the same day (not that they’ll last that long anyway!).
Going nuts
Want to add some crunch? Toss in 1/4 cup of toasted pine nuts or chopped walnuts with the dry ingredients. The toasted nuttiness complements the herbal rosemary perfectly. Pecans work surprisingly well too, especially if you’re making a sweeter version with dried cranberries instead of olives (which is also delicious, by the way!).
Herb variations
While rosemary is the star, try mixing in other fresh herbs for fun. A tablespoon each of chopped thyme and rosemary makes a beautiful combination. Or go Mediterranean with oregano and a pinch of dried red pepper flakes. My most adventurous version used finely chopped preserved lemon peel and mint – sounds wild, but the brightness was incredible!
The possibilities are endless with this versatile loaf. Once you’ve mastered the basic version, don’t be afraid to get creative and make it your own. After all, the best recipes are the ones that adapt to your tastes and inspire your kitchen adventures!
Serving Suggestions for Olive and Rosemary Loaf
Oh, the places this olive and rosemary loaf can go! Seriously, I’ve lost count of all the ways I’ve served it over the years – it’s like the ultimate culinary wingman that makes everything taste better. Whether you’re hosting a dinner party or just treating yourself to something special, here are my absolute favorite ways to enjoy this Mediterranean beauty.
Soups and stews
There’s nothing quite like tearing off a warm chunk of this loaf to dunk into a steaming bowl of soup. My personal favorite? A hearty tomato basil soup where the bread soaks up all that rich, herby goodness. It’s also magical with creamy potato leek soup or a rustic minestrone. For cold winter nights, pair it with beef stew – the rosemary in the bread echoes beautifully with the savory meat.
Cheese boards that wow
Slice this loaf thinly (or tear it into rustic chunks for that authentic feel) and watch it disappear at your next wine and cheese night. It’s incredible with creamy brie or goat cheese – the tangy cheese plays off the salty olives perfectly. For something different, try it with manchego and a drizzle of honey. Pro tip: lightly toast slices brushed with olive oil for crostini that’ll have your guests raving.
Salad sidekick
Transform your everyday salad into something extraordinary with thick slices of this loaf on the side. It’s particularly good with Greek salads (hello, flavor harmony!) or a simple caprese. Sometimes I’ll cube leftover bread, toss it with olive oil and salt, then bake until crispy for the world’s best croutons. They’ll elevate even the saddest bagged salad.
Breakfast game-changer
Don’t limit this bread to savory meals – it makes killer toast! A thick slice toasted with butter and a sprinkle of flaky salt is my weekend treat. For brunch, top it with smashed avocado and poached eggs, or go sweet with ricotta and honey. My neighbor swears by using it for French toast with a sprinkle of rosemary sugar – sounds weird, tastes amazing.
Antipasto platter star
Arrange slices alongside cured meats, marinated vegetables, and tapenade for an effortless appetizer spread. The bread holds up beautifully to bold flavors like roasted red peppers and artichoke hearts. For parties, I’ll sometimes make mini sandwiches with prosciutto and fig jam – they disappear faster than I can plate them!
The beauty of this olive and rosemary loaf is how it adapts to any occasion. From casual weeknight dinners to fancy gatherings, it always finds its place at the table – usually right at the center where everyone can reach it. Just be warned: once you start serving it, people will request it at every meal!
Storage and Reheating Instructions
Okay, let’s talk leftovers – though honestly, with how delicious this olive and rosemary loaf is, you might not have many! But just in case you manage to save some (or if you’re smart like me and bake an extra loaf ahead of time), here’s how to keep it tasting fresh and how to bring back that just-baked magic.
Storing at room temperature
The best way to store this loaf is wrapped tightly in aluminum foil or beeswax wrap at room temperature. It’ll stay fresh for about 2 days this way. Whatever you do, don’t put it in plastic wrap or a sealed container unless you want soggy bread – this baby needs to breathe a little! If your kitchen runs warm though, you might want to pop it in the fridge after day one.
Freezing for later
Here’s my secret weapon: slice the cooled loaf before freezing. That way, you can pull out just what you need! Wrap individual slices tightly in foil, then place them in a freezer bag. They’ll keep beautifully for up to 3 months. I always have a stash ready for unexpected guests or lazy Sunday brunches.
Reviving your loaf
For room-temperature bread that’s lost its crispness, pop slices in a 350°F (175°C) oven for 5 minutes. If you’re reheating frozen slices, no need to thaw – just bake directly from frozen for about 8 minutes. Want next-level results? Lightly brush slices with olive oil before reheating for extra crispness and flavor.
Microwave magic (in a pinch!)
Okay, I know purists will gasp, but sometimes you need bread NOW. For a single slice, 15 seconds in the microwave wrapped in a slightly damp paper towel works surprisingly well. It won’t be crusty, but it’ll be warm and soft – perfect for soaking up soup or making quick toast.
Pro tip: however you reheat your olive and rosemary loaf, serve it with a little dish of good olive oil for dipping. Sprinkle some flaky salt and freshly cracked pepper into the oil, and suddenly your leftovers taste like a gourmet treat!
Olive and Rosemary Loaf Nutritional Information
Let’s talk numbers – because while this olive and rosemary loaf tastes indulgent, it’s actually pretty wholesome! Here’s the nutritional breakdown per slice (based on cutting the loaf into 10 generous pieces), but keep in mind these are estimates. Your actual numbers might vary slightly depending on exact ingredient brands and any fun variations you try.
- Calories: About 150 per slice – perfect for guilt-free snacking!
- Fat: 7g (mostly from heart-healthy olive oil)
- Carbohydrates: 20g (with 1g fiber from those lovely olives)
- Protein: 3g – not bad for a quick bread!
- Sodium: Around 200mg (the olives contribute most of this)
- Sugar: Just 1g naturally occurring (no added sugar here)
A few important notes: if you use different olives or add cheese, the numbers will change slightly. Kalamata olives tend to be a bit higher in fat than green olives, for example. And if you’re watching sodium, you can rinse your olives before chopping – it helps reduce the saltiness without losing flavor.
What I love about this nutritional profile is how balanced it is. You’re getting good fats from the olive oil, some protein from the egg and milk, and just enough carbs to feel satisfied. It’s the kind of bread that fuels you without weighing you down – which is probably why I find myself reaching for “just one more slice” way too often!
Frequently Asked Questions About Olive and Rosemary Loaf
Over the years, I’ve gotten so many questions about this olive and rosemary loaf – and I love that people are as excited about it as I am! Here are the answers to the most common ones that pop up. Got a question I haven’t covered? Drop it in the comments – I’m happy to help!
Q1: Can I use dried rosemary instead of fresh?
While you can substitute dried rosemary in a pinch, I really recommend fresh for this recipe. Dried rosemary tends to be woody and less flavorful. If you must use dried, reduce the amount to 1 teaspoon (since dried herbs are more concentrated), and crush it between your fingers before adding to release the oils.
Q2: What if I don’t have olives? Can I leave them out?
Absolutely! The loaf will still be delicious with just rosemary. Or try substituting with sun-dried tomatoes, roasted red peppers, or even artichoke hearts for a different flavor profile. The basic bread recipe is super adaptable.
Q3: Can I make this gluten-free?
Yes! I’ve had great results using a 1:1 gluten-free baking blend instead of regular flour. The texture will be slightly denser but still wonderful. Just make sure your baking powder is gluten-free too.
Q4: How do I know when the loaf is perfectly baked?
Besides the toothpick test, look for these signs: the loaf should be golden brown on top, pulling slightly away from the pan edges, and sound hollow when tapped on the bottom. If you have an instant-read thermometer, the internal temperature should be about 190-200°F (88-93°C).
Q5: Can I freeze the baked loaf?
You sure can! Cool it completely, then wrap tightly in foil and place in a freezer bag. It keeps well for up to 3 months. Thaw at room temperature, then refresh in a 350°F (175°C) oven for 5-10 minutes. I actually prefer freezing sliced – that way you can toast individual slices straight from frozen!
Q6: What’s the best way to chop olives without making a mess?
Here’s my trick: place pitted olives on a cutting board, cover with a paper towel, and gently press down with the flat side of your knife before chopping. The towel keeps them from rolling away and absorbs excess oil. Game changer!
Q7: Can I make mini loaves or muffins with this batter?
Absolutely! For mini loaves, bake for 20-25 minutes. For muffins, fill cups 2/3 full and bake 15-18 minutes. They make perfect individual portions for brunch or gifts – just reduce the baking time and keep an eye on them.
Share Your Olive and Rosemary Loaf Experience
Alright, now it’s your turn! Nothing makes me happier than hearing how this olive and rosemary loaf turns out in your kitchen. Did you stick to the classic version or try one of the fun variations? Maybe you discovered a brilliant new twist of your own? I want to hear all about it!
Drop a comment below to tell me:
- What surprised you most about this recipe
- How your family or guests reacted (I bet they begged for seconds!)
- Any clever adaptations you tried
- Your favorite way to serve it
And if you snapped a photo of your gorgeous loaf (you know I love seeing those golden crusts and olive-studded slices!), tag me on social media or use #OliveRosemaryLoaf so we can all admire your baking skills. Your feedback and creativity inspire me to keep experimenting in the kitchen! You can also find more recipe inspiration on Pinterest.
Most importantly – did this recipe earn a spot in your regular rotation? Rate it below so others can see how much you loved it. Every star and comment helps fellow bakers discover this Mediterranean gem. Now get baking, get sharing, and let’s keep this delicious conversation going!
Print
Savory Olive and Rosemary Loaf Recipe That Delights in 35 Minutes
- Total Time: 45 minutes
- Yield: 1 loaf 1x
- Diet: Vegetarian
Description
A simple and aromatic olive and rosemary loaf, perfect as a side for meals or as a snack.
Ingredients
- 2 cups all-purpose flour
- 1 tbsp baking powder
- 1/2 tsp salt
- 1/2 cup pitted olives, chopped
- 1 tbsp fresh rosemary, chopped
- 1 cup milk
- 1/4 cup olive oil
- 1 egg
Instructions
- Preheat your oven to 375°F (190°C).
- In a large bowl, mix flour, baking powder, and salt.
- Add olives and rosemary to the dry ingredients.
- In another bowl, whisk together milk, olive oil, and egg.
- Combine wet and dry ingredients until just mixed.
- Pour the batter into a greased loaf pan.
- Bake for 30-35 minutes or until a toothpick comes out clean.
- Let cool before slicing.
Notes
- Use fresh rosemary for the best flavor.
- You can add other herbs or spices to suit your taste.
- Prep Time: 10 minutes
- Cook Time: 35 minutes
- Category: Baking
- Method: Oven Baked
- Cuisine: Mediterranean
Nutrition
- Serving Size: 1 slice
- Calories: 150
- Sugar: 1g
- Sodium: 200mg
- Fat: 7g
- Saturated Fat: 1g
- Unsaturated Fat: 5g
- Trans Fat: 0g
- Carbohydrates: 20g
- Fiber: 1g
- Protein: 3g
- Cholesterol: 15mg