Every Halloween, my kitchen turns into a mad scientist’s lab—but instead of potions, I’m whipping up batches of these adorable Mummy Rice Krispie Treats! They’re my secret weapon for last-minute party treats that wow both kids and adults. I’ll never forget the year I brought them to my niece’s Halloween bash—the kids went wild for the candy eyes peeking through the “bandages” of white chocolate. The best part? You probably have most of the ingredients in your pantry right now.
These no-bake treats come together in about 20 minutes flat, which is perfect when you’re juggling costumes, decorations, and a sugar-crazed household. The classic crispy rice cereal texture gets a spooky makeover with simple drizzled chocolate and those irresistible candy eyes. Trust me, once you see how easy it is to turn ordinary Rice Krispie treats into these mummy masterpieces, you’ll be making them every October!
Why You’ll Love These Mummy Rice Krispie Treats
These spooky-good treats aren’t just adorable—they’re practically magic! Here’s why they’ve become my go-to Halloween recipe:
- No oven required – perfect for when you’re already baking three dozen cookies!
- Kids can decorate – mine love “wrapping” their mummies with chocolate drizzle
- Ready in 20 minutes – faster than carving a pumpkin!
- Party-perfect – they disappear faster than ghosts at sunrise
- Endless creativity – swap white chocolate for colored icings or add edible glitter
The best part? Watching everyone’s faces light up when they see these little mummies peeking from the treat table!
Ingredients for Mummy Rice Krispie Treats
Gather these simple ingredients – I promise you probably have most in your pantry already! The key is using fresh marshmallows (those stale ones in your cabinet won’t melt as smoothly) and good-quality white chocolate for that perfect “mummy wrap” effect.
- 3 tablespoons butter – I always use unsalted so I can control the sweetness
- 4 cups mini marshmallows – fresh ones melt like a dream (measure packed cups!)
- 5 cups Rice Krispies cereal – the classic crispy texture is non-negotiable
- 1 cup white chocolate chips – for the mummy “bandages” (trust me, don’t skimp here)
- 1 teaspoon coconut oil – helps thin the chocolate for perfect drizzling
- Candy eyes – about 24 pieces (the bigger ones make for extra-spooky mummies!)
See? Nothing fancy needed! Just make sure your marshmallows are fresh – that bag that’s been sitting since last Halloween will leave you with lumpy mummies, and nobody wants that.
Equipment You’ll Need
No fancy gadgets required here! Just grab these basics from your kitchen—I bet you’ve got most of them already. The right tools make decorating these mummy treats a breeze.
- Large pot – for melting that gooey marshmallow goodness
- Spatula – my trusty silicone one never lets marshmallow stick
- Greased 9×13-inch baking pan – a quick butter rub keeps everything from sticking
- Sharp knife – for slicing clean mummy “bandages”
- Piping bag or zip-top bag – with the corner snipped for perfect chocolate drizzle
That’s it! Now let’s make some magic (and mess—embrace the sticky fingers!).
How to Make Mummy Rice Krispie Treats
Alright, let’s turn those simple ingredients into the cutest little mummies you ever did see! Follow these steps closely—I’ve made every mistake so you don’t have to. The secret is in the timing and that perfect chocolate drizzle.
Step 1: Melt the Marshmallow Mixture
First, grab your large pot and melt the butter over low heat—I can’t stress this enough. High heat burns butter faster than a vampire hates sunlight! Once melted, add all those mini marshmallows and keep stirring. You’ll want to watch for that magical moment when they turn into a smooth, glossy pool. As soon as the last marshmallow dissolves (about 3-4 minutes), yank it off the heat. Trust me, residual heat keeps working, so stopping early prevents cement-like treats!
Step 2: Combine with Cereal
Now, dump in your Rice Krispies all at once. Here’s my trick: use a rubber spatula to fold gently from the bottom up, like you’re tucking a mummy into bed. Overmixing crushes the cereal, and nobody wants sad, flat mummies! Work quickly before the marshmallow sets—you’re aiming for every single Krispie to get a glossy coat. The mixture should look like edible gold when it’s ready.
Step 3: Shape and Cool
Pour the sticky goodness into your greased pan. Now comes the fun part—press firmly with greased hands (or a greased spatula) to create an even layer. Don’t smash it down like the Hulk—just enough pressure so your mummies will hold their shape. Let it cool for at least 20 minutes. I know it’s tempting, but cutting too soon makes crumbly ghost blobs instead of crisp mummy bars!

Step 4: Decorate Like Mummies
Time for the transformation! Melt white chocolate chips with coconut oil in 30-second microwave bursts (stirring between each), then transfer to a piping bag with a tiny hole snipped in the corner. Drizzle zig-zag patterns across each bar—messy is good here, real mummies weren’t neat! Immediately press on candy eyes before the chocolate sets. Pro tip: tilt some eyes sideways for extra personality. Let the chocolate harden (about 15 minutes), then watch your edible mummies come to life!

Tips for Perfect Mummy Rice Krispie Treats
After making dozens of batches (some more successful than others!), here are my hard-earned secrets for mummy treat perfection:
- Fresh marshmallows are non-negotiable—that bag from last year won’t melt smoothly!
- Grease your hands with butter or cooking spray before pressing the mixture—it’s the only way to avoid sticky fingers disaster
- Chill the pan for 10 minutes before cutting—cold bars slice cleanly without crumbling
- Warm your knife under hot water and dry it for perfect slices through the chocolate drizzle
- Work quickly when decorating—white chocolate sets fast once it hits the cool bars
Follow these, and you’ll have mummies that look professionally decorated—even if your kitchen looks like a marshmallow bomb went off!
Variations and Substitutions
These mummy treats are crazy flexible—swap ingredients based on what’s in your pantry or dietary needs! My nephew’s allergic to dairy, so we use vegan marshmallows and coconut butter instead. For an extra-spooky twist, mix orange food coloring into the white chocolate or swap it for dark chocolate “dirt” drizzle. Gluten-free cereal works perfectly too—just keep that crispy texture. Honestly, the only limit is your imagination (and maybe how many candy eyes you’ve stockpiled)!
Serving and Storage
These mummy treats taste best at room temperature—the chocolate stays perfectly crisp and the marshmallow stays delightfully chewy! Stack them in an airtight container with parchment between layers (so their “bandages” don’t stick together). They’ll stay fresh for up to 3 days—if they last that long! Whatever you do, don’t refrigerate—that’s a one-way ticket to sad, soggy mummies.
Nutritional Information
Just so you know what you’re biting into (because even mummies deserve transparency!): Each treat has about 180 calories. That breaks down to 7g fat, 28g carbs, and 2g protein per serving. Remember—these are estimates and might vary slightly depending on your ingredient brands and how generous you are with those candy eyes!
Frequently Asked Questions
Got questions about your mummy treats? I’ve got answers! Here are the top things people ask me about these spooky snacks:
Can I use regular marshmallows instead of mini?
Absolutely! Just chop them up—it helps them melt evenly. You’ll need about 40 regular marshmallows to equal 4 cups mini.
How do I prevent sticky Rice Krispie bars?
Grease your hands when pressing the mixture, and let bars cool completely before cutting. Fresh marshmallows make all the difference!
Can I make these mummy treats ahead?
Yes! Decorate them up to 3 days before serving. Store in an airtight container at room temperature.
What if my white chocolate drizzle is too runny?
Add more chocolate chips to thicken it up. Runny chocolate makes messy mummy bandages—still tasty though!
Can I skip the candy eyes?
Sure! Use mini chocolate chips or draw eyes with edible marker instead. But the candy eyes are half the fun!
Now go make some mummy magic! Tag me in your photos—I love seeing your spooky creations! Check out more recent posts for more fun recipes.
For more Halloween inspiration, follow us on Pinterest!
Print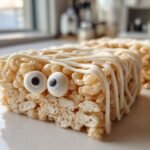
Spooky Mummy Rice Krispie Treats – 20-Minute Fun
- Total Time: 25 minutes
- Yield: 12 bars 1x
- Diet: Vegetarian
Description
A fun and easy no-bake treat perfect for Halloween. These Mummy Rice Krispie Treats are shaped like mummies and decorated with candy eyes for a spooky twist.
Ingredients
- 3 tablespoons butter
- 4 cups mini marshmallows
- 5 cups Rice Krispies cereal
- 1 cup white chocolate chips
- 1 teaspoon coconut oil
- Candy eyes for decoration
Instructions
- Melt butter in a large pot over low heat.
- Add marshmallows and stir until fully melted.
- Remove from heat and mix in Rice Krispies until well coated.
- Press the mixture into a greased baking pan and let cool.
- Cut into rectangular bars.
- Melt white chocolate chips with coconut oil and drizzle over the bars to create mummy wrappings.
- Add candy eyes before the chocolate sets.
- Let the chocolate harden before serving.
Notes
- Use a piping bag for cleaner chocolate drizzling.
- Store in an airtight container for up to 3 days.
- For extra flavor, add a pinch of vanilla extract to the marshmallow mixture.
- Prep Time: 15 minutes
- Cook Time: 10 minutes
- Category: Dessert
- Method: No-Bake
- Cuisine: American
Nutrition
- Serving Size: 1 bar
- Calories: 180
- Sugar: 15g
- Sodium: 120mg
- Fat: 7g
- Saturated Fat: 4g
- Unsaturated Fat: 2g
- Trans Fat: 0g
- Carbohydrates: 28g
- Fiber: 0g
- Protein: 2g
- Cholesterol: 10mg