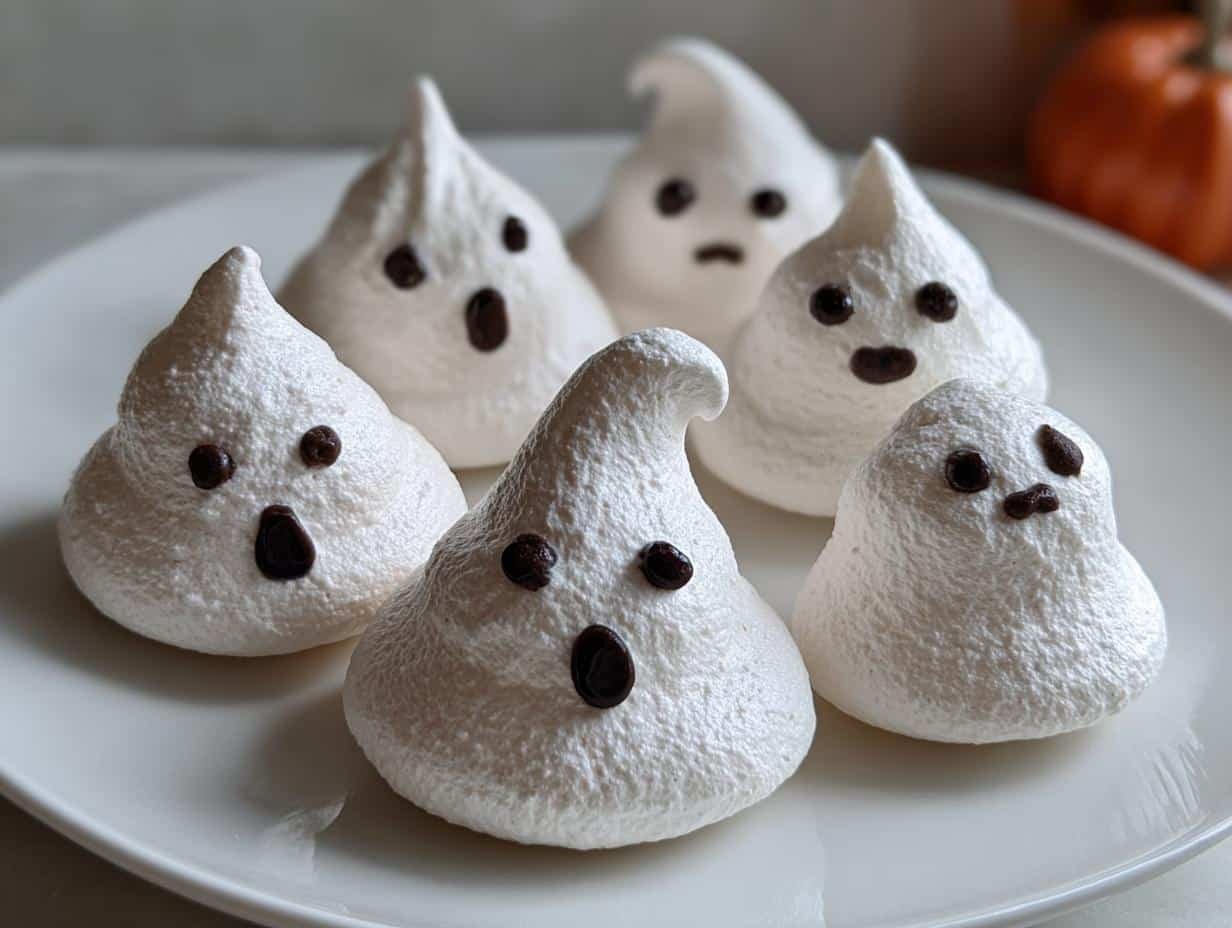
There’s something magical about pulling a tray of meringue kisses with crushed candy canes out of the oven during the holidays. The sweet peppermint scent fills the kitchen, and those delicate little clouds of sugar practically scream “Christmas!” I remember my aunt teaching me to make these when I was twelve – we’d pipe them into tiny kisses while Christmas carols played in the background. Now, they’re my go-to holiday treat because they’re surprisingly simple (just five ingredients!) yet feel so special. The crisp shell gives way to that melt-in-your-mouth center, with bursts of candy cane adding festive crunch. Trust me, one bite and you’ll be hooked!
Why You’ll Love These Meringue Kisses with Crushed Candy Canes
Oh my gosh, these little treats are just the best! I make them every single year because they always hit the spot. Here’s why I think you’re going to fall head over heels for them, just like I did.
- They come together so fast. Seriously, the active time is maybe 20 minutes. You can whip up a batch (pun totally intended!) while your main holiday dish is in the oven.
- That festive flavor is everything. The combo of sweet, airy meringue and the cool, minty crunch of candy cane feels like Christmas in a bite. It’s pure holiday joy.
- They’re miraculously light. After a big, heavy meal, these are the perfect little sweet something that won’t make you feel overly stuffed. They just melt away!
- They look so fancy but are secretly easy. Everyone will be impressed when you bring these out on a pretty platter. They’re the perfect holiday treat to share (or not share, I won’t judge!).
Ingredients for Meringue Kisses with Crushed Candy Canes
Okay, let’s talk ingredients! The beauty of these meringue kisses is how simple they are – just five key players come together to create holiday magic. But here’s the thing: quality matters. I’ve learned the hard way that shortcuts here can lead to sad, flat meringues (we’ve all been there!). Here’s exactly what you’ll need:
- 4 large egg whites – Room temperature is best! Cold eggs just don’t whip up as nicely.
- 1 cup granulated sugar – Regular white sugar works perfectly here. No fancy substitutes!
- 1/4 teaspoon cream of tartar – This little helper stabilizes the egg whites so they hold their shape beautifully.
- 1/2 cup crushed candy canes – Crushed, not powdered! You want those pretty little red-and-white flecks and satisfying crunch.
- 1/4 teaspoon peppermint extract – Just enough to give that festive minty flavor without being overpowering.
Pro tip from my many kitchen experiments: Make sure your mixing bowl and beaters are squeaky clean before starting. Any trace of grease can sabotage your meringue. I always give mine a quick wipe with lemon juice or vinegar – just to be safe!
How to Make Meringue Kisses with Crushed Candy Canes
Alright, let’s get to the fun part! Making these meringue kisses is like conducting a sweet little science experiment in your kitchen. The key is patience and paying attention to the details – but don’t worry, I’ll walk you through every step. When you nail that perfect stiff peak and see those first beautiful piped kisses, you’ll feel like a pastry chef!
Preparing the Meringue
First things first, preheat your oven to 200°F (95°C). Line two baking sheets with parchment paper – no greasing needed! Now, here’s where the magic starts:
Grab your absolutely clean bowl (I mean it – no greasy residue!) and add those room-temperature egg whites. Toss in the cream of tartar. Start beating on medium speed until you get soft peaks – that’s when the whisk leaves trails that slowly disappear. This usually takes about 2 minutes for me.
Now comes the sugar! Add it one tablespoon at a time while beating on high speed. This gradual addition helps the sugar dissolve completely, giving you that glossy, stable meringue. Keep going until you get stiff peaks – when you lift the beater, the meringue should stand straight up without flopping over. Pro tip: Rub a bit between your fingers – if it feels gritty, keep beating until smooth.
Adding Flavor and Texture
Okay, now for the festive part! Add that 1/4 teaspoon peppermint extract – careful, it’s strong stuff! Then gently fold in your crushed candy canes. I use a big rubber spatula and make slow, sweeping motions from the bottom up. You want those pretty candy cane pieces evenly distributed without deflating all that beautiful air you just whipped in.
Here’s my secret: fold just until combined. A few streaks are okay – overmixing is the enemy of fluffy meringues! The mixture should still hold its shape when you scoop it. If it starts looking watery, you’ve gone too far (but don’t panic – they’ll still taste amazing).
Baking and Cooling
Transfer your meringue to a piping bag fitted with a large star tip. Pipe small kisses onto your prepared sheets – just squeeze, lift, and release to create cute little peaks. Leave about an inch between them since they don’t spread much.
Bake for 1 hour and 30 minutes. Resist opening the oven door! The low temperature slowly dries them out without browning. When time’s up, turn off the oven but leave the meringues inside for another hour to cool gradually. This prevents cracking and helps them stay crisp all the way through.
When they’re ready, they should lift cleanly off the parchment – that satisfying “tap tap” sound means perfection! Let them cool completely before storing. Now try not to eat them all straight off the tray… I dare you!
Tips for Perfect Meringue Kisses with Crushed Candy Canes
After making countless batches of these holiday treats (and yes, a few flops along the way!), I’ve picked up some foolproof tricks that’ll guarantee your meringue kisses turn out perfect every single time. These little nuggets of wisdom will save you from the heartbreak of deflated meringues or sticky candy cane messes!
The Bowl Matters More Than You Think
I learned this the hard way when my first batch stubbornly refused to whip up – turns out my “clean” bowl had invisible grease residue! Now I always wipe everything down with lemon juice or vinegar before starting. Metal or glass bowls work best (plastic can hold onto grease). And seriously – no egg yolk allowed! Even a speck can sabotage your fluffy dreams.
Candy Cane Texture is Key
Don’t pulverize those candy canes into dust! I place them in a zip-top bag and whack them with a rolling pin until they’re in small, colorful chunks. You want pieces big enough to give that satisfying crunch but small enough not to clog your piping tip. Pro tip: Save a tablespoon of extra-crushed candy cane to sprinkle on top after piping for extra festive sparkle!
Weather is Your Secret Ingredient
Humidity is the arch-nemesis of meringue kisses. If it’s super muggy outside, your kisses might stay sticky no matter how long you bake them. On rainy days, I’ll sometimes cheat by leaving them in the turned-off oven overnight. And always store them in an airtight container with a silica packet or piece of dry bread to absorb moisture!
Patience Leads to Perfection
I know it’s tempting to crank up the oven temperature to speed things along – don’t do it! That low-and-slow bake is what gives meringue kisses their signature crisp exterior and melt-in-your-mouth center. Same goes for cooling – rushing them out of the oven leads to cracks and collapses. Trust me, the wait is worth it when you bite into that perfect cloud-like texture!
Variations for Meringue Kisses
Okay, let’s get creative! The basic meringue recipe is like a perfect blank canvas, and I love playing around with different flavors and colors. Once you’ve mastered the classic candy cane version, try one of these fun twists. They’re all so simple and let you mix things up for any occasion!
Switch up the extract. Instead of peppermint, try a 1/2 teaspoon of almond extract for a nutty flavor, or vanilla bean paste for a simple, classic taste. A little lemon or orange zest folded in at the end is also amazing for a bright, citrusy kick.
Add some color! A drop or two of gel food coloring makes these so fun. Add it right at the end of whipping the meringue to your desired shade. Pink for Valentine’s Day, pastels for Easter, or red and green swirl for Christmas. Just remember, liquid food coloring can deflate your meringue, so stick with gel or powder!
Change the mix-ins. Not a candy cane fan? No problem! Fold in 1/2 cup of mini chocolate chips, chopped toasted nuts, or even colorful sprinkles. Just keep the pieces small so they don’t clog your piping tip. My personal favorite is a mix of white chocolate chips and freeze-dried raspberries for a seriously pretty pink cookie.
The best part is, no matter what variation you try, that light, airy, melt-in-your-mouth base stays the same. Have fun with it and make it your own!
Storing Meringue Kisses with Crushed Candy Canes
Okay, here’s the deal – these little beauties are delicate creatures when it comes to storage! I’ve had batches turn into sticky messes and others stay perfectly crisp for weeks, all based on how I stored them. Let me save you from learning the hard way with my tried-and-true storage secrets.
Airtight is everything! The moment your meringue kisses are completely cooled (I mean totally, completely cool – no cheating!), pop them into an airtight container. I love using cookie tins lined with parchment paper or those fancy glass jars with rubber seals. The goal is to keep any moisture out, because humidity turns crisp meringues into sad, chewy puffs.
Room temperature is your friend. Unlike most cookies, these actually do best stored at room temp rather than in the fridge. The fridge’s moisture will make them weep (and nobody wants weepy cookies!). If your kitchen tends to be humid, toss in a silica packet or a piece of dry bread to absorb any extra moisture – it works like magic!
How long do they last? Properly stored, your meringue kisses will stay crisp and delicious for up to 2 weeks. But let’s be real – in my house they never last that long! If you’re making them ahead for a party, I’d suggest baking them no more than 3 days before for peak freshness. The candy canes might start to soften slightly after that, but they’ll still taste amazing.
One last pro tip: Never, ever stack them without layers of parchment in between! Those delicate peaks will break faster than you can say “holiday treat.” Trust me – I learned this lesson the messy way!
Nutritional Information
Okay, let’s talk numbers – but don’t worry, these meringue kisses with crushed candy canes are actually one of the lighter holiday treats you can enjoy! (And trust me, I’ve done the taste-testing to prove it.) These values are per serving (about 2 kisses), but keep in mind all nutritional info is just an estimate – your exact amounts might vary slightly depending on how big you pipe your kisses!
Each little cloud of peppermint joy comes in at:
- 45 calories – Perfect for when you want just a small sweet treat!
- 10g sugar – Yes, they’re sweet, but that’s what makes them such a festive delight.
- 0g fat – All that airiness means virtually no fat – hooray!
- 1g protein – Thanks to those hardworking egg whites.
Now, I’m not a nutritionist (just a very enthusiastic home baker!), but I love that these let me indulge without overdoing it. They’re naturally gluten-free and vegetarian too, which makes them great for sharing with friends who have dietary restrictions. Just remember – while they might be light, that addictive crunch means it’s easy to lose count of how many you’ve popped in your mouth. Not that I’d know anything about that… ahem!
FAQs About Meringue Kisses with Crushed Candy Canes
I get so many questions about these adorable little treats – and believe me, I’ve asked most of them myself over the years! Here are the answers to everything you might be wondering about making perfect meringue kisses with crushed candy canes.
Can I use peppermint oil instead of extract?
Oh boy, let me tell you about the time I learned this lesson the hard way! Peppermint oil is way stronger than extract – we’re talking like 4 times as potent. If you use oil, start with just 1-2 drops and taste as you go. Too much will make your meringues taste like toothpaste (not the holiday vibe we’re going for!). Extract gives you more control over that perfect minty balance.
Why did my meringues crack or collapse?
Ugh, the heartbreak of cracked meringues! Usually this happens for one of three reasons: 1) You opened the oven door too soon (resist the temptation to peek!), 2) The oven temperature was too high (that low-and-slow bake is crucial), or 3) They cooled too quickly. Always let them cool gradually in the turned-off oven – I set a timer so I don’t forget!
Can I make these without a piping bag?
Absolutely! If you don’t have a piping bag, just spoon small dollops onto your baking sheet. They won’t have those cute little peaks, but they’ll taste just as delicious. A zip-top bag with the corner snipped off works in a pinch too. Pro tip: If you’re spooning them, make them slightly smaller since they’ll spread a tiny bit more than piped kisses.
How do I know when the meringue is whipped enough?
This is the million-dollar question! Your meringue is ready when it forms stiff peaks that stand straight up when you lift the beater. But here’s my foolproof test: Turn the bowl upside down (just a little at first if you’re nervous!). If the meringue doesn’t budge, you’re golden. If it slides at all, keep beating. And remember – no gritty sugar feeling between your fingers!
Can I freeze meringue kisses?
Technically yes, but I don’t recommend it. Freezing can make them lose that perfect crisp texture. They’re best enjoyed within a couple weeks at room temperature. That said, if you must freeze them, put them in a single layer in an airtight container with parchment between layers. Thaw at room temperature for an hour before serving – but don’t be surprised if they’re slightly softer.
Share Your Holiday Treats
Nothing makes me happier than seeing your beautiful meringue kisses with crushed candy canes! Seriously, it’s like Christmas morning every time I scroll through my notifications and spot your creations. Did yours turn out perfectly? Did you try any fun variations? I want to see them all!
Leave a rating below if you loved this recipe – your feedback helps other bakers know what to expect. And if you snapped a photo (because how could you resist?), tag me on Instagram @[yourhandle]! Use #meringuekissmagic so I can find your posts easily. I always try to share my favorite reader creations in my stories – your cookies might just make the cut!
Check out more delicious recipes on Pinterest!
Happy baking, friends! May your meringues be stiff, your candy canes crunchy, and your holiday season filled with sweet moments (and sweet treats). Now go enjoy those little clouds of peppermint joy!
Print
5-Ingredient Meringue Kisses with Crushed Candy Canes – Pure Joy
- Total Time: 2 hours 50 minutes
- Yield: 40 kisses 1x
- Diet: Low Fat
Description
Light and airy meringue cookies with a festive peppermint flavor from crushed candy canes. These sweet treats are a perfect holiday dessert.
Ingredients
- 4 large egg whites
- 1 cup granulated sugar
- 1/4 teaspoon cream of tartar
- 1/2 cup crushed candy canes
- 1/4 teaspoon peppermint extract
Instructions
- Preheat your oven to 200°F (95°C). Line two baking sheets with parchment paper.
- In a clean, dry bowl, beat the egg whites and cream of tartar on medium speed until soft peaks form.
- Gradually add the sugar, one tablespoon at a time, beating on high speed until stiff, glossy peaks form and the sugar is dissolved.
- Gently fold in the peppermint extract and the crushed candy canes.
- Transfer the meringue to a piping bag fitted with a large star tip. Pipe small kisses onto the prepared baking sheets.
- Bake for 1 hour and 30 minutes. Turn off the oven and let the meringues cool in the oven for another hour.
Notes
- Ensure your bowl and beaters are completely free of any grease for the best volume.
- Crush the candy canes into small pieces, but not a fine powder, for the best texture.
- Store your meringue kisses in an airtight container at room temperature to keep them crisp.
- Prep Time: 20 minutes
- Cook Time: 1 hour 30 minutes
- Category: Dessert
- Method: Baked
- Cuisine: American
Nutrition
- Serving Size: 2 kisses
- Calories: 45
- Sugar: 10g
- Sodium: 5mg
- Fat: 0g
- Saturated Fat: 0g
- Unsaturated Fat: 0g
- Trans Fat: 0g
- Carbohydrates: 11g
- Fiber: 0g
- Protein: 1g
- Cholesterol: 0mg