Embarking on a journey through the world of croissant bread, we uncover the secrets behind this beloved pastry that has captured hearts worldwide. From its flaky texture to the rich, buttery layers that melt in your mouth, croissant bread is more than just a breakfast item; it’s a culinary masterpiece that speaks volumes of artisan baking and the delicate art of pastry making. This article delves deep into the essence of croissant bread, exploring its origins, the meticulous process of crafting the perfect croissant, and the variations that have evolved over time. Whether you’re a seasoned baker or a curious food enthusiast, prepare to be whisked away on a flavorful adventure that promises to enlighten, entertain, and inspire.
Part 1: Introduction to Croissant Bread
Ah, the croissant bread—a marvel of the baking world, a testament to the magic that flour, butter, and a touch of patience can create. This section peels back the layers of history to reveal how this pastry, as iconic as the Eiffel Tower, found its way from the bustling streets of Paris to coffee shops and breakfast tables around the globe.
The History and Origin of Croissant Bread
Once upon a time, in a land known for its culinary prowess, the croissant was born. Not merely a product of chance, but a creation that embodies the fusion of tradition and innovation. The journey of the croissant begins in the 13th century, with its ancestor, the Kipferl—a simple, crescent-shaped pastry from Austria. Fast forward to the late 1600s, the Kipferl makes its way to France, where it’s embraced and transformed by French bakers into what we now know as the croissant.
The transformation wasn’t overnight, oh no. It took centuries of refinement, a dash of creativity, and the French flair for artisan baking to perfect the croissant’s flaky layers and buttery richness. By the 20th century, the croissant had become a symbol of French patisserie, a staple in the repertoire of every pastry chef.
Why Croissant Bread is a Beloved Pastry Worldwide
But what makes the croissant a global sensation? Is it the way it flirts with your senses, its aroma promising a bite of heaven? Or perhaps, it’s the flaky texture, a marvel of dough fermentation and laminated dough techniques, that makes each bite a symphony of crisp and tender.
The croissant’s versatility also plays a part in its worldwide adoration. From the classic butter croissant to indulgent fillings of chocolate and almond paste, there’s a croissant for every palate. It’s this ability to adapt and evolve, while still holding onto its essence, that endears the croissant to millions.
In essence, the croissant is more than just bread; it’s a piece of history, a work of art, and a culinary delight that transcends borders. As we delve deeper into the art of making croissant bread, remember, each fold, each turn, is a step in the dance of baking that brings us closer to achieving croissant rock-star status. So, let’s roll up our sleeves, dust off our rolling pins, and embark on this buttery journey together.
Part 2: The Art of Making Croissant Bread
Diving into the art of making croissant bread is akin to embarking on a culinary adventure, one that requires patience, precision, and a passion for artisan baking. This part of our journey unveils the secrets behind crafting the perfect croissant, from selecting the right ingredients to mastering the technique of lamination. So, let’s get started, shall we?
Understanding the Ingredients
The foundation of a sublime croissant lies in the quality of its ingredients. Simple yet essential, each component plays a pivotal role in the pastry’s final taste and texture.
- Flour: The backbone of our croissant, all-purpose flour works wonders, providing the dough with structure and strength.
- Butter: The heart and soul of the croissant, unsalted butter, cold yet pliable, introduces those irresistible, flaky layers.
- Yeast: The magic behind the rise, instant yeast kickstarts the dough fermentation, giving our croissant its light, airy interior.
- Water and Milk: These liquids hydrate the flour, activating the gluten formation for elasticity and extensibility.
- Sugar and Salt: While sugar offers a hint of sweetness and aids in browning, salt balances the flavors and strengthens the gluten network.
The Process of Making Croissant Bread
Preparing the Dough

The adventure begins with the creation of the dough. Starting with a poolish, a type of preferment, enriches the dough’s flavor and texture. This mixture of flour, water, and a pinch of yeast sits overnight, developing a deep, complex taste.
Next, we combine the poolish with our main dough ingredients, gently mixing until a cohesive dough forms. The key here is not to rush; patience ensures the gluten develops optimally, setting the stage for those beautiful, buttery layers.
Laminating the Dough
Lamination is where the magic happens, where butter meets dough in a delicate dance of folding and rolling. This process, though daunting at first, is what gives the croissant its signature texture.
- Creating a Butter Block: Start by beating cold butter into a rectangle, then chilling it just enough to keep it pliable.
- Encasing the Butter: Roll out your dough into a large rectangle, place the butter block on half, and fold the dough over it, sealing the butter within.
- The Turns: Roll out the dough and fold it in thirds, like a letter. This is one turn. Perform a total of three turns, chilling the dough between each to keep the butter from melting.
Each turn layers butter between sheets of dough, creating the flaky strata that puff up in the oven to create the croissant’s iconic texture.
Shaping and Baking
With our laminated dough ready, it’s time to shape our croissants. Cut the dough into triangles, then roll each piece from the base to the tip, curving the ends to form that classic crescent shape.
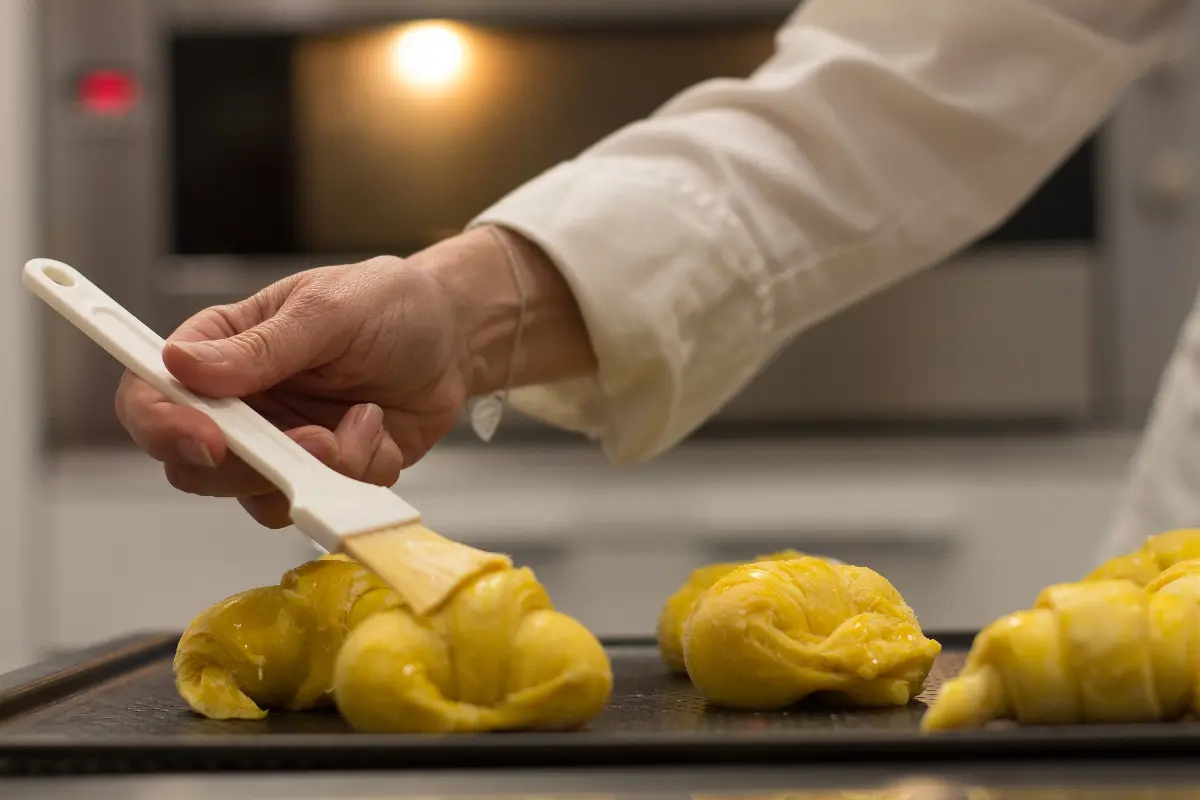
After a final proof, where the shaped dough doubles in size, we brush our croissants with an egg wash for a golden finish. Baking at a high temperature ensures the butter steams, puffing up the layers, and creating a golden, crispy exterior that’s music to our taste buds.
In the realm of artisan baking, making croissant bread is a testament to the baker’s skill and dedication. It’s a process that can’t be rushed, a reminder of the beauty of baking, where time and care bring forth delicious rewards. As we move forward, remember, each step in this process is a building block to achieving that perfect, buttery croissant that’s worth every bit of effort.
Part 3: Variations and Fillings
The world of croissant bread is as diverse as it is delicious. Beyond the classic butter croissant lies a treasure trove of variations and fillings, each adding a unique twist to this beloved pastry. Let’s explore the endless possibilities that await in the realm of croissant creativity.
Exploring Croissant Varieties
The beauty of croissants lies in their versatility. From the simple yet sublime plain croissant to the decadent chocolate croissant, there’s a variety to satisfy every craving. But why stop there? The culinary adventure only begins with these classics.
- Almond Croissants: A favorite among many, almond croissants are filled and topped with frangipane (almond cream), then sprinkled with sliced almonds for an extra crunch.
- Ham and Cheese Croissants: For those who lean towards savory, the combination of Gruyere cheese and smoked ham tucked into a croissant is nothing short of heavenly.
- Fruit-Filled Croissants: A dollop of fruit jam or fresh fruit pieces can transform a simple croissant into a sweet, tart delight, perfect for a summer morning.
DIY Croissant Fillings
Why not take a leap and experiment with your own fillings? The process is not only fun but also allows you to customize your croissants to your heart’s content. Here are a couple of ideas to get you started:
- Savory Fillings: Think outside the box with fillings like pesto and mozzarella, bacon and egg, or even a spicy chorizo and cheddar. The key is to balance flavors that can stand up to the buttery richness of the croissant dough.
- Sweet Fillings: Sweet fillings offer a playground of flavors. From the classic chocolate bars to more adventurous options like almond paste, lemon curd, or even a sweet cream cheese filling, the possibilities are endless.
Creating your own filled croissants is a journey of discovery, one where you can explore the depths of your culinary creativity. Whether you’re a fan of the classics or eager to experiment with new flavors, the world of croissant fillings is your oyster.
In the end, whether you choose to stick with the traditional or venture into the realm of inventive fillings, each variation of croissant bread brings its own unique flavor and texture to the table. As we continue to explore the art and science of croissant making, remember that each choice, each ingredient, adds a new layer of complexity and delight to this timeless pastry. So, go ahead, let your imagination run wild, and who knows? You might just create the next croissant sensation.
Part 4: Serving and Storage Tips

After mastering the craft of baking the perfect croissant bread, the next steps are just as crucial—serving and storing these flaky delights. Ensuring your croissants remain as delectable as the moment they left the oven requires a bit of know-how. So, let’s dive into the best practices for serving and storing croissants, keeping them irresistible down to the last crumb.
How to Serve Croissants
The ideal croissant is served warm, with its buttery aroma wafting through the air, inviting a bite. Here’s how to bring out the best in your croissants:
- Heating: If you’re enjoying a croissant that’s not fresh out of the oven, a quick warm-up can revive its texture and flavor. A few minutes in a preheated oven at 350°F (175°C) should do the trick, enhancing its buttery layers.
- Pairing: Croissants are versatile and can be paired with a variety of accompaniments. A simple spread of jam or honey can elevate a plain croissant, while a savory one might pair beautifully with a cup of rich, aromatic coffee or a light, refreshing tea.
Storing Croissants
The key to storing croissants is to maintain their texture and flavor for as long as possible. Here are some tips to keep them tasting fresh:
- Short-Term Storage: If you plan to devour your croissants within a day or two, keeping them at room temperature in an airtight container is your best bet. This method helps retain their moisture without making them soggy.
- Freezing: For longer storage, croissants freeze remarkably well. Wrap each croissant individually in plastic wrap, then place them in a freezer bag. When you’re ready to enjoy, thaw them at room temperature or gently warm them in the oven to bring back their flaky texture and buttery taste.
Remember, the goal is to preserve the delicate balance of crispness and tenderness that makes croissants so delightful. Whether you’re savoring them now or later, these tips will ensure your croissants remain as enjoyable as the day they were baked.
In the grand scheme of artisan baking, the journey from dough to delicious doesn’t end when the croissants come out of the oven. How you serve and store these pastries plays a pivotal role in the overall experience. By following these simple yet effective tips, you ensure that every croissant, whether enjoyed immediately or saved for later, is a testament to your baking prowess. So, go ahead, bake with confidence, and rest assured that your croissants will remain the highlight of any table, any time.
Part 5: FAQs
In the world of croissant bread, questions abound. From curious beginners to seasoned bakers, everyone has something to ask about crafting the perfect croissant. Let’s tackle some of the most frequently asked questions, shedding light on the intricacies of croissant making and ensuring your next baking adventure is a success.
How long does it take to make croissant bread?
The journey to perfect croissants is not a sprint; it’s more of a leisurely stroll. From start to finish, you’re looking at a process that spans over two to three days. This includes the initial preparation of the poolish, the resting and dough fermentation periods, the laminating process, and finally, shaping and baking. While it might seem like a marathon, remember, good things come to those who wait, and croissants are no exception.
Can croissant dough be frozen?
Absolutely! Freezing croissant dough is a fantastic way to manage your baking schedule more flexibly. After completing the lamination process and giving the dough its final fold, wrap it tightly in plastic wrap and then place it in a freezer bag. When you’re ready to bake, transfer the dough to the refrigerator to thaw overnight. The next day, proceed with shaping, proofing, and baking as usual. This method ensures you can enjoy fresh croissants without starting from scratch every time.
What are the common mistakes when making croissants?
Even the most experienced bakers can encounter hiccups when making croissants. Here are a few common pitfalls to avoid:
- Rushing the Process: Patience is key in croissant making. Rushing through steps, especially during the dough fermentation and lamination, can result in less-than-ideal texture and flavor.
- Overworking the Dough: When mixing and shaping the dough, work gently. Overworking can lead to tough croissants.
- Inconsistent Butter Temperature: The butter used in the lamination process should be cold but pliable. If it’s too hard, it can tear through the dough; if too soft, it can melt, leading to a greasy mess.
- Improper Proofing: Under-proofed croissants won’t have that beautiful, airy interior, while over-proofed ones can collapse. Finding the right balance is crucial.
Making croissants is as much an art as it is a science. Each step, from mixing the dough to the final bake, is a piece of the puzzle that, when done correctly, results in a pastry that’s nothing short of sublime. So, take these FAQs as your guide, learn from each attempt, and remember, practice makes perfect. Before you know it, you’ll be turning out croissants that could rival those of the finest bakeries in Paris.
Part 6: Advanced Tips and Tricks
Mastering the art of croissant bread making is a journey filled with learning and discovery. As you become more comfortable with the basics, it’s time to elevate your skills with some advanced tips and tricks. These insights will help you refine your technique, tackle common challenges, and achieve that perfect croissant, which is the epitome of artisan baking excellence.
Mastering Croissant Bread
To truly excel in croissant making, understanding the nuances of the process is key. Here are some advanced tips to guide you:
- Temperature Control: One of the most critical factors in making croissants is managing the temperature of both your dough and butter throughout the lamination process. Keeping the dough cold ensures the butter remains in distinct layers rather than melting into the dough, which is crucial for achieving those flaky, airy layers.
- Precision in Measurement: Accuracy in measuring your ingredients can make or break your croissants. Use a digital scale for the most precise measurements, ensuring the balance of ingredients promotes the ideal texture and rise.
- Rolling and Folding Techniques: Perfecting your rolling and folding technique is essential for uniform layers. Always start rolling from the center of the dough outward, applying even pressure to maintain consistent thickness. When folding, aim for sharp, clean folds to maximize layering.
- Proofing Perfection: Finding the sweet spot for proofing your croissants can dramatically impact their final texture and volume. A slightly warm, humid environment is ideal for proofing. However, be vigilant; over-proofed croissants can lose their shape and under-proofed ones may not achieve the desired lift.
Troubleshooting Common Issues
Even with the best preparation, you might encounter some issues. Here are solutions to common problems:
- Butter Breaking Through Dough: This often occurs if the butter is too cold and hard. Allow the butter to sit at room temperature just until it’s pliable before starting the lamination process.
- Croissants Not Rising Properly: Inadequate proofing or old yeast can lead to flat croissants. Ensure your yeast is fresh and give your shaped croissants enough time to proof in a warm, draft-free area.
- Uneven Baking: If your croissants are baking unevenly, it might be due to inconsistent oven temperature or placement. Use an oven thermometer to verify temperature accuracy and rotate your baking sheet halfway through baking for even browning.
Embracing these advanced tips and tricks will not only enhance your croissant bread making skills but also deepen your appreciation for the craft of baking. Each batch of croissants is an opportunity to experiment, learn, and, most importantly, enjoy the fruits of your labor. So, keep pushing the boundaries of your baking abilities, and remember, the journey to croissant perfection is as rewarding as the delicious results.
Part 7: Conclusion
As we wrap up our comprehensive journey through the world of croissant bread, it’s clear that the art of crafting the perfect croissant is both a challenge and a delight. From the meticulous process of mixing and laminating the dough to the patience required during proofing and the joy of pulling golden, flaky croissants out of the oven, each step in the process is a testament to the beauty and complexity of baking.
The journey doesn’t end here, though. Each batch of croissants offers a new opportunity to refine your technique, experiment with flavors, and share the fruits of your labor with friends and family. The tips, tricks, and insights shared throughout this guide are designed to empower you, whether you’re a novice baker taking your first steps into the world of artisan baking or an experienced pastry chef looking to perfect your craft.
Remember, the key to mastering croissant bread lies in embracing the process, learning from each attempt, and never being afraid to try again. The pursuit of the perfect croissant is a journey of discovery, filled with moments of frustration, bursts of success, and, ultimately, the deep satisfaction of creating something truly exquisite.
So, armed with knowledge, passion, and a rolling pin, step into your kitchen and let the adventure begin. The world of croissant making awaits, ready to reveal its secrets to those willing to explore its depths. Happy baking, and may your croissants always be buttery, flaky, and utterly delicious.
here are some suggestions based on the available content:
- Chocolate Olive Oil Cake: While not directly related to croissants, this recipe represents another sophisticated baking endeavor that readers interested in artisan baking might appreciate. You could embed a link in the section discussing the versatility of croissants and their variations. For instance, in the sentence discussing sweet fillings, you might say, “For those who enjoy exploring sophisticated flavors in baking, our Chocolate Olive Oil Cake offers a delightful challenge.”
- The Buttermilk Pancake House Experience: This article could be linked in the introduction or conclusion to suggest another breakfast option for readers who enjoy morning pastries and baking. A possible insertion could be in the conclusion, “If you’re looking to expand your breakfast repertoire beyond croissants, our exploration of The Buttermilk Pancake House Experience might just inspire your next morning masterpiece.”
- Bundt Cake Recipes – Master Baking & Decorating: Given the focus on artisan baking, readers interested in croissants might also be intrigued by the art of Bundt cake baking. A link could be placed in the section discussing advanced tips and tricks for croissant making. For example, “As you master the art of croissant baking, you might also enjoy the challenge of Bundt cakes. Discover our guide on Master Baking & Decorating Bundt Cakes for more baking inspiration.”
For enhancing the article with informative external links that are not recipe providers, here are some suggestions based on the content explored:
- Smithsonian Magazine’s Article on Croissant History: In the section “The History and Origin of Croissant Bread”, you can embed a link to provide readers with a deep dive into the croissant’s fascinating history. Suggested insertion: “The journey of the croissant begins in the 13th century, with its ancestor, the Kipferl—a simple, crescent-shaped pastry from Austria. For those intrigued by the croissant’s storied past, Smithsonian Magazine offers an enlightening brief history of the croissant, from kipfel to Cronut.”
- The Chopping Block’s Article on Croissant Quality: In the “Advanced Tips and Tricks” section, where the focus is on refining croissant-making skills, an external link to discussions about croissant quality could be valuable. Suggested insertion: “Even with the best preparation, you might encounter some issues. For a broader perspective on what makes a quality croissant and common pitfalls, consider reading The Chopping Block’s insights on The Internet Has a Croissant Problem.”
These external links are chosen to enrich the reader’s understanding of croissants beyond the baking process, offering historical context and quality considerations that are integral to appreciating this iconic pastry fully.