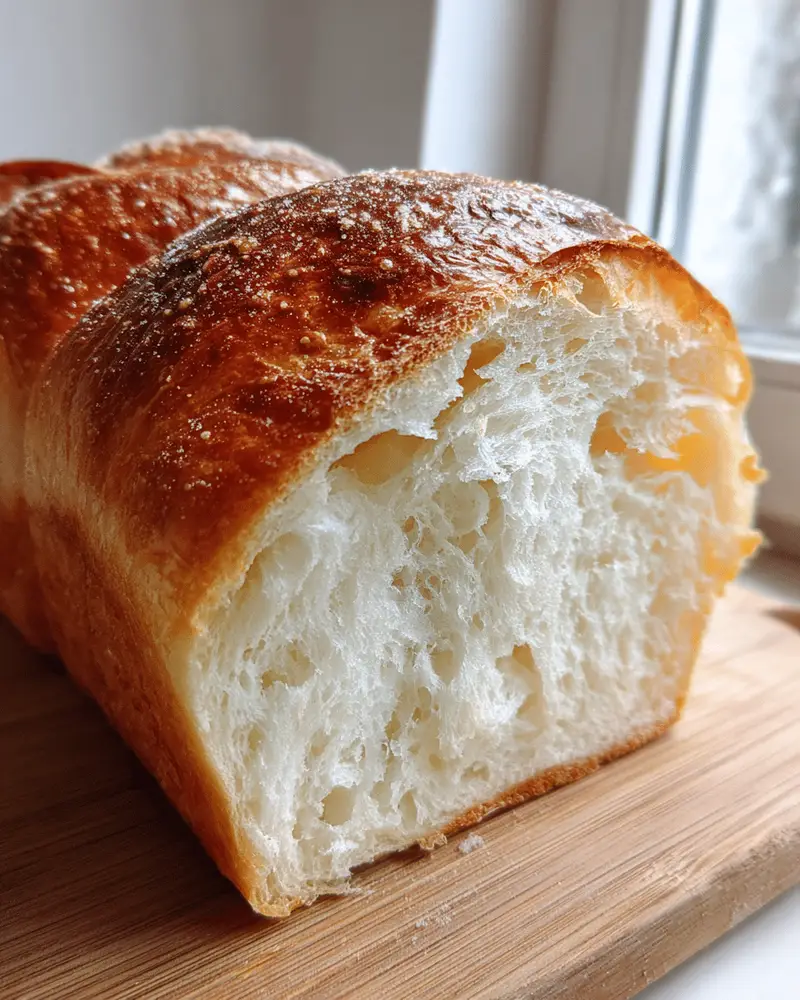
There’s something magical about pulling a fresh loaf of Japanese Shokupan from the oven – that first glimpse of golden brown crust giving way to the softest, cloud-like interior you’ll ever taste. I still remember my first bite of authentic Shokupan at a tiny Tokyo bakery years ago, and I’ve been obsessed with recreating that perfect balance of milky sweetness and feather-light texture ever since.
This Japanese milk bread recipe became my kitchen project through many happy (and sometimes lumpy) trials. What makes Shokupan special? It’s the way the slices practically melt when toasted, holding just enough structure for jam or becoming the world’s fluffiest sandwich bread. Unlike dense Western loaves, every bite of homemade Shokupan feels like a gentle hug – tender enough to tear by hand yet sturdy enough for thick spreads.
After testing countless variations, I’ve nailed down a foolproof method that delivers professional bakery results. The secret lies in patient kneading, quality bread flour (absolutely worth the specialty purchase), and that glorious second rise that transforms humble ingredients into something extraordinary. Whether you’re making morning toast or an afternoon egg sandwich, this Japanese Shokupan recipe will become your new baking staple.
Why You’ll Love This Japanese Bread Shokupan Recipe
This isn’t just bread – it’s a little slice of bakery heaven you can make right in your own kitchen. Here’s why this Shokupan recipe will steal your heart:
- Cloud-like texture – That signature fluffiness comes from perfect kneading and a double rise
- Milky sweetness – Whole milk gives it that authentic Japanese bakery flavor
- Simple ingredients – Just pantry staples transformed into something extraordinary
- Versatile uses – Equally amazing for French toast, sandwiches, or just warm with butter
- Beginner-friendly – My tested method makes professional results achievable at home
Trust me, once you taste homemade Shokupan, store-bought bread will never compare!
Ingredients for Japanese Bread Shokupan
Great Shokupan starts with great ingredients – and I don’t mess around with approximations here! After several “oops” moments in my early baking days (let’s just say eyeballing measurements leads to hockey puck bread), I learned the hard way that precision matters. Here’s exactly what you’ll need:
- 300g bread flour – That high-protein content is non-negotiable for that perfect chew
- 25g sugar – Just enough to complement the milk without making it dessert-sweet
- 5g salt – Your flavor booster that keeps the bread from tasting bland
- 6g dry yeast – The tiny powerhouse that makes our dough rise to cloud-like heights
- 30g unsalted butter, softened – Not melted! That bit of patience makes all the difference
- 200ml whole milk, lukewarm – About 100-110°F (test it on your wrist like a baby bottle)
- 1 egg yolk (optional) – For that gorgeous golden top if you’re feeling fancy
A quick tip from my flour-dusted notebook: measure everything before starting. There’s nothing worse than getting floury hands only to realize you’re short on butter! And yes, the bread flour really does make a difference – I tried subbing all-purpose once and the texture just wasn’t the same.
Equipment Needed for Japanese Shokupan
You’ll be shocked how few tools this recipe actually needs! Here are my absolute must-haves:
- Kitchen scale – Because guessing with cups leads to sad, dense bread
- Stand mixer with dough hook (or very determined arms)
- 9×4 inch loaf pan – The perfect size for that bakery-style height
- Silicone spatula – For scraping every bit of that glorious dough
- Damp kitchen towel – Your dough’s best friend during rising time
That’s it! No fancy gadgets – just these trusty tools I use every single bake.
How to Make Japanese Bread Shokupan Step-by-Step
Okay, let’s get our hands floury! I’ll walk you through each step just like my Japanese baking mentor taught me – with plenty of “why’s” so you understand the magic happening in your bowl. Don’t worry if it seems like a lot – once you’ve done it, the rhythm becomes second nature!
Preparing the Dough
First things first: whisk together your 300g bread flour, 25g sugar, 5g salt, and 6g dry yeast right in your mixing bowl. This dry team needs to get acquainted before the milk joins the party! I like making a little well in the center – it’s like preparing a cozy bed for our liquid ingredients.
Now, slowly pour in that 200ml lukewarm whole milk while mixing on low speed (or stirring with a wooden spoon if you’re going old-school). The dough will look shaggy at first – totally normal! We’re aiming for all the flour getting hydrated with no dry patches. If it feels too sticky, resist adding more flour yet – the magic happens during kneading.
Kneading and Incorporating Butter
Here’s where the arm workout begins! Knead for about 5 minutes until the dough starts coming together into a rough ball. Now add your 30g softened butter (not melted – we want it incorporated slowly). At first, it’ll seem like a greasy mess – trust the process!
Keep kneading for another 10-15 minutes until you get that magical windowpane effect – when you can stretch a small piece thin enough to see light through without tearing. This gluten development is what gives Shokupan its signature cloud-like texture. My trick? Set a timer and put on your favorite song – the rhythm helps!
Shaping and Final Rise
Once your dough passes the windowpane test, form it into a smooth ball and place it in a lightly oiled bowl. Cover with a damp kitchen towel and let it rise in a warm spot until doubled in size – about 1 hour. No peeking too often – we want that cozy environment to work its magic!
After the first rise, gently punch down the dough to release air (so satisfying!) and divide into 3 equal portions. Roll each into smooth balls, then use a rolling pin to flatten into ovals about 8 inches long. Roll them up like little sleeping bags and tuck seam-side down into your greased loaf pan. Cover again and let rise until the dough just crowns above the pan rim – about 40 minutes.
Baking the Shokupan
Preheat your oven to 180°C (356°F) during the last 15 minutes of the second rise. For that bakery-perfect shine, gently brush the top with beaten egg yolk (a pastry brush works best). Bake for 25-30 minutes until the top is a deep golden brown and the loaf sounds hollow when tapped.
Here’s my can’t-skip tip: immediately turn the loaf out onto a cooling rack after baking. This prevents steaming that could make the bottom soggy. Resist slicing for at least 30 minutes – I know it’s hard, but this lets the crumb set properly!
Tips for Perfect Japanese Shokupan
After baking more Shokupan loaves than I can count (and yes, plenty of learning-from-mistakes moments), I’ve gathered my absolute must-know tips to guarantee bakery-worthy results every time. These little tricks made all the difference in my bread-baking journey!
- The wrist test is your best friend – That lukewarm milk should feel just slightly warm when dripped on your inner wrist, like testing a baby’s bottle. Too hot kills the yeast, too cold slows rising
- Butter temperature matters! – Softened butter blends perfectly into the dough, while melted butter makes things greasy. I leave mine out 30 minutes before baking
- Windowpane or bust – Don’t shortcut the kneading! That stretchy, translucent dough when pulled means perfect gluten development for cloud-like texture
- Create a cozy rising spot – My favorite trick? Place the bowl in the microwave with a cup of just-boiled water (off!) for the perfect warm, draft-free environment
- Damp cloth coverage is non-negotiable – A slightly wet kitchen towel prevents dough skin from forming during rises. I learned this the hard way with crusty patches!
- Second rise patience pays off – Wait until the dough just peeks above the pan rim before baking. Under-risen bread won’t have that signature fluff
- Cooling discipline – I know it’s tempting, but that 30-minute wait before slicing lets the crumb set properly. Otherwise you get a gummy mess
- Slice with a serrated knife – That perfect fluffy texture deserves clean cuts! Saw gently rather than pressing down
My biggest lesson? Shokupan rewards patience at every step – from proper kneading to resisting that first slice. But oh, is that first bite of perfectly pillowy bread worth the wait!
Common Questions About Japanese Shokupan
After sharing this recipe with so many friends (and fielding countless bread emergencies!), I’ve gathered the most common Shokupan questions. Here’s everything I’ve learned through trial, error, and many delicious loaves:
Can I use all-purpose flour instead of bread flour?
Oh, how I wish the answer was yes! But trust me, I learned the hard way that bread flour’s higher protein content (12-14% vs all-purpose’s 10-12%) makes all the difference. That extra gluten development gives Shokupan its signature chew and cloud-like texture. In a pinch, you can add 1 tablespoon vital wheat gluten per cup of all-purpose flour, but nothing beats real bread flour for authentic results.
Why is my Shokupan dense instead of fluffy?
We’ve all been there! Usually it’s one of three culprits:
- Under-kneaded dough – Didn’t achieve that magical windowpane stage
- Rushed rising – Yeast didn’t have enough time to work its magic
- Over-floured surface – Added too much flour during shaping, making the dough stiff
My first dense loaf happened because I got impatient with the second rise – now I set a timer and wait until the dough just crowns the pan rim.
Can I make Shokupan without a stand mixer?
Absolutely! My Japanese baking mentor always mixed by hand – it just takes about 20 minutes of kneading (great arm workout!). The key is using a “stretch and fold” technique: pull the dough outward, then fold it back over itself. Rotate 90 degrees and repeat. You’ll feel the dough transform from sticky to smooth and elastic.
How do I know when the bread is fully baked?
Besides the golden crust, try these foolproof tests:
- Hollow sound – Tap the bottom of the loaf – it should sound hollow
- Internal temp – 190°F (88°C) on an instant-read thermometer
- Spring back – The indentation from your finger should slowly fill back in
I burned my first loaf by relying only on color – now I always use the thermometer test!
Can I substitute plant-based milk?
I’ve tested with oat milk and full-fat coconut milk with decent results, but the texture won’t be quite as rich. The proteins in dairy milk really help with structure. If you do substitute, add 1/2 teaspoon extra butter or oil to compensate for the missing fat content.
Why does my Shokupan collapse after baking?
This heartbreaking issue usually means:
- Over-proofed dough – The yeast exhausted itself before baking
- Under-baked – The structure didn’t set properly
- Too much yeast – Caused overly rapid rising then collapse
My third loaf ever did this – turns out my “warm spot” near the radiator was too hot! Now I aim for about 75-80°F (24-27°C) for rising.
Remember, even “failed” Shokupan makes amazing bread pudding or French toast! Every bake teaches you something new.
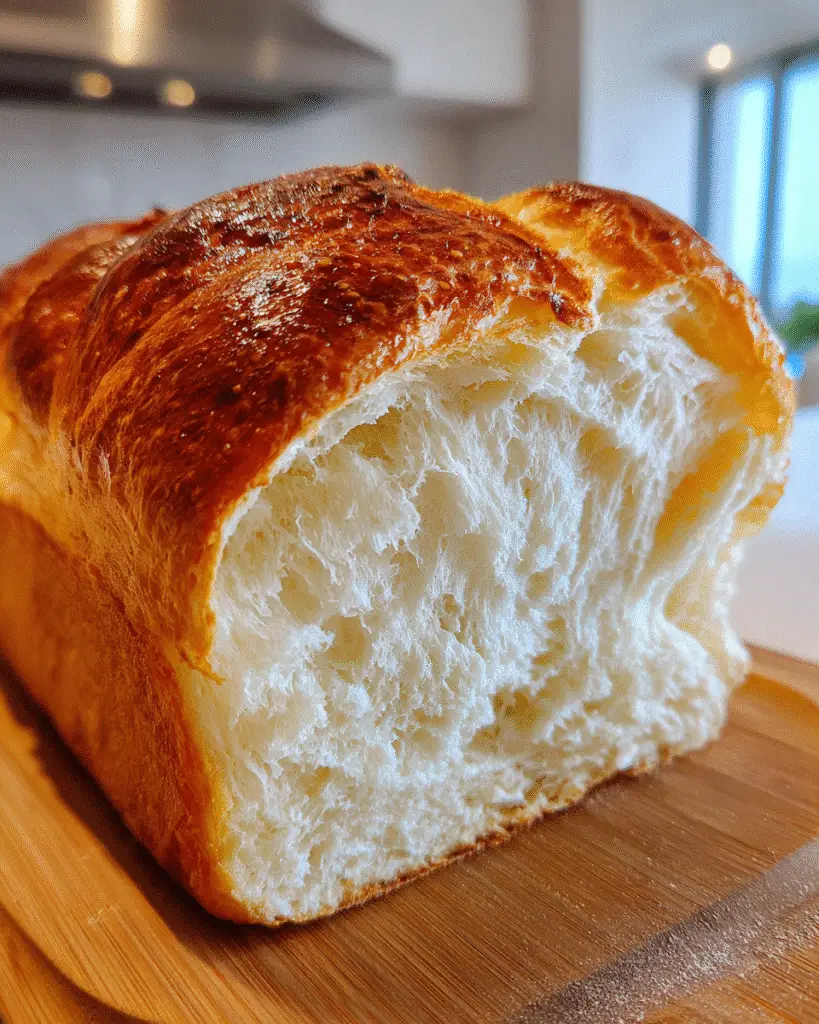
Serving and Storing Japanese Bread Shokupan
Oh, that moment when your Shokupan is finally cool enough to slice – pure joy! Here’s how I enjoy this heavenly bread at its best and keep it fresh (though let’s be honest, it rarely lasts long in my house).
Fresh is best – The first 24 hours after baking are pure magic. I love thick slices still slightly warm, with just a smear of good butter that melts into all those fluffy layers. For breakfast, toasted Shokupan becomes golden crisp outside while staying cloud-soft inside – perfect with jam or a drizzle of honey.
Sandwich superstar – This bread makes the most incredible egg salad or cucumber sandwiches (crusts optional, childhood nostalgia mandatory). The slices hold up beautifully without squishing your fillings. My kids adore it for peanut butter and banana – the milkiness pairs perfectly!
Storage secrets – Once completely cool, store your Shokupan in an airtight container or beeswax wrap at room temperature. It stays fresh for about 3 days this way. If it starts getting slightly dry (rare in my experience!), a quick toast revives it beautifully. Never refrigerate – that just accelerates staleness!
Pro tip from my kitchen: I slice the entire loaf once cooled and store slices in a bread box. That way, I can grab perfect portions for toast without squashing the loaf. If you must freeze (why?!), wrap individual slices tightly in plastic, then foil, and use within 2 weeks – but really, fresh is so much better.
Nutritional Information for Japanese Shokupan
Let’s be real – we’re not eating Shokupan for its diet-friendly qualities (though it’s certainly not unhealthy!). But since I know some folks like to track, here’s the nutritional breakdown per slice, based on cutting our loaf into 10 generous portions. Remember, these are estimates – your exact values will vary slightly depending on your specific ingredients and slice thickness!
- Calories: 150
- Carbohydrates: 25g
- Sugar: 4g
- Protein: 5g
- Fat: 4g
- Saturated Fat: 2g
- Sodium: 150mg
- Fiber: 1g
A quick note from my nutritionist friend: Compared to typical sandwich bread, Shokupan tends to be slightly higher in protein (thanks to that bread flour!) and lower in sugar than many commercial loaves. The whole milk adds beneficial fats and a bit of calcium too. But let’s be honest – we’re here for that dreamy texture and milky flavor, not the nutrition label!
Disclaimer: Nutrition values are estimates only and will vary based on exact ingredients used and portion sizes. Calculations assume whole milk, unsalted butter, and standard bread flour.
Share Your Japanese Shokupan Experience
Nothing makes me happier than hearing about your Shokupan adventures! Did your loaf rise to golden perfection? Maybe you discovered a brilliant twist (I once added a teaspoon of matcha powder to half the dough – so pretty swirled!). Or perhaps you had one of those “learning experiences” we bakers so fondly call mistakes (my first attempt could’ve doubled as a doorstop).
Drop me a note about:
- Your kneading soundtrack (I swear by 80s power ballads for that 15-minute stretch)
- How you resisted (or didn’t resist!) slicing into that warm loaf
- The perfect thing you slathered on your first heavenly slice
- That “aha!” moment when the dough passed the windowpane test
Your stories fuel my baking experiments – who knows, your tip might just help another reader achieve their fluffiest Shokupan yet! You can also find more inspiration on Pinterest.
Print
Fluffy Japanese Shokupan Recipe in 5 Simple Steps
- Total Time: 2 hours 15 minutes
- Yield: 1 loaf (8-10 slices) 1x
- Diet: Vegetarian
Description
A simple recipe for Japanese Shokupan, a fluffy and milky white bread perfect for sandwiches or toast.
Ingredients
- 300g bread flour
- 25g sugar
- 5g salt
- 6g dry yeast
- 30g unsalted butter, softened
- 200ml whole milk, lukewarm
- 1 egg yolk (for egg wash, optional)
Instructions
- Mix flour, sugar, salt, and yeast in a bowl.
- Add lukewarm milk and knead until a dough forms.
- Incorporate softened butter and knead until smooth and elastic.
- Let the dough rise in a warm place until doubled in size (about 1 hour).
- Punch down the dough and divide it into equal parts.
- Shape each piece into a roll and place in a greased loaf pan.
- Let rise again until it fills the pan (about 40 minutes).
- Preheat oven to 180°C (356°F).
- Brush the top with egg wash if desired.
- Bake for 25-30 minutes until golden brown.
- Cool on a wire rack before slicing.
Notes
- Use a kitchen scale for precise measurements.
- Kneading time affects texture—aim for a smooth, stretchy dough.
- Cover dough with a damp cloth to prevent drying while rising.
- Adjust baking time based on oven performance.
- Prep Time: 1 hour 45 minutes
- Cook Time: 30 minutes
- Category: Bread
- Method: Baking
- Cuisine: Japanese
Nutrition
- Serving Size: 1 slice
- Calories: 150
- Sugar: 4g
- Sodium: 150mg
- Fat: 4g
- Saturated Fat: 2g
- Unsaturated Fat: 1g
- Trans Fat: 0g
- Carbohydrates: 25g
- Fiber: 1g
- Protein: 5g
- Cholesterol: 20mg