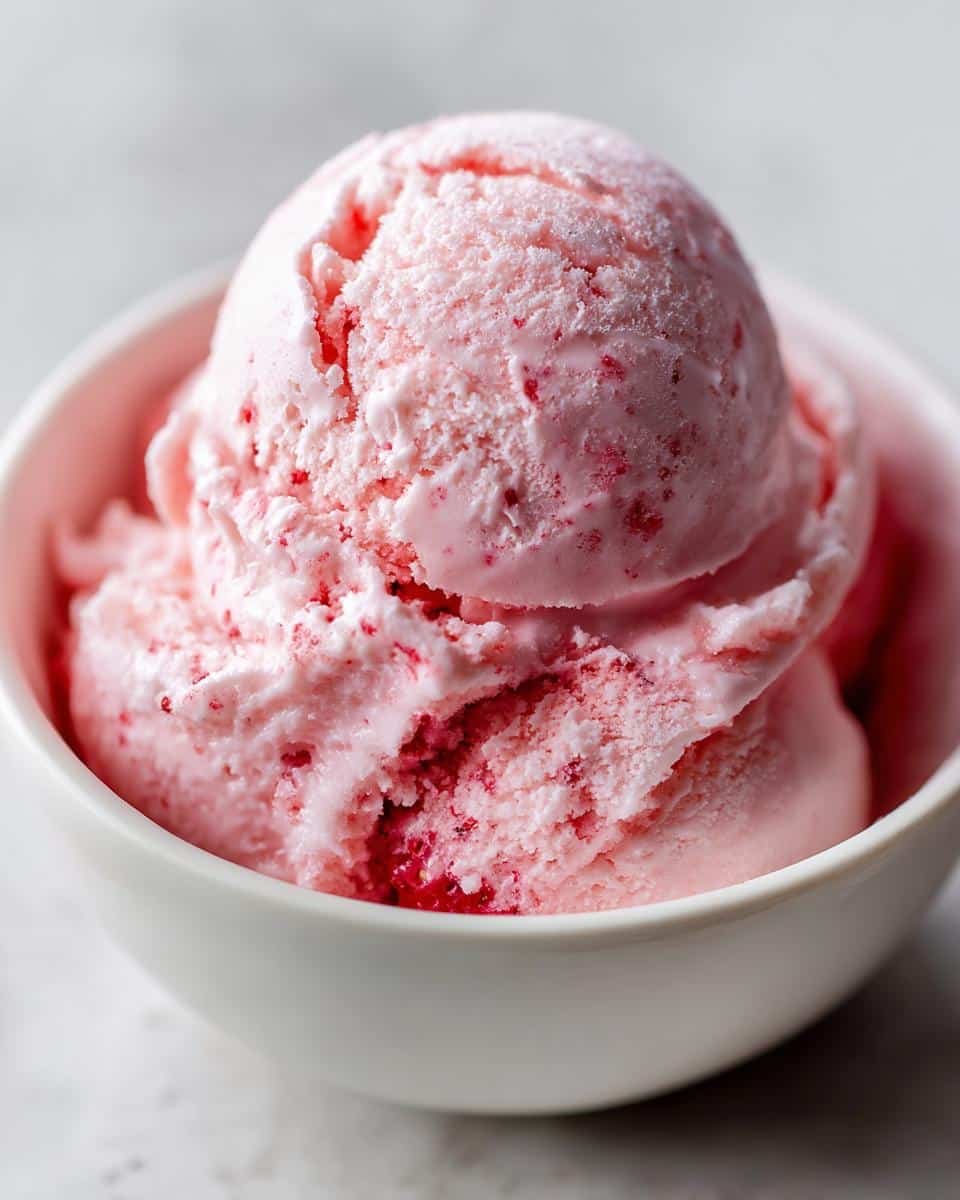
There’s nothing quite like the taste of homemade strawberry ice cream on a hot summer day. The moment you take that first creamy, fruity bite, it’s pure nostalgia – it takes me right back to childhood summers spent picking strawberries at my grandpa’s farm. I’d come home with stained fingers and a basket full of ripe berries, begging my mom to turn them into ice cream. That’s the magic of this recipe – it captures the bright, fresh flavor of real strawberries, no artificial colors or flavors needed. Just simple ingredients churned into something truly special.
Table of Contents
Table of Contents
Why You’ll Love This Homemade Strawberry Ice Cream

Trust me, this isn’t your average store-bought ice cream—every spoonful is packed with personality and love. Here’s why it’s a game-changer:
- Creamy dreamy texture: The combo of heavy cream and whole milk gives it that luxuriously smooth, rich mouthfeel you crave in homemade ice cream. No icy crystals here!
- Real strawberry flavor: Forget artificial pink stuff—we’re using fresh, juicy strawberries blended right in. You’ll taste summer in every bite.
- No weird ingredients: Just simple pantry staples you can pronounce. (And yes, that tiny pinch of salt makes all the difference!)
- Easier than you think: If you can blend and stir, you can make this. The ice cream maker does most of the work while you relax!
Ingredients for Homemade Strawberry Ice Cream
Here’s everything you’ll need to make this dreamy strawberry ice cream – and trust me, using the freshest ingredients makes all the difference:
- 2 cups fresh strawberries (hulled and sliced – about 1 pound of berries)
- 1 cup granulated sugar (I like to pack it lightly when measuring)
- 2 cups heavy cream (go for the good stuff – at least 36% milk fat)
- 1 cup whole milk (again, full-fat for that perfect creamy texture)
- 1 teaspoon pure vanilla extract (the real deal, not imitation!)
- 1/4 teaspoon fine sea salt (just a pinch to balance the sweetness)
See? Nothing fancy – just simple, quality ingredients that let the strawberries shine. Now let’s turn them into magic!
Equipment Needed
Gathering your tools before starting makes everything smoother (literally!). Here’s what you’ll need:
- A good blender or food processor for that perfect strawberry puree
- Ice cream maker (I love my old-school churn, but any model works!)
- A freezer-safe container with a tight lid
- Optional: Fine-mesh strainer if you want ultra-smooth ice cream
That’s it! Now let’s get churning.
How to Make Homemade Strawberry Ice Cream
Okay, let’s turn these simple ingredients into something magical! I’ll walk you through each step—it’s easier than you think, I promise. Just follow along and you’ll be scooping heavenly strawberry ice cream in no time.
Preparing the Strawberry Puree
First things first – those beautiful berries need to become a smooth, sweet puree. Toss your hulled and sliced strawberries into the blender with the sugar. Now here’s my secret: let them sit for about 5 minutes before blending. The sugar draws out the juices, making everything blend up smoother.
Blend until it’s completely smooth – about 30-45 seconds should do it. If you’re after ultra-smooth ice cream (no tiny seed bits), now’s the time to strain it through a fine-mesh sieve. But honestly? I love the rustic texture with all the seeds – tastes more like real strawberries to me!
Mixing the Ice Cream Base
In a large bowl, whisk together the heavy cream, whole milk, vanilla, and that all-important pinch of salt. Don’t skip the salt! It might seem odd, but it makes the strawberry flavor pop like crazy.
Now gently fold in your strawberry puree until everything is beautifully combined. You’ll get this gorgeous pink mixture that already smells like summer. Pro tip: If you have time, chill this mixture for an hour before churning – it helps create that perfect creamy texture.
Churning and Freezing
Pour your mixture into your ice cream maker and let it work its magic! My old hand-crank takes about 25 minutes, but electric ones usually need 20-30 minutes. You’ll know it’s ready when it’s the consistency of soft-serve.

No ice cream maker? No problem! Pour the mixture into a shallow dish and pop it in the freezer. Every 30 minutes for about 4 hours, give it a good stir to break up ice crystals. It’s a bit more work, but still totally worth it.
Transfer to a freezer-safe container and let it firm up for at least 4 hours (if you can wait that long!). Then grab your spoon and dig in to strawberry heaven!
Tips for Perfect Homemade Strawberry Ice Cream
Want pro-level results every time? Here are my tried-and-true secrets:
- Strain for smoothness: Press that puree through a fine-mesh sieve if you want silky texture – but I actually love the rustic charm of leaving the seeds in!
- Chill before churning: Letting the mixture cool in the fridge for an hour helps create that dreamy creamy consistency we all crave.
- Stay diligent with manual freezing: If you’re going the no-churn route, set a timer to stir every 30 minutes – it prevents icy chunks and keeps everything smooth.
Little tricks make all the difference between good ice cream and “oh wow” ice cream!
Variations and Serving Suggestions
Oh, the possibilities! This strawberry ice cream is delicious all on its own, but sometimes I love to jazz it up. Try folding in dark chocolate chunks during the last few minutes of churning – the combo is heavenly. For a classic summer dessert, serve it over warm shortcake or alongside fresh berry pie. And if you’re feeling fancy, a drizzle of balsamic reduction takes it to a whole new level of deliciousness!
Storage and Reheating
Your homemade strawberry ice cream will keep beautifully in an airtight container for about 2 weeks – if it lasts that long in your freezer! When ready to serve, let it sit at room temperature for 5-10 minutes to soften slightly for perfect scoopability. No reheating needed – this treat is best enjoyed cold!
Nutritional Information
Just a quick note – these nutritional values are estimates since exact amounts can vary based on your specific ingredients and brands. But rest assured, you’re treating yourself to real, wholesome ingredients with this homemade strawberry ice cream!
Frequently Asked Questions
Can I use frozen strawberries? You absolutely can! Just thaw them completely first and drain any excess liquid. The flavor will still be fantastic, though fresh berries give that bright, summery taste I love. If using frozen, you might need an extra tablespoon of sugar since they’re less sweet when frozen at peak ripeness.
How long does homemade strawberry ice cream keep? In an airtight container, it’ll stay delicious for about 2 weeks in the freezer. After that, it’s still safe to eat but might start developing ice crystals. Pro tip: Press parchment paper directly on the surface before freezing to prevent freezer burn!
Why add salt to sweet ice cream? That pinch of salt is magic! It doesn’t make the ice cream salty—it actually enhances all the other flavors, making the strawberries taste even more vibrant and the cream richer. Think of it like adding salt to chocolate chip cookies – it brings everything into perfect balance.
For more delicious recipes, check out our recent posts and follow us on Pinterest!
Print
Creamy Homemade Strawberry Ice Cream in Just 4 Steps
- Total Time: 4 hours 15 mins
- Yield: 6 servings 1x
- Diet: Vegetarian
Description
A refreshing homemade strawberry ice cream recipe perfect for summer.
Ingredients
- 2 cups fresh strawberries, hulled and sliced
- 1 cup granulated sugar
- 2 cups heavy cream
- 1 cup whole milk
- 1 teaspoon vanilla extract
- 1/4 teaspoon salt
Instructions
- Puree strawberries and sugar in a blender until smooth.
- In a large bowl, whisk together cream, milk, vanilla extract, and salt.
- Stir in strawberry puree until fully combined.
- Pour mixture into an ice cream maker and churn according to manufacturer’s instructions.
- Transfer to a freezer-safe container and freeze for at least 4 hours before serving.
Notes
- For a smoother texture, strain the strawberry puree before mixing.
- If you don’t have an ice cream maker, pour the mixture into a shallow dish and freeze, stirring every 30 minutes until firm.
- Prep Time: 15 mins
- Cook Time: 0 mins
- Category: Dessert
- Method: Churned
- Cuisine: American
Nutrition
- Serving Size: 1/2 cup
- Calories: 250
- Sugar: 25g
- Sodium: 50mg
- Fat: 15g
- Saturated Fat: 9g
- Unsaturated Fat: 5g
- Trans Fat: 0g
- Carbohydrates: 28g
- Fiber: 1g
- Protein: 3g
- Cholesterol: 50mg