Making homemade Lunchables has become a go-to solution for busy parents, health-conscious eaters, and anyone who enjoys a simple, fun meal prep option. This article breaks down how to build your own kid-friendly lunch packs using fresh ingredients, budget-savvy tips, and creative inspiration. Whether you’re packing for school, a day at the park, or prepping easy lunches for work, you’ll love how flexible and tasty homemade Lunchables can be.
Homemade Lunchables: Simple, Healthy & Fun DIY Lunch Ideas
Table of Contents
Lunchbox Magic: Where It All Began
Back when I was a kid, unwrapping a store-bought Lunchable felt like opening a tiny treasure chest. There was something exciting about choosing your own cracker, stacking meats and cheese, and having a little dessert tucked in the corner. Fast-forward to today, and I’ve discovered the joy in recreating that same magic—only fresher and better—for my own family with homemade Lunchables.
My daughter especially loves being part of the process. She picks her favorite fruit, helps cut cheese into little shapes, and always asks if she can sneak in one of our cereal bars as a surprise treat. These little boxes aren’t just meals—they’re mini experiences packed with care.
The best part? Homemade Lunchables are incredibly customizable. You control the ingredients, portions, and freshness. There’s no mystery meat or preservatives—just real, simple food you can feel good about. Whether I’m filling a bento-style box with turkey and cheddar or throwing in some crispy cottage cheese treats, it’s always something my kids (and let’s be honest—me too) look forward to opening.
Over time, these lunchboxes became a weekly routine. A mix of protein, fruit, veggies, and crunch made the perfect balanced midday fuel. It’s faster than packing sandwiches and more exciting than leftovers. Plus, when you add fun bites like homemade cheeze-its, every bite feels like a snack party.
Simple Ingredients That Make a Big Impact
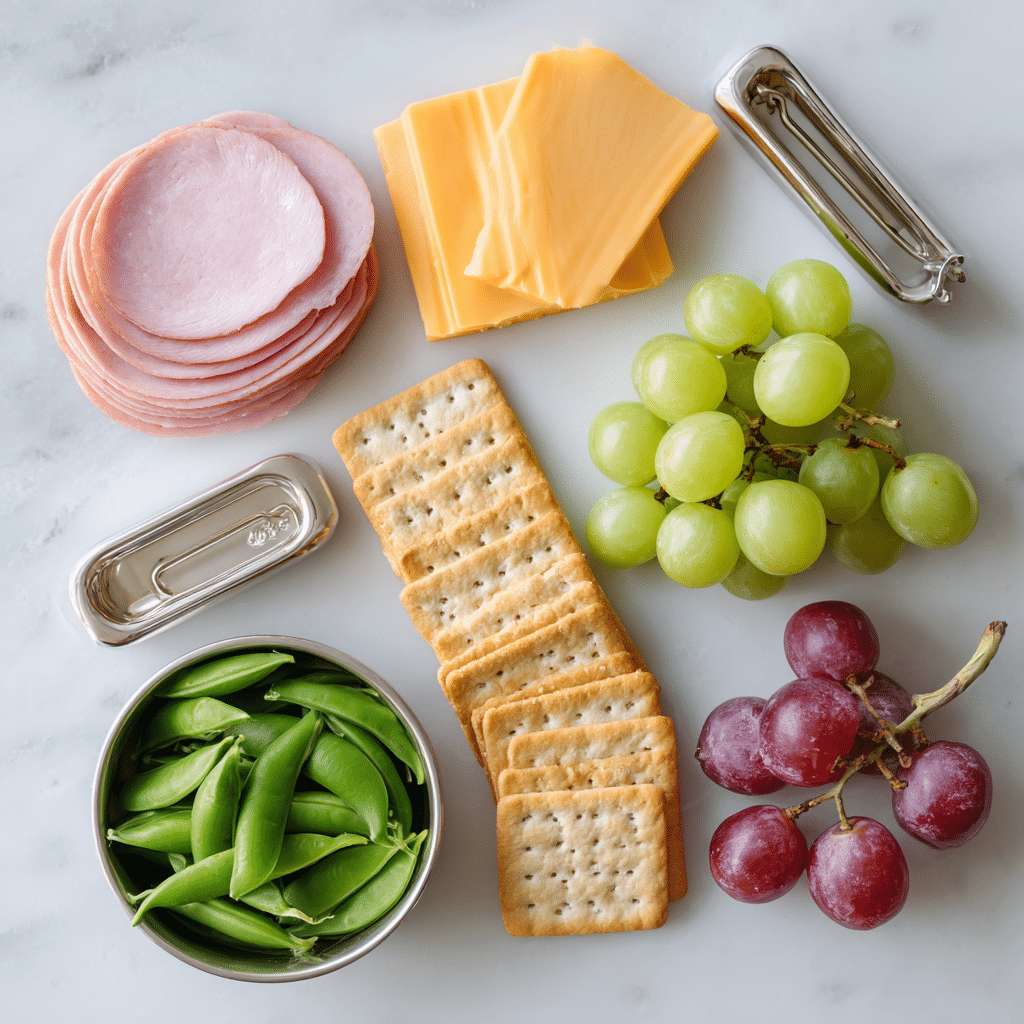
The beauty of homemade Lunchables lies in how easy they are to assemble with what you already have at home. A good Lunchable formula usually includes a protein, cheese, fresh fruit or veggies, and something crunchy. Start with classics like turkey, ham, or sliced chicken. Pair it with cubes or slices of cheddar, Swiss, or Colby Jack.
From there, add in colorful, kid-approved produce like baby carrots, grapes, or snap peas. We love sugar snap peas for their crunch, and grapes are naturally sweet without any added sugar. For a crunchy side, go for crackers that hold up well like multigrain rounds or buttery squares. A batch of cinnamon sugar banana chips adds a sweet, crispy element kids can’t resist.
Cheese and meats can be pre-sliced or cut into fun shapes with mini cookie cutters. This turns snack time into play time—especially for young kids. Toss in a treat like air fryer apple pie bombs to make lunchtime feel like a reward.
Balanced Nutrition for Busy Days
It’s easy to overlook how well-balanced a homemade Lunchable can be. You’ve got protein from deli meats and cheese, fiber from veggies, natural sugar from fruits, and carbs from the crackers. Add in a calcium-rich dairy option or a hard-boiled egg for an extra nutrient boost.
Here’s a helpful guide:
| Component | Examples |
|---|---|
| Protein | Ham, Turkey, Chicken, Eggs |
| Cheese | Cheddar, Colby Jack, Swiss |
| Veggies | Carrots, Snap Peas, Cherry Tomatoes |
| Fruit | Grapes, Berries, Banana Slices |
| Crunch | Crackers, [Homemade Cheeze-Its](https://recipeslia.com/homemade-cheeze-its/), Pretzels |
Pack everything in a divided container and your homemade Lunchables are ready to go. These quick kits are just as convenient as the store version—but crammed with fresh, real food.
Keeping Everything Fresh and Organized
One of the biggest perks of homemade Lunchables is how easy they are to prep in batches. All you need are a few reliable containers to keep everything neat and fresh. Bento boxes with compartments work perfectly, especially when packing fruits and veggies separately from crackers to avoid sogginess. Divided containers also make food look more appealing to picky eaters.
When I prep Lunchables for my kids, I fill two or three containers at once and stack them in the fridge. It saves time, cuts morning stress, and guarantees lunch is already ready to grab and go. To keep crackers crisp, I always pack them separately in a small snack bag and tuck them into the lunchbox right before leaving.
For a fun twist, try wrapping up extras like zucchini cheddar biscuits or slipping in a bite-sized treat like frozen banana snickers. It keeps lunchtime exciting and varied without adding more work.
Shelf Life and Food Safety Tips
Homemade Lunchables can last up to two days in the fridge when stored properly. Use airtight containers to lock in freshness and keep flavors from mingling. Make sure to wash all produce thoroughly before packing and pat dry fruits or veggies like grapes and snap peas to reduce excess moisture.
When packing for school, consider using an insulated lunch bag with an ice pack to keep contents cool and safe until lunchtime. This is especially important when including dairy or meats. If you’re using hard-boiled eggs, peel them before packing and eat within 24 hours for best texture and safety.
By sticking to a quick routine and using fresh ingredients, you can easily keep your homemade Lunchables delicious and safe all week long.
Fun Lunchable Combos for Every Taste
The best part about homemade Lunchables is how flexible they are. You’re not limited to ham and cheese—this is your chance to mix it up and keep things interesting. Try a Mediterranean version with pita wedges, hummus, olives, and cucumber slices. Or go for a breakfast box with mini pancakes, berries, and yogurt.
Need a protein-packed idea for older kids or adults? Fill a container with slices of grilled chicken, sharp cheddar, raw veggies, and a container of ranch dip. Add something sweet like crispy cottage cheese treats or cereal bars for a balanced and satisfying meal.
For dessert options, swap out sugary snacks with something fun and nutritious—think banana chips with cinnamon or even air fryer apple pie bombs. You’ll never go back to the store-bought version again.
Make It a Family Activity
Getting kids involved in making their own lunchables turns meal prep into quality time. Let them choose a fruit, pick their cheese, or use small cutters to shape the food. This builds independence and teaches healthy food choices—without nagging.
It’s also a terrific way to use leftovers creatively. Have leftover roasted veggies or grilled chicken? Toss them into tomorrow’s box. That little bit of variety keeps things exciting. If your little one helped make it, they’re way more likely to eat it.
Whether you’re prepping for picky eaters or trying to simplify your weekday routine, homemade Lunchables deliver big flavor and fun in every bite. They’re quick to assemble, affordable, and totally customizable. And the best part? Everyone actually looks forward to lunch.
Print
Homemade Lunchables: Simple, Healthy & Fun DIY Lunch Ideas
- Total Time: 10
- Yield: 2 servings 1x
Description
These Homemade Lunchables are a fun, healthy lunch idea perfect for school or work. Packed with protein, fruit, veggies, and crunchy snacks.
Ingredients
4 oz deli sliced ham
4 oz cheddar cheese (or 4 slices)
1/2 cup grapes
1/2 cup sugar snap peas
12 crackers
Instructions
1. Divide the ham, cheese, grapes, and peas evenly between two containers.
2. Use a bento or divided lunchbox to keep items separate.
3. Seal the containers and refrigerate. They stay fresh for up to 2 days.
4. Pack crackers separately and add the day you plan to eat.
Notes
Use mini cookie cutters to make food shapes more fun.
Swap grapes for berries, and cheddar for Swiss if preferred.
- Prep Time: 10
- Category: Lunch
- Method: No-Cook
- Cuisine: American
Nutrition
- Serving Size: 1 lunchbox
- Calories: 280
- Sugar: 6g
- Sodium: 470mg
- Fat: 12g
- Saturated Fat: 5g
- Unsaturated Fat: 5g
- Trans Fat: 0g
- Carbohydrates: 24g
- Fiber: 3g
- Protein: 15g
- Cholesterol: 35mg
FAQ: Homemade Lunchables
What do you put in homemade Lunchables?
Start with a protein (like turkey, ham, or eggs), cheese, fresh fruit, veggies, and something crunchy like crackers. You can also add dips or treats to make it more exciting.
How long do homemade Lunchables last?
When stored in airtight containers in the fridge, they stay fresh for up to 2 days. Add crackers the morning of to keep them crisp.
Are homemade Lunchables healthier than store-bought?
Yes. You control the ingredients—no preservatives, lower sodium, and no processed additives. Homemade versions are usually fresher and more nutritious.
What crackers work best for Lunchables?
Choose firm crackers that won’t get soggy. Whole grain, buttery, or round wheat crackers are all great. Or try homemade Cheeze-Its for extra flavor.
Conclusion: Why Homemade Lunchables Are a Game-Changer
Homemade Lunchables aren’t just a trend—they’re a practical, fun, and healthier way to tackle everyday lunches. Whether you’re packing for school, work, or a picnic, these easy little boxes let you put variety and nutrition first without sacrificing convenience.
From fresh produce to hand-picked crackers and cheese, every bite is thoughtful and customizable. And when you add in delicious sides like zucchini cheddar biscuits or a sweet like frozen banana snickers, you’re creating lunches people look forward to opening.
Quick to prep, endlessly flexible, and totally satisfying—Homemade Lunchables truly hit the sweet spot.