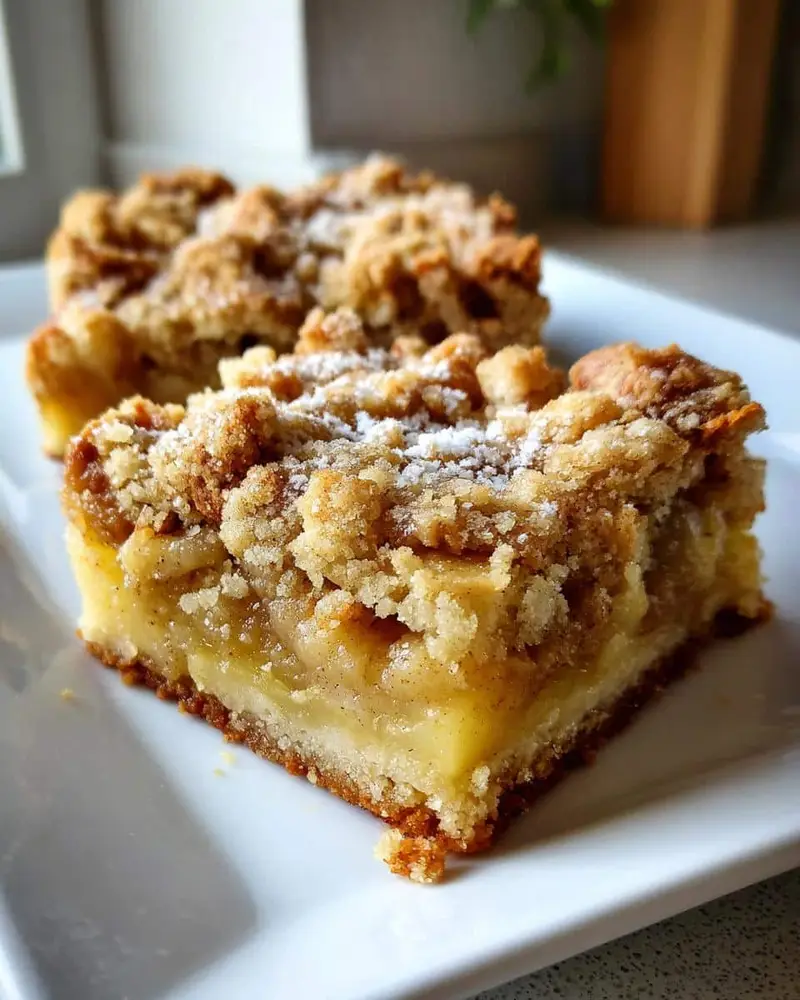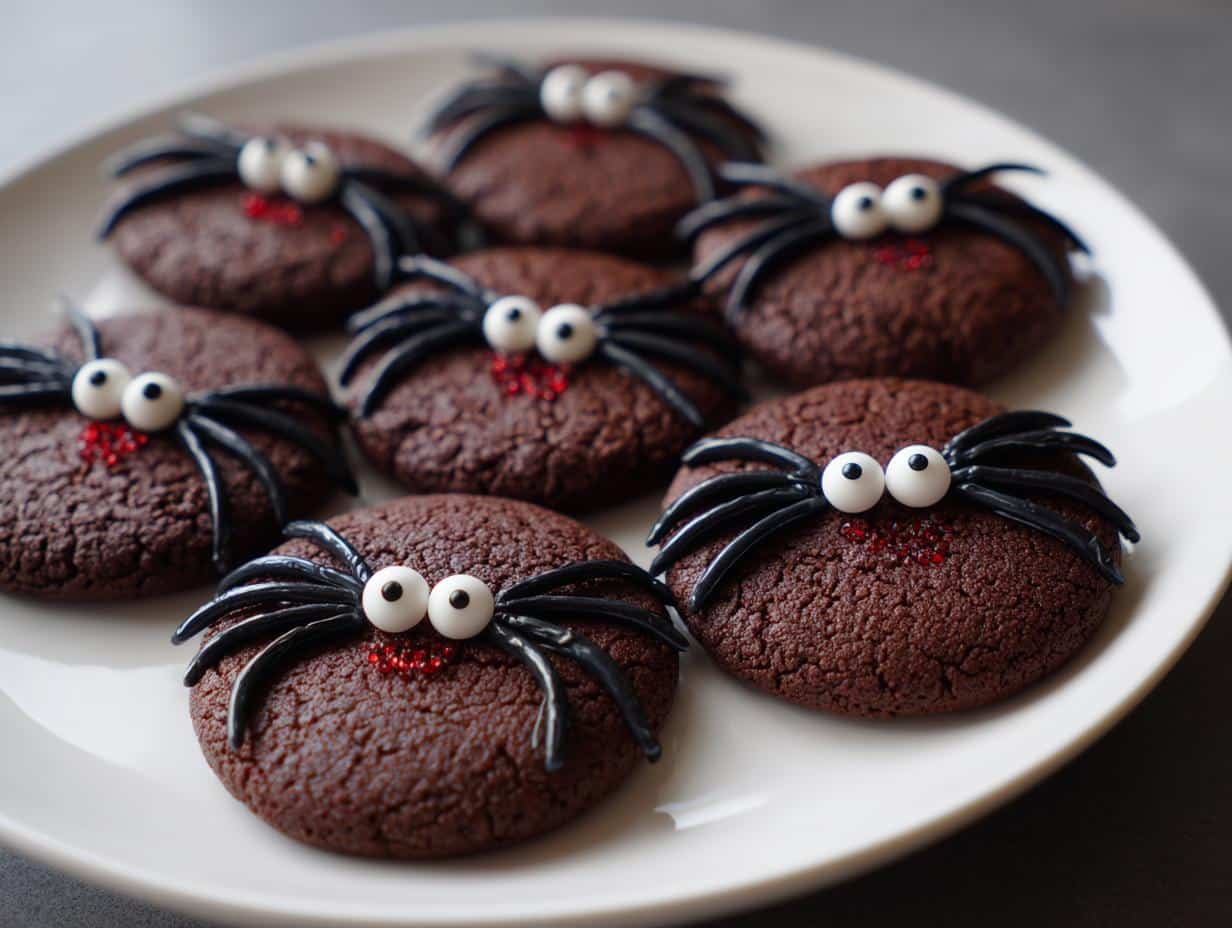
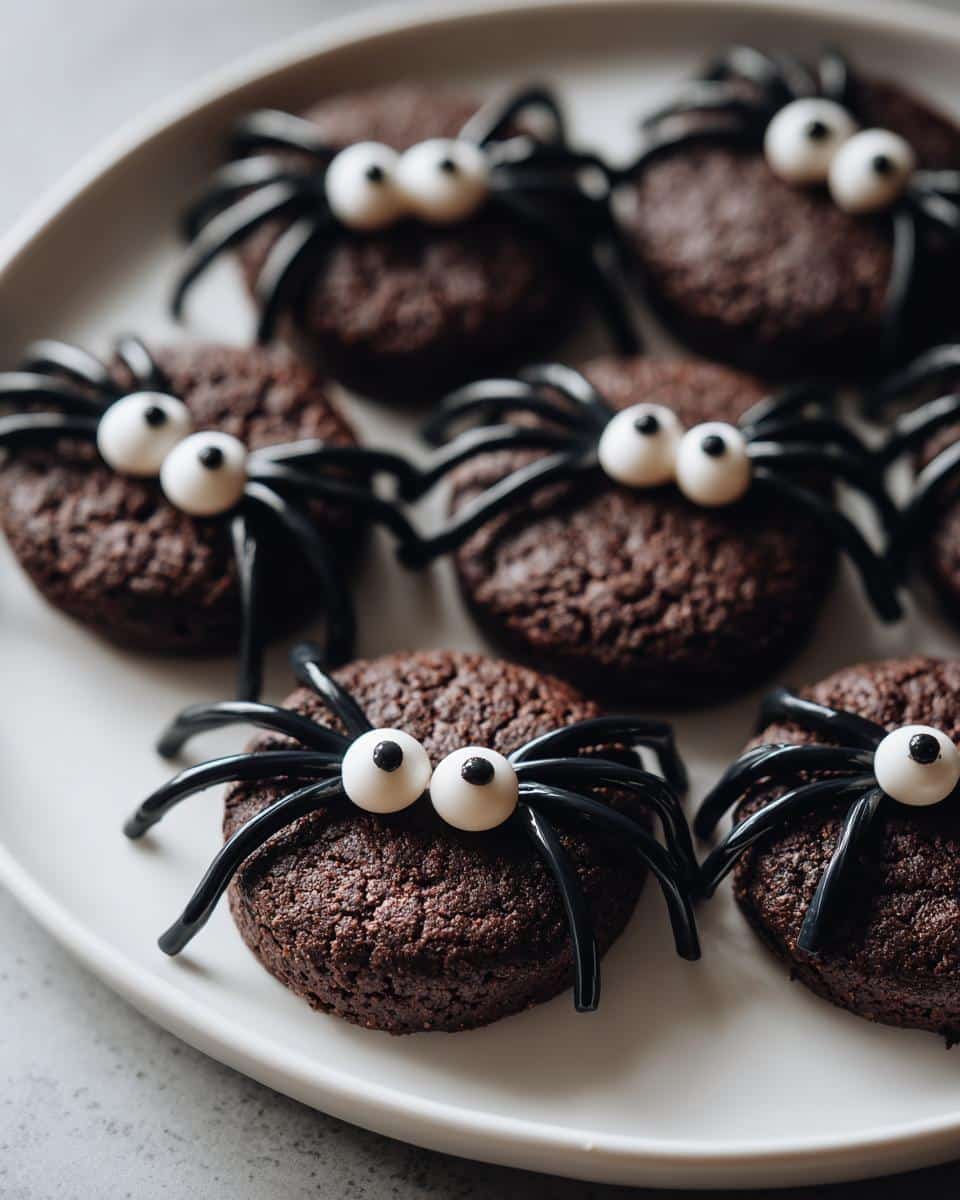
Oh my gosh, you’ve got to try these Halloween spider cookies! They’re the perfect mix of spooky and sweet, and trust me, they’re way easier to make than they look. Every Halloween, my kitchen turns into a mini bakery filled with these creepy-cute treats—the kids go wild for them, and they’re always the first to disappear at parties. The best part? You don’t need fancy skills to pull them off. Just a simple chocolate cookie base, some candy eyes, and a little black gel for those wiggly spider legs. Let’s get baking—these little guys are waiting to crawl onto your dessert table!
Table of Contents
Table of Contents
Why You’ll Love These Halloween Spider Cookies
These cookies are an absolute blast—here’s why:
- Super simple: Even if baking isn’t your thing, you can nail these spider cookies on the first try!
- Kid-approved: Little helpers love decorating—just watch those giggles when the spider legs start squiggling!
- Party favorite: They look fancy but take barely any effort—perfect for spooky potlucks or classroom treats.
- Endless fun: Get creative with the piping gel—make ’em creepy, silly, or even give them little “hair bows” (why not?).
Seriously, these cookies are like a Halloween magic trick—easy for you, unforgettable for everyone else!
Ingredients for Halloween Spider Cookies
Here’s everything you’ll need to whip up these adorable (and slightly creepy) spider cookies. I’ve learned the hard way—measurements matter with baking, so let’s get it right from the start!
- 1 cup all-purpose flour – Spoon and level it, don’t scoop straight from the bag!
- ½ cup unsweetened cocoa powder – The darker, the spookier (and tastier).
- ½ tsp baking soda – Not baking powder—they’re not the same!
- ¼ tsp salt – Just a pinch to balance the sweetness.
- ½ cup unsalted butter, softened – Leave it out for 30 minutes—it should dent gently when pressed.
- ¾ cup granulated sugar – Pack it lightly into your measuring cup.
- 1 large egg – Crack it into a separate bowl first (no shell surprises!).
- 1 tsp vanilla extract – Pure vanilla makes all the difference.
- 24 chocolate sandwich cookies (like Oreos) – The spider “bodies”—no substitutions here!
- 48 candy eyes – Because spiders need to see their prey (or your guests).
½ cup black decorating gel – For those gloriously goopy legs—Wilton’s works great.
Pro tip: Set everything out before you start. Nothing’s worse than realizing your butter’s still rock-hard when you’re ready to bake!
Equipment Needed for Halloween Spider Cookies
No fancy gadgets required—just grab these basics from your kitchen, and you’re all set to make your spider army crawl to life! Here’s what I always have ready:
- Mixing bowls – One for dry, one for wet ingredients (or be lazy like me and wash one in between).
- Baking sheet – Line it with parchment paper unless you enjoy scrubbing cookie remnants.
- Hand mixer – Or strong arms and a wooden spoon if you need a workout.
- Piping bag or ziplock – Snip the tiniest corner for spider-leg precision (no fancy tips needed!).
- Measuring cups/spoons – Eyeballing leads to cookie disasters—ask me how I know!
That’s it! Now let’s make some edible arachnids…
How to Make Halloween Spider Cookies
Okay, let’s turn those ingredients into spooky masterpieces! Follow these steps, and you’ll have a batch of creepy-crawly cookies in no time. Trust me—I’ve made these so often, I could do it in my sleep (though maybe not after watching too many horror movies).
1. Prep the dough
First, preheat your oven to 350°F (175°C)—no sneaky shortcuts here, or your spiders will bake unevenly! Line your baking sheet with parchment paper (lifesaver for easy cleanup). In one bowl, whisk together the flour, cocoa powder, baking soda, and salt. In another bowl, cream the softened butter and sugar until it’s light and fluffy—about 2 minutes with a mixer. Beat in the egg and vanilla until just combined. Now, gradually add the dry ingredients, mixing until the dough comes together. It’ll be thick and fudgy—perfect for shaping!
2. Shape and bake
Roll the dough into 1-inch balls (roughly the size of a walnut) and place them on your prepared baking sheet, about 2 inches apart. Gently flatten each ball slightly with your palm—they’ll puff a bit but shouldn’t spread too much. Bake for 8–10 minutes. The cookies will look soft when they come out (they’ll firm up as they cool), so resist the urge to overbake! Let them cool completely on the sheet—warm cookies plus gel equals a sticky mess.
3. Decorate your spiders
Time for the fun part! Pipe a tiny dab of black gel onto the back of each candy eye and stick two onto each cookie—go for a cute or creepy vibe. Then, using your piping bag (or a ziplock with the tiniest corner snipped), draw four wiggly legs on each side of the cookie, radiating from the center. Pro tip: If your gel is too thick, warm the closed bag in your hands for a few seconds to loosen it. Let the gel set for at least 30 minutes before stacking or serving—unless you want spider leg smudges everywhere!

And voilà! You’ve just created a batch of Halloween magic. Watch those little faces light up when they spot these edible arachnids—just don’t be surprised if they “accidentally” lose a leg or two during taste-testing!
Tips for Perfect Halloween Spider Cookies
After years of making these spooky treats, I’ve picked up some tricks to guarantee your spider cookies turn out frightfully perfect every time:
- Avoid cracks: Don’t roll your dough balls too firmly—gentle shaping prevents those unsightly spider “scars.”
- Gel alternatives: No black gel? Melt dark chocolate chips with a teaspoon of coconut oil for piping—it sets beautifully.
- Kid-friendly decorating: Let little hands place the eyes while you handle the piping bag. For extra safety, put gel in small squeeze bottles with wide tips.
- Speed setting: Pop decorated cookies in the fridge for 15 minutes if you’re in a hurry—the legs will firm up faster.
- Storage trick: Layer cookies between parchment paper to prevent leg smudging when stacking.
Remember—even “imperfect” spiders look delightfully creepy, so don’t stress over every wobbly leg!
Variations for Halloween Spider Cookies
Want to mix things up? Here are some fun spins on our classic spider cookies:
- Ghostly spiders: Swap chocolate cookies for vanilla sugar cookies—pipe white chocolate legs and tiny “boo!” faces.
- Sparkly critters: Add edible glitter to the black gel before piping for shimmering, party-ready spiders.
- Peanut butter bodies: Use peanut butter sandwich cookies instead—just warn guests about nuts!
- Zombie edition: Drag red gel downward from the eyes for bloody “zombie spider” vibes.
The best part? No rules—get as creative (or silly) as you want!
How to Store Halloween Spider Cookies
These little critters are best kept in an airtight container—they’ll stay fresh and creepy for up to 3 days at room temperature. If your kitchen runs warm (or you added cream cheese decorations), pop them in the fridge—just let them come to room temp before serving so the legs don’t stiffen up too much. Pro tip: Separate layers with parchment paper to prevent spider leg casualties! For longer storage, freeze undecorated cookies up to a month—thaw and add the eyes and legs when you’re ready to scare (I mean, serve).
Halloween Spider Cookies Nutritional Information
Each spider cookie packs about 120 calories, with 5g fat (3g saturated), 18g carbs, and 1g fiber. The sugar comes mainly from the cookie base and decorating gel—hey, it’s Halloween, live a little! Remember, these are estimates—actual numbers may vary slightly based on your specific ingredients and how enthusiastically you pipe those legs. Enjoy your spooky treats guilt-free… mostly!
FAQ About Halloween Spider Cookies
Got questions about these eight-legged treats? Here are answers to the ones I get asked most often—usually while covered in black gel and giggling with sugar-hyped kids!
Can I use store-bought cookie dough instead?
Absolutely! Save time with pre-made chocolate dough—just roll, bake, and decorate. But honestly? The homemade version tastes richer, and the dough’s sturdier for holding those spider legs. Your call!
How long do decorated spider cookies last?
About 3 days in an airtight container at room temp. The gel legs might soften slightly, but they’ll still taste delicious. Pro tip: If your kitchen’s humid, stash them in the fridge to keep the legs crisp.
Can I freeze these creepy cookies?
Yes—but freeze the undecorated baked cookies first. Thaw at room temp, then add eyes and legs. Frozen decorated cookies turn into a goopy spider apocalypse (learned that the hard way).
Help! My gel legs are too thick/thin!
Too thick? Warm the closed gel tube in your hands for a minute. Too runny? Chill it briefly or add a pinch of powdered sugar to thicken. Spider legs should be wiggly, not watery!
Are these okay for school parties?
Check your school’s nut policy first—some sandwich cookies contain traces. For allergies, swap candy eyes for drawn-on icing dots. Every kid deserves spooky treats!
For more fun recipes and ideas, check out our Pinterest page!
Print
Spooky Sweet Halloween Spider Cookies in Just 30 mins
- Total Time: 30 mins
- Yield: 24 cookies 1x
- Diet: Vegetarian
Description
Spooky and fun Halloween spider cookies that are easy to make. Perfect for parties or a festive treat.
Ingredients
- 1 cup all-purpose flour
- 1/2 cup unsweetened cocoa powder
- 1/2 tsp baking soda
- 1/4 tsp salt
- 1/2 cup unsalted butter, softened
- 3/4 cup granulated sugar
- 1 large egg
- 1 tsp vanilla extract
- 24 chocolate sandwich cookies (like Oreos)
- 48 candy eyes
- 1/2 cup black decorating gel
Instructions
- Preheat oven to 350°F (175°C). Line a baking sheet with parchment paper.
- In a bowl, whisk flour, cocoa powder, baking soda, and salt.
- Cream butter and sugar until light and fluffy. Beat in egg and vanilla.
- Gradually mix in dry ingredients until combined.
- Roll dough into 1-inch balls and place on baking sheet. Flatten slightly.
- Bake for 8-10 minutes. Let cool completely.
- Attach two candy eyes to each cookie with black gel.
- Pipe spider legs with black gel from the center outward.
- Let gel set before serving.
Notes
- Store in an airtight container for up to 3 days.
- Use melted chocolate if you don’t have black gel.
- Kids can help decorate the cookies.
- Prep Time: 20 mins
- Cook Time: 10 mins
- Category: Dessert
- Method: Baking
- Cuisine: American
Nutrition
- Serving Size: 1 cookie
- Calories: 120
- Sugar: 10g
- Sodium: 50mg
- Fat: 5g
- Saturated Fat: 3g
- Unsaturated Fat: 2g
- Trans Fat: 0g
- Carbohydrates: 18g
- Fiber: 1g
- Protein: 2g
- Cholesterol: 15mg