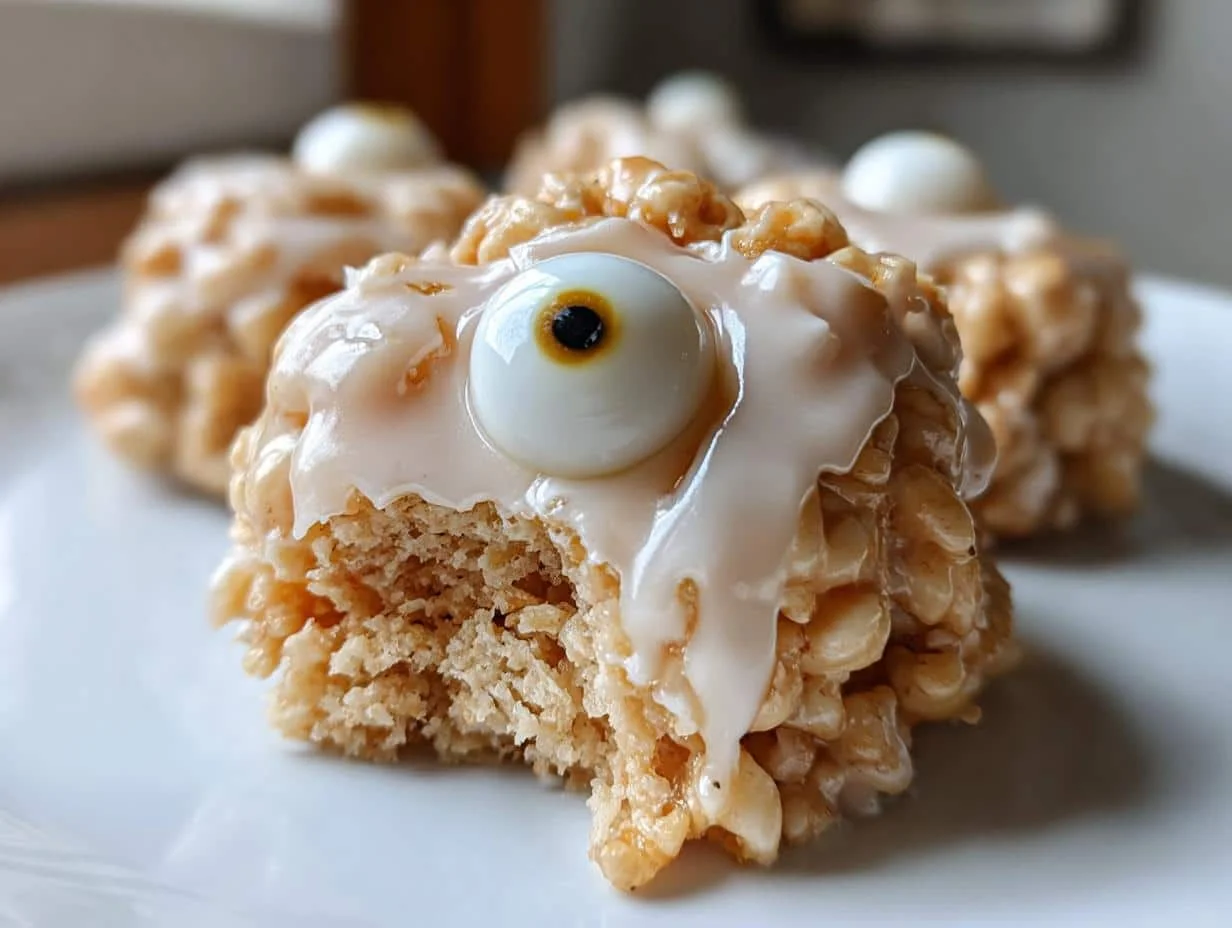
Let me tell you about the Halloween treat that saved my sanity last year—Halloween eyeball no-bake cookies! Picture this: It’s 8 PM on October 30th, my kids are buzzing with costume ideas, and I suddenly remember I promised to bring treats to their classroom party. Cue panic. But these cookies? Five ingredients, zero baking, and those creepy candy eyeballs make them instant Halloween magic. By the time my little werewolf and zombie finished arguing over who got to press the eyeballs in, we had two dozen spooky snacks ready to haunt the teacher’s lounge. The best part? They’re so easy, you’ll have time to actually enjoy your own Halloween fun instead of slaving over a hot oven.
Table of Contents
Table of Contents
Why You’ll Love These Halloween Eyeball No-Bake Cookies
Trust me, these cookies are a game-changer for Halloween. Here’s why they’ve become my go-to spooky treat:
- No baking, no stress: Melt, mix, and chill—that’s it! Perfect for when you’re juggling costumes, decorations, and sugar-hyped kids.
- Instant Halloween vibes: Those candy eyeballs staring back at you? Pure festive magic with zero artistic skill required.
- Kid-approved fun: Little hands love rolling the dough and pressing in the eyeballs (just try not to eat all the decorations first).
- Secretly wholesome: With oats and peanut butter, you can almost pretend they’re not pure sugar bombs. Almost.
Bonus? The whole batch disappears faster than a ghost in the night—every single time.
Ingredients for Halloween Eyeball No-Bake Cookies
Here’s the beautiful part – you probably have most of this in your pantry right now! These eyeball cookies come together with just a handful of simple ingredients:
- 1 cup white chocolate chips – The melty glue holding everything together (good-quality chips melt smoother!)
- 1/2 cup creamy peanut butter – Natural PB works but may be looser; Skippy-style gives perfect texture
- 1 1/2 cups quick oats – Not instant! The slightly chewy texture makes these cookies
- 1/4 cup powdered sugar – Sift if lumpy for smooth mixing
- 1 tsp pure vanilla extract – My secret flavor booster
- 24 candy eyeballs – The spooky stars of the show (find them at craft stores or online)
PS: Allergic to nuts? Swap peanut butter for sunflower seed butter – just add an extra pinch of salt to balance the sweetness.
Equipment You’ll Need
Don’t worry—no fancy gadgets required here! You’ll just need:
- A microwave-safe bowl (glass works best for even melting)
- Measuring cups and spoons
- A sturdy spoon or spatula for mixing
- Parchment paper (trust me, this makes cleanup a breeze)
- An airtight container for storage—if they last that long!
That’s it! No mixer, no baking sheets—just simple tools you already own. Now go make some spooky magic!
How to Make Halloween Eyeball No-Bake Cookies
Alright, let’s get to the fun part—making these creepy-cute cookies! I’ve made this recipe dozens of times (mostly while dodging little fingers trying to steal ingredients), and I’ll walk you through every step. The process is simple, but a few tricks make all the difference.
Step 1: Melt the White Chocolate
First, grab that microwave-safe bowl and dump in your white chocolate chips. Here’s my golden rule: microwave in 30-second bursts, stirring well after each one. Why? Because white chocolate burns if you stare at it wrong! When it’s almost melted but still has a few lumps, stop—the residual heat will finish the job as you stir. You want it smooth but not scorching hot. Pro tip: If your chocolate seizes up, add a tiny splash of vegetable oil and stir like crazy to save it.
Step 2: Mix the Ingredients
Now, stir in the peanut butter while the chocolate’s still warm—it blends easier this way. Next comes the oats, powdered sugar, and vanilla. Mix until every oat is coated and the dough holds together when pressed. If it seems too dry, add another tablespoon of PB. Too wet? More oats to the rescue! The texture should be like playdough—easy to roll but not sticky. Taste-testing is mandatory here (quality control, obviously).
Step 3: Shape and Decorate
Scoop tablespoon-sized portions—I use a cookie scoop for speed, but two spoons work fine. Roll between your palms to form balls, then flatten slightly so the eyeballs won’t roll off. Now the best part: press candy eyeballs into the center while the cookies are still slightly warm; they’ll adhere better. Get creative—wonky eyes make them extra spooky! Just try not to eat all the decorations first (no judgement if you do).
Step 4: Chill and Serve
Pop those little eyeball monsters in the fridge for at least 20 minutes—this firms them up so they don’t fall apart when handled. The wait is torture, I know! But it’s crucial. Serve chilled for the best texture, or let them sit out 5 minutes if you prefer softer cookies. Watch them disappear faster than a ghost when the kids (and let’s be honest, adults too) spot them!
Tips for Perfect Halloween Eyeball Cookies
After making these spooky treats more times than I can count, here are my foolproof tricks for eyeball cookie success:
- Line your tray with parchment – No sticking, no mess, and you can slide the whole batch into the fridge at once.
- Wear food-safe gloves if rolling by hand – The dough won’t stick to your fingers, and your cookies stay perfectly round.
- Chill the dough 10 minutes first if it’s too soft – Especially helpful on warm days when the peanut butter gets extra gooey.
- Double the eyeballs for extra creep factor – Some of mine have three eyes… because why not?
Remember – imperfect cookies just look more “haunted house approved” anyway!
Variations and Substitutions
Oh, the beauty of this recipe? You can tweak it a dozen ways and still end up with deliciously creepy cookies! Here are my favorite riffs:
- Nut-free? Swap peanut butter for sunflower seed butter—it has the same sticky texture and adds a slightly nutty flavor. Just add an extra pinch of salt to balance the sweetness.
- Dairy-free? Use vegan white chocolate chips (they melt just as beautifully) and skip the powdered sugar or use a dairy-free alternative.
- Extra protein boost: Stir in a scoop of vanilla protein powder with the oats—my fitness-obsessed niece swears by this version!
- Halloween colors: Add a few drops of orange food coloring to the melted chocolate for pumpkin-inspired eyeballs. So fun!
The possibilities are endless—just keep that peanut butter-to-oats ratio balanced, and you’re golden.
Storing and Serving Suggestions
These eyeball cookies are happiest living in the fridge – tuck them into an airtight container with parchment between layers (so the eyeballs don’t get squished!). They’ll stay fresh and creepy for up to a week… if they last that long! For parties, arrange them on a black platter with dry ice “fog” – the floating eyeballs look terrifyingly awesome. Pro tip: Bring extras – these disappear faster than kids at a haunted house!
Nutritional Information
Now, let’s be real – these eyeball cookies are meant for fun, not health food! While oats and peanut butter do offer some protein and fiber, we’re mainly here for the sugar rush and spooky vibes. Nutritional values will vary based on your specific ingredients (especially the type of chocolate and peanut butter you use). If you’re watching your intake, maybe enjoy just one cookie… or two… okay fine, three – it’s Halloween after all!
Frequently Asked Questions
Can I use dark chocolate instead of white chocolate?
Absolutely! Dark chocolate makes a delicious (if slightly less spooky) version. The cookies will be richer and less sweet – perfect for grown-up Halloween parties. Just know the eyeballs won’t pop as dramatically against the darker background. For extra fun, use orange and green candy melts for monster-inspired colors!
Help! My cookies are too sticky to roll – what did I do wrong?
No panic! This usually means your peanut butter was extra oily or the chocolate wasn’t cool enough before mixing. Pop the dough in the fridge for 10 minutes to firm up, then dust your hands with powdered sugar before rolling. Next time, let the melted chocolate cool slightly before adding other ingredients.
Can I make these eyeball cookies ahead of time?
You bet! They actually taste better after chilling overnight as the flavors meld. Just wait to add the candy eyeballs until right before serving so they stay perfectly in place. Store the undecorated dough balls in the fridge for up to 3 days or freeze for a month (thaw in fridge before decorating).
Final Thoughts
There you have it – the easiest, creepiest Halloween treat that’ll have everyone screaming for more (in a good way!). Whether you’re throwing a monster bash or just want to surprise the kids, these eyeball cookies never fail to delight. Snap a pic of your spooky creations and tag me – I’d love to see your edible eyeballs staring back at me! You can find more fun recipes on our Pinterest page.
Print
5-Ingredient Halloween Eyeball Cookies That’ll Haunt Your Delight
- Total Time: 35 mins
- Yield: 24 cookies 1x
- Diet: Vegetarian
Description
Easy no-bake Halloween eyeball cookies that are fun to make and perfect for parties.
Ingredients
- 1 cup white chocolate chips
- 1/2 cup creamy peanut butter
- 1 1/2 cups quick oats
- 1/4 cup powdered sugar
- 1 tsp vanilla extract
- 24 candy eyeballs
Instructions
- Melt white chocolate chips in a microwave-safe bowl in 30-second intervals, stirring until smooth.
- Stir in peanut butter, oats, powdered sugar, and vanilla extract until well combined.
- Scoop tablespoon-sized portions and roll into balls.
- Press a candy eyeball into the center of each cookie.
- Chill in the fridge for 20 minutes before serving.
Notes
- Store in an airtight container in the fridge for up to a week.
- Use gluten-free oats if needed.
- Prep Time: 10 mins
- Cook Time: 5 mins
- Category: Dessert
- Method: No-Bake
- Cuisine: American
Nutrition
- Serving Size: 1 cookie
- Calories: 120
- Sugar: 8g
- Sodium: 35mg
- Fat: 6g
- Saturated Fat: 2.5g
- Unsaturated Fat: 3g
- Trans Fat: 0g
- Carbohydrates: 14g
- Fiber: 1g
- Protein: 3g
- Cholesterol: 5mg