Oh, you’re going to love these Halloween Deviled Eggs Recipe That’s SUPER Spooky! Every year, my kitchen turns into a mad scientist’s lab around October—egg whites become ghostly canvases, olive slices transform into creepy eyeballs, and just a drop of red food coloring creates the perfect “bloody” effect. What I adore about this recipe is how simple it is—you probably have all the ingredients in your fridge right now—yet the results look like you spent hours crafting them. Trust me, these little devils will be the star of your Halloween spread, whether you’re hosting a party or just want to spook your family at dinner. And the best part? Kids go absolutely wild for them (though fair warning—they might fight over who gets the last “eyeball” egg!).
Why You’ll Love This Halloween Deviled Eggs Recipe
Listen, as someone who’s made approximately 5,000 deviled eggs in my lifetime (okay, maybe not that many, but close!), I can tell you this Halloween version is special. Here’s why:
- So easy a zombie could do it – Seriously, if you can boil eggs and use a spoon, you’re golden
- Endless creepy creativity – Turn them into little monsters, spiders, or bloody eyeballs – your imagination’s the limit
- Party perfection – They disappear faster than ghosts at sunrise at every Halloween gathering I’ve brought them to
- Totally customizable – Want them spicy? Add hot sauce. Vegetarian? Already are. Kid-friendly? Absolutely (just maybe go light on the “blood”)
Honestly, the hardest part is not eating them all yourself while you’re decorating!
Ingredients for the Halloween Deviled Eggs Recipe
Okay, let’s raid the fridge and pantry! Here’s everything you’ll need to create these spooky little delights. I’m giving you the exact amounts I use after years of tweaking – trust me, these measurements create the perfect creamy-to-spooky ratio.
- 6 large eggs – hard-boiled, cooled, and peeled (fresh eggs actually peel worse, so use ones that are a week old if you can!)
- 2 tablespoons mayonnaise – the real stuff, none of that “light” business if you want that rich texture
- 1 teaspoon yellow mustard – just enough for tang without overpowering
- 1 teaspoon white vinegar – this little splash makes all the difference in brightening up the flavors
- Salt and pepper – to taste, but I usually do about ¼ teaspoon salt and a few good grinds of pepper
- 6-8 black olives – pitted and sliced into thin strips for creepy “eyes” or “spider legs”
- Red food coloring (optional) – just a drop or two for that perfect bloody effect
See? Nothing fancy – just regular kitchen staples transformed into something wonderfully eerie. Now let me tell you about my olive slicing trick: use small scissors instead of a knife for more control when making those delicate spider legs!
Equipment You’ll Need
Don’t worry—this isn’t one of those recipes that needs fancy gadgets! You probably already have everything:
- Small mixing bowl – For mashing those yolks into creamy perfection
- Sharp knife – To slice eggs cleanly (a dull one will massacre them!)
- Piping bag or spoon – Or get crafty with a zip-top bag—just snip a corner
That’s it! Unless you count your imagination as equipment… which honestly is the most important tool here.
How to Make the Halloween Deviled Eggs Recipe
Alright, let’s get our hands dirty—figuratively speaking! Here’s my foolproof method for creating these spooky treats that’ll have everyone doing a double-take:
Step 1: The Egg Autopsy
Grab your cooled, peeled hard-boiled eggs and lay them on their sides. With a sharp knife (I can’t stress this enough—sharp!), carefully slice each egg lengthwise. I like to wipe the knife between cuts to keep the edges clean. Now the fun part—gently pop out the yolks into a bowl. Don’t toss those pretty white halves! Arrange them on your serving plate like little ghostly coffins.
Step 2: Creepy Filling Creation
Mash those yolks with a fork until they’re fine crumbs—no lumps allowed! Add mayo, mustard, vinegar, salt, and pepper. Mix until it’s smoother than a vampire’s charm. Want it extra creamy? I sometimes push it through a fine mesh strainer. The consistency should be like thick frosting—if it’s too stiff, add a teaspoon of mayo; too loose, sprinkle in more yolk.
Step 3: The Ghoulish Assembly
Now for the magic! Spoon your filling into a piping bag (or that trusty zip-top bag with a corner snipped). Pipe the mixture back into the egg whites with dramatic swirls—this isn’t the time for neatness! Leave some peaks and valleys for texture.
Step 4: Decorating Nightmares
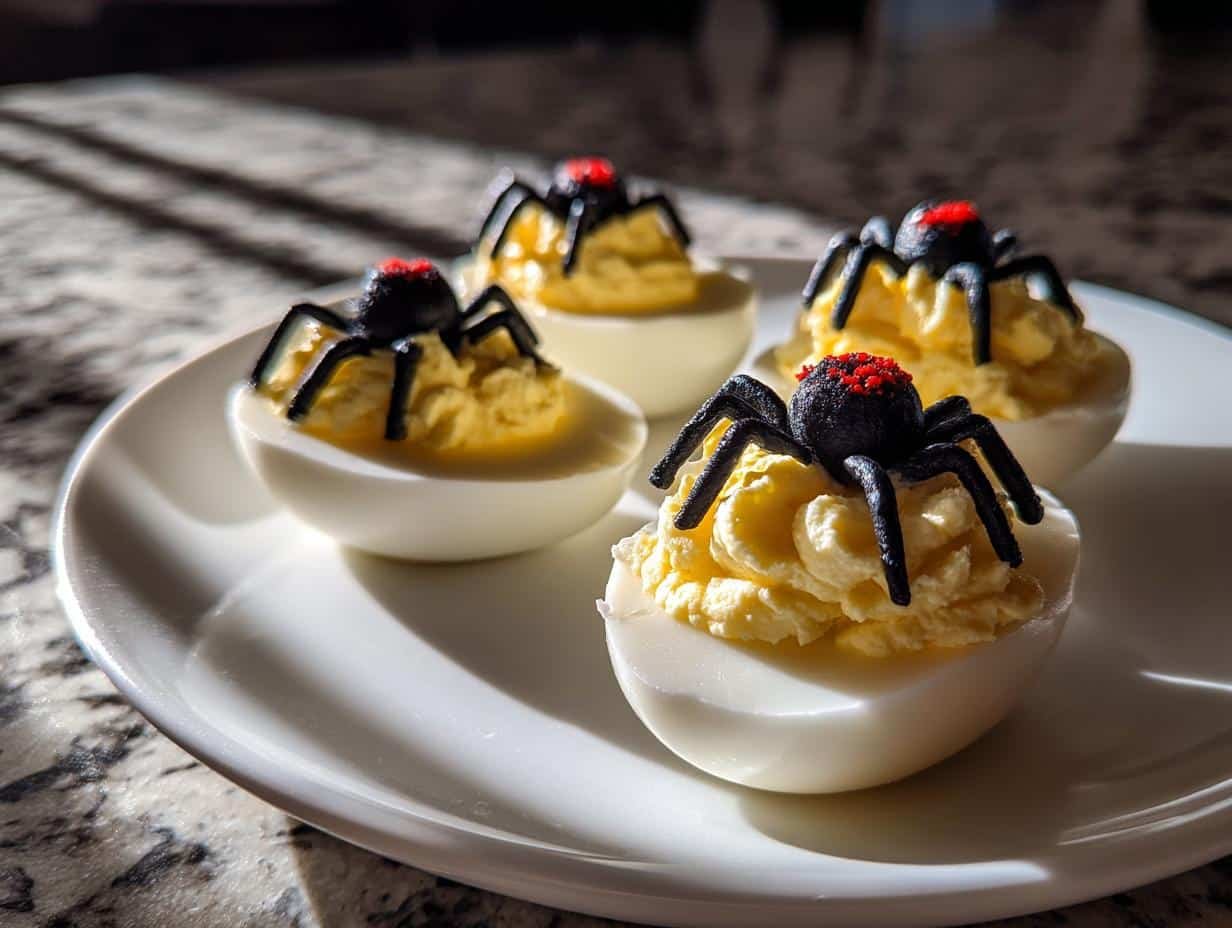
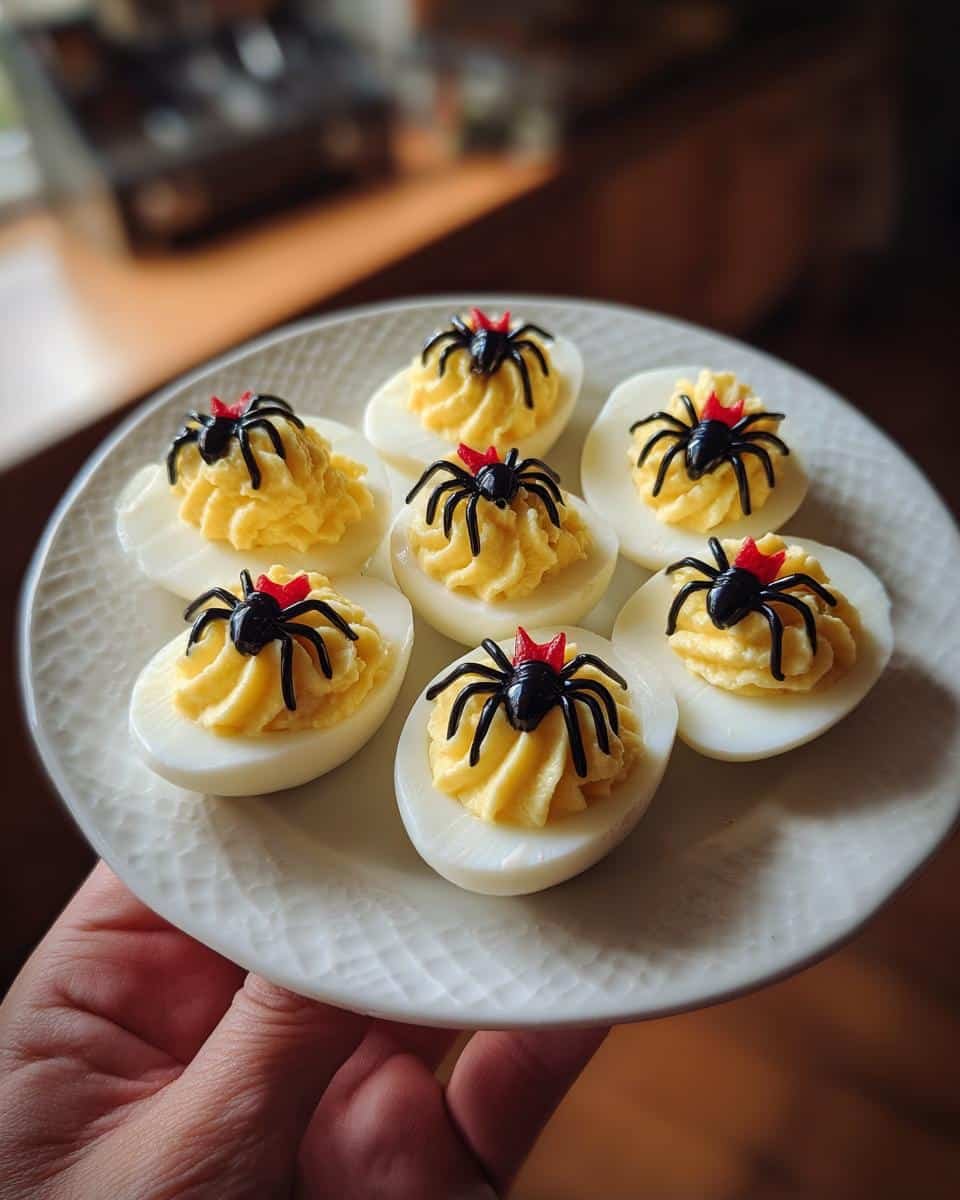
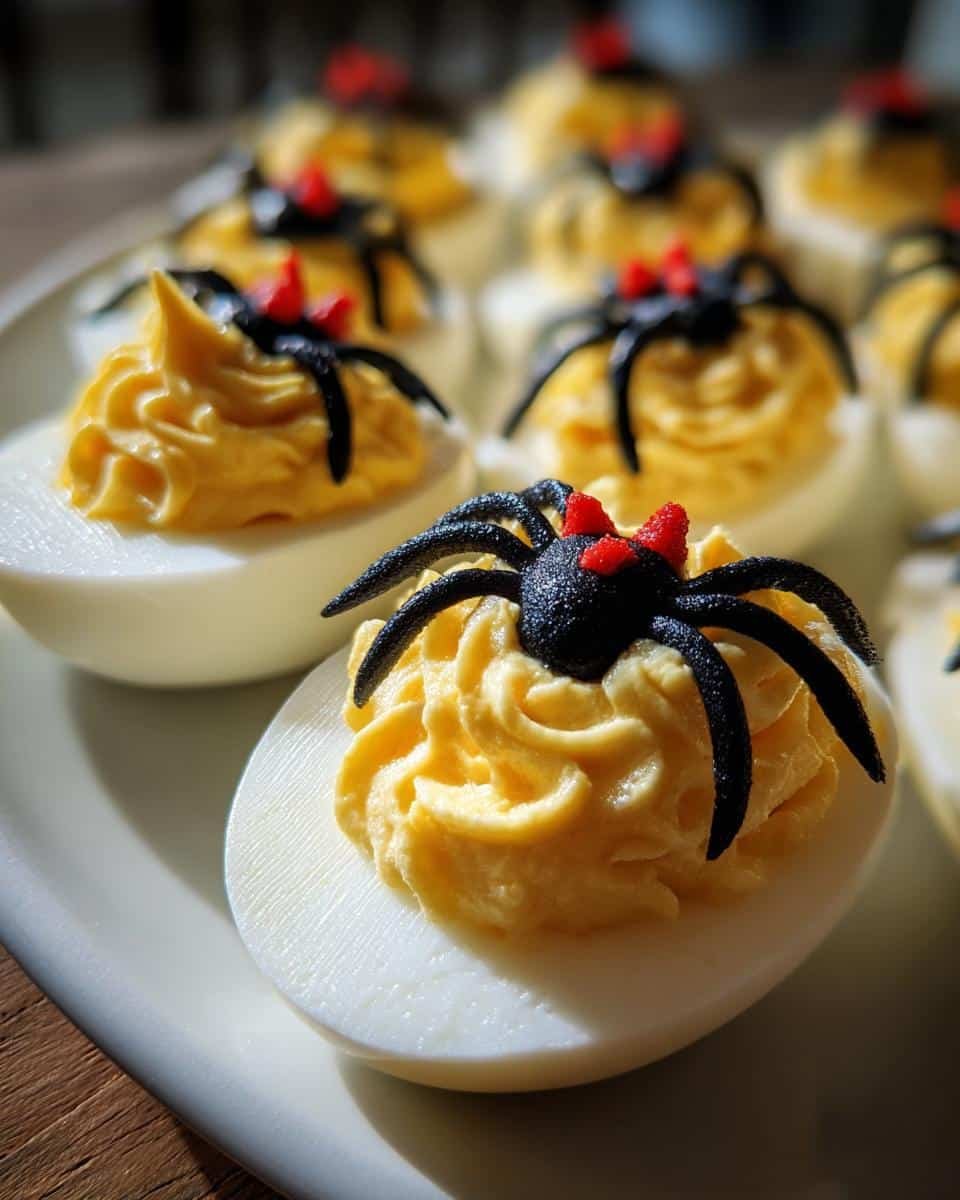
Here’s where the Halloween spirit comes alive! Slice black olives into tiny pieces to create:
- Bloodshot eyes (round centers with thin strips radiating out)
- Spider bodies (an oval slice with eight thin “legs”)
- Or for real drama, add a drop of red food coloring to some filling and drizzle it over for a “bloody” effect
Chill for at least 30 minutes—this helps flavors meld and makes the decorations stay put. Serve on a dark platter with fake cobwebs for maximum spook factor!
Tips for Perfect Spooky Deviled Eggs
After making enough creepy deviled eggs to feed a graveyard full of zombies, I’ve picked up some tricks that’ll take yours from “nice try” to “how’d you DO that?!” Here are my can’t-live-without tips:
1. The Egg Age Trick
Want to avoid that egg-peeling frustration? Use eggs that are about a week old—fresh ones cling to their shells like monsters under the bed. And here’s my secret: add a tablespoon of baking soda to the boiling water. It changes the pH and makes peeling a breeze!
2. Blood That Looks Real (But Tastes Great)
For that perfect “fresh kill” look with the red food coloring, mix a drop with ½ teaspoon water first. Too dark? It’ll look like ketchup. Too light? Just sad pink streaks. Dip a toothbrush in the mixture and flick it across the eggs for splatter effects that’ll freak out your guests (in the best way).
3. Olive Artistry 101
Make olive decorations easier by using kitchen shears instead of a knife—you’ll get those spider legs paper-thin. Keep them in ice water until ready to use so they stay firm. And pro move? Dab a tiny bit of mayo on the back to make them stick to the eggs like glue.
4. The Chill Factor
Don’t skip the chilling step! Those 30 minutes in the fridge aren’t just for show—they let the flavors develop and, more importantly, help your decorations stay put. I once rushed this and ended up with “melting zombie face” eggs. Still tasty, but not the look we’re going for!
Creative Variations for Your Halloween Deviled Eggs
Oh, the spooky possibilities are endless with these little devils! Here are my favorite ways to mix things up when I’m feeling extra creative:
- Spider web eggs – Swap olives for thin chive strands arranged in web patterns (bonus points if you add a tiny olive “spider” in the center!)
- Vampire bites – Add a dash of hot sauce to the filling and pipe little “fang marks” with paprika
- Witch’s brew eggs – Tint the filling green with food coloring and top with pretzel stick “broom handles”
Last year I even made “mummy eggs” by piping the filling in thin stripes across the whites—total showstoppers!
Serving and Storing Your Halloween Deviled Eggs
Here’s the scoop on keeping your spooky creations looking and tasting their best! Serve these deviled eggs chilled—straight from the fridge keeps the decorations fresh and the flavors bright. For a show-stopping display, arrange them on a black platter with fake cobwebs or place them in an “egg carton coffin” lined with lettuce “grave grass.” Leftovers? Ha! As if—but just in case, store them in an airtight container in the fridge for up to 2 days (though the olives may weep a bit). Pro tip: Add decorations right before serving if you’re making them ahead—nobody likes a droopy spider!
Frequently Asked Questions
Q1. Can I make these Halloween deviled eggs ahead of time?
Absolutely! The filling keeps beautifully in the fridge for up to 2 days—just store it separately from the whites. Assemble and decorate no more than 4 hours before serving to keep everything looking fresh. Trust me, I’ve made this mistake—olives turn rubbery if they sit too long!
Q2. How do I prevent my eggs from cracking while boiling?
Start with room-temperature eggs (take them out 30 minutes before cooking) and add them gently to already-boiling water with a tablespoon of vinegar. The vinegar helps seal any micro-cracks instantly. My grandma swore by this trick—works like a charm!
Q3. What’s the best way to peel hard-boiled eggs?
After boiling, shock them in ice water immediately. Then roll each egg gently on the counter to crackle the shell all over before peeling under cool running water. The water gets under the membrane and lifts the shell right off—no more frustration!
Q4. Can I make these vegetarian-friendly?
They already are! Just double-check your mayonnaise is egg-free if needed. For vegan versions, I’ve had success with mashed avocado filling—though the color won’t be as ghostly white (more like zombie green, which honestly fits the theme!).
Q5. My filling is too runny—help!
Oh honey, we’ve all been there! Chill the mixture for 20 minutes to firm up, or mix in a teaspoon of powdered mustard or cornstarch. Next time, go easier on the mayo—you can always add more, but you can’t take it out!
Nutrition Information
Just between us, I’m not counting calories when there’s Halloween fun to be had—but for those who are curious, here’s the scoop! (Nutritional values are estimates and vary based on ingredients used.) Each spooky egg clocks in at about 60 calories, with 5g fat and 3g protein. The olives add negligible carbs but maximum creepy factor—now that’s what I call a good trade-off!
Final Thoughts
There you have it—your ticket to the most delightfully spooky appetizer on the block! I can’t wait to see what creepy creations you whip up with this recipe. Snap a photo of your monster masterpieces and tag me—I live for these ghoulish food transformations! Now go scare up some delicious fun in the kitchen. For more inspiration, check out our Pinterest page!
Print
6 Spooky Halloween Deviled Eggs That’ll Haunt Your Party
- Total Time: 30 mins
- Yield: 12 deviled eggs 1x
- Diet: Vegetarian
Description
Spooky deviled eggs perfect for Halloween. These creepy yet delicious treats are easy to make and will impress your guests.
Ingredients
- 6 hard-boiled eggs
- 2 tbsp mayonnaise
- 1 tsp mustard
- 1 tsp vinegar
- Salt and pepper to taste
- Black olives (for garnish)
- Red food coloring (optional)
Instructions
- Cut the eggs in half lengthwise and scoop out the yolks.
- Mash the yolks with mayonnaise, mustard, vinegar, salt, and pepper.
- Fill the egg whites with the yolk mixture using a piping bag or spoon.
- Cut black olives into small pieces to create spooky ‘eyes’ or ‘spiders’ on top.
- For a bloody effect, add a drop of red food coloring to some filling.
- Chill for 30 minutes before serving.
Notes
- Use fresh eggs for easier peeling.
- Adjust seasoning to taste.
- Experiment with different spooky designs.
- Prep Time: 20 mins
- Cook Time: 10 mins
- Category: Appetizer
- Method: Boiling
- Cuisine: American
Nutrition
- Serving Size: 1 deviled egg
- Calories: 60
- Sugar: 0.2g
- Sodium: 70mg
- Fat: 5g
- Saturated Fat: 1g
- Unsaturated Fat: 3g
- Trans Fat: 0g
- Carbohydrates: 0.5g
- Fiber: 0g
- Protein: 3g
- Cholesterol: 95mg