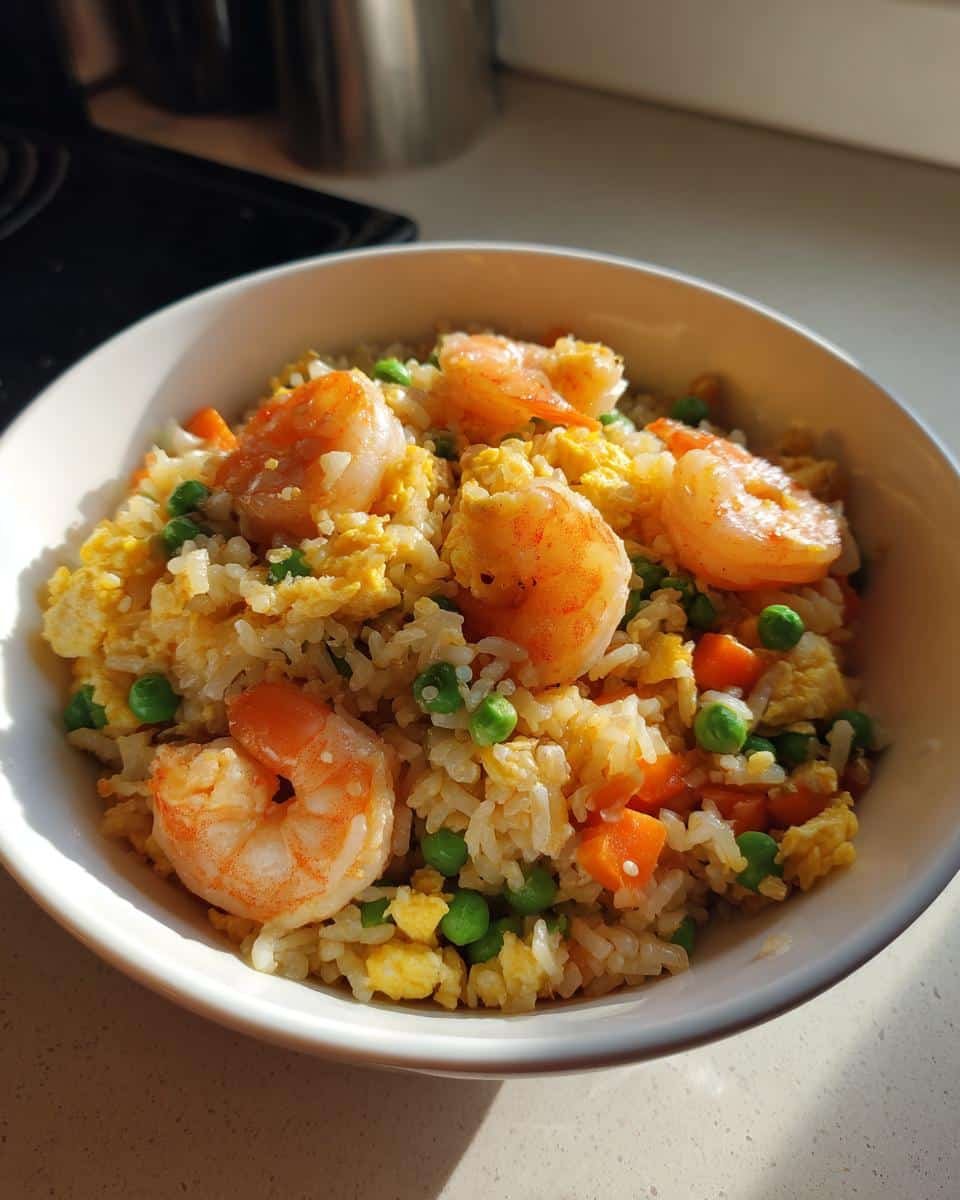
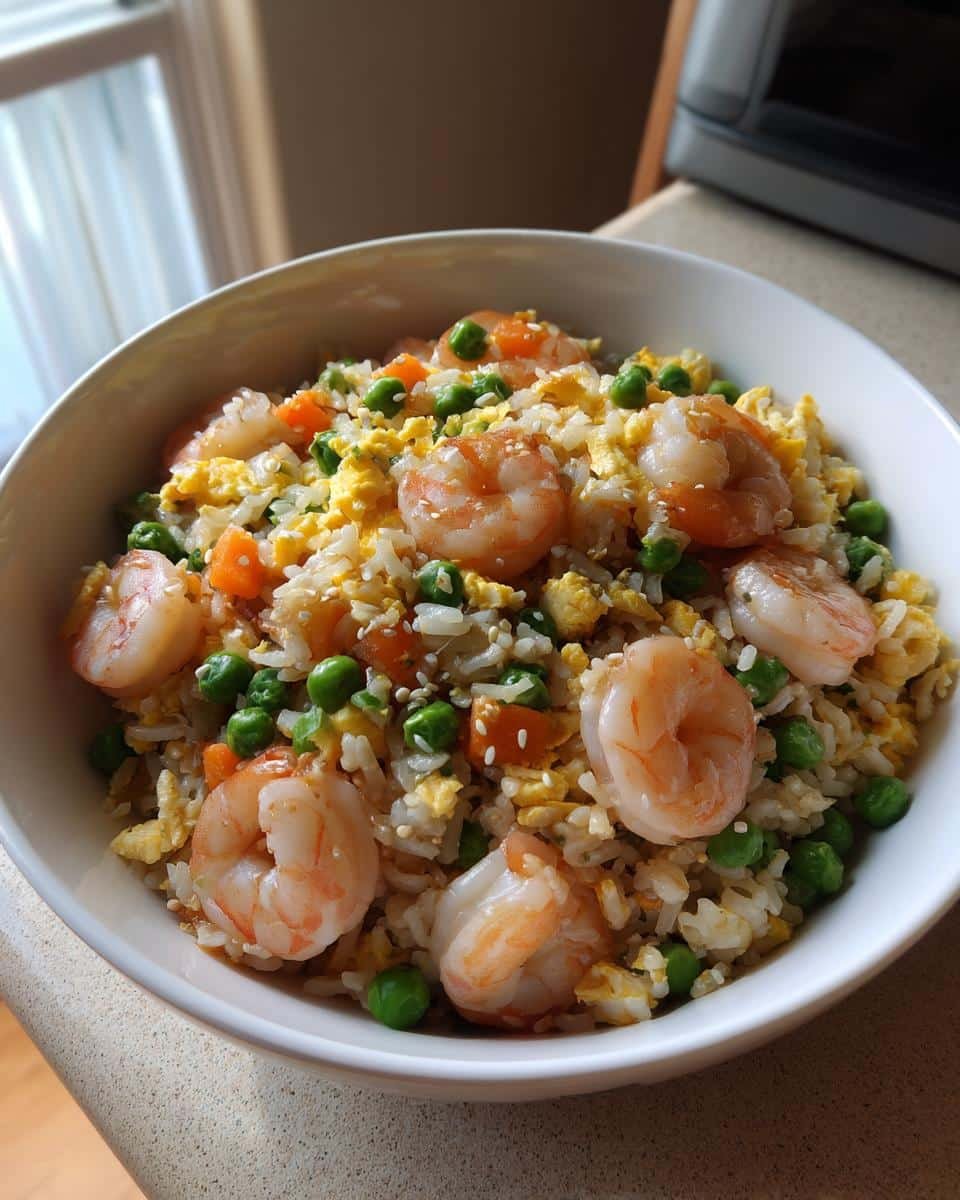
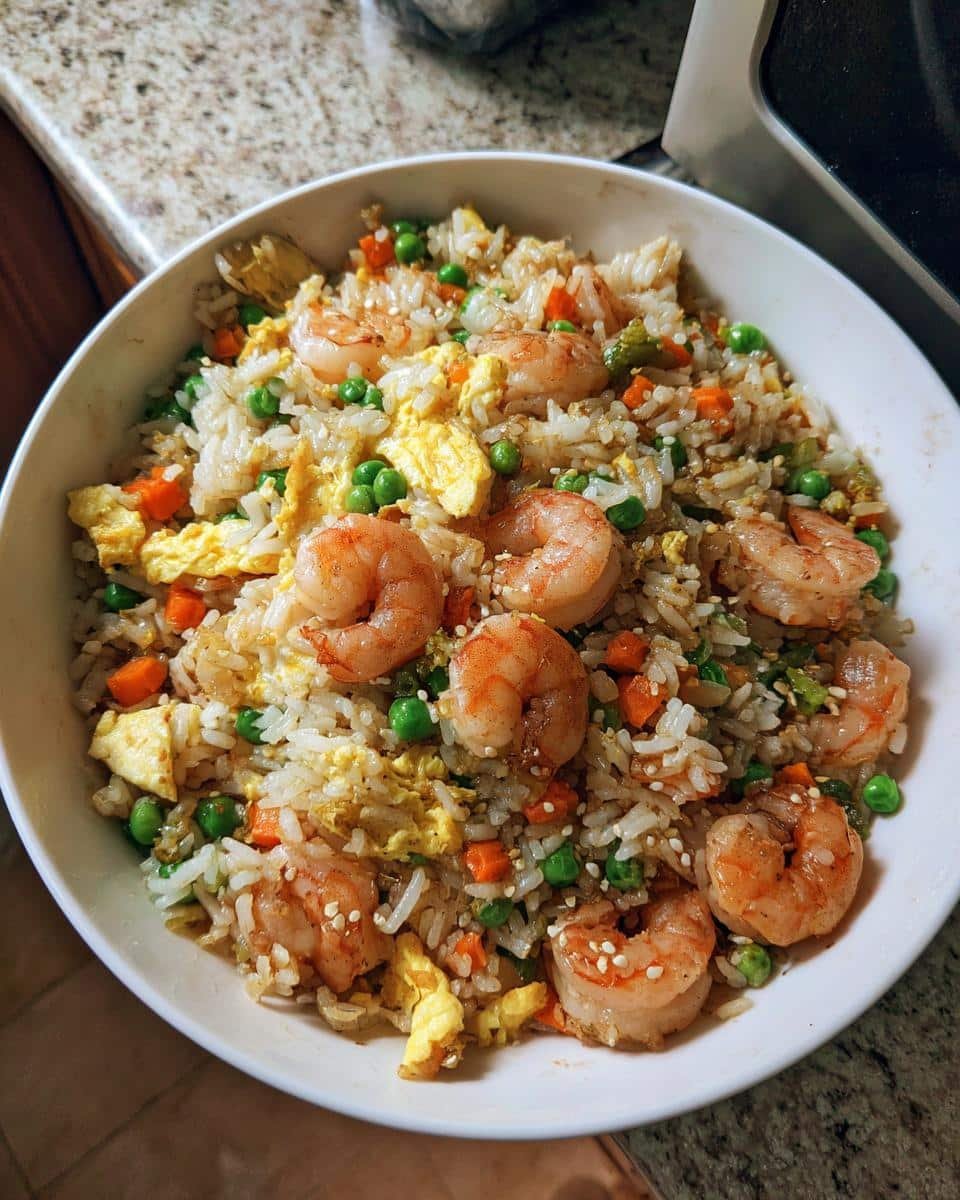
Ever have one of those nights where you need dinner on the table fast, but you’re craving something that actually tastes amazing? That’s when my shrimp fried rice saves the day! I discovered this recipe during my college years when my tiny kitchen and empty wallet demanded magic from minimal ingredients. Now it’s my go-to when I want a meal that’s faster than takeout but tastes ten times better. The sizzle of garlic hitting the hot pan, the sweet shrimp turning pink, that perfect bite of slightly crispy rice – it’s pure comfort in under 20 minutes. Trust me, once you try this version, you’ll never look at leftover rice the same way again!
Why You’ll Love This Shrimp Fried Rice
Listen, I’m not exaggerating when I say this shrimp fried rice checks ALL the boxes. Here’s why it’s become my kitchen MVP:
- Crazy fast – We’re talking 20 minutes start to finish (faster than waiting for delivery!)
- No fancy skills needed – If you can stir a pan, you’ve got this
- Flavor bomb – That garlic-sesame-soy combo? Absolute magic
- Cleans out your fridge – Got random veggies? Toss ’em in!
- Better than takeout – Fresh shrimp makes all the difference
Seriously, it’s the dish I make when I want to feel like a kitchen rockstar without any of the stress. The first time I made it, my roommate walked in and said “You ordered Chinese?” Nope – just me being awesome!
Ingredients for Shrimp Fried Rice
Okay, let’s talk ingredients – and I mean the good stuff that makes this dish sing. Here’s exactly what you’ll need (and why each one matters):
- 2 cups cooked rice – Day-old and cold is key here, people! Fresh rice turns mushy, but that slightly dried-out texture from the fridge? Perfect for soaking up all the flavors without getting gummy.
- 1/2 lb shrimp – Peeled, deveined, and tails off unless you like playing seafood surgeon at the dinner table. Medium size (31-40 count) works best – big enough to bite into but small enough to cook fast.
- 2 tbsp vegetable oil – Divided between cooking the shrimp and everything else. I use regular ol’ canola, but peanut oil adds extra restaurant-style flavor if you’ve got it.
- 2 eggs – Lightly beaten with a fork until just combined. Don’t overmix – those little streaks of white and yellow make the final dish prettier.
- 1/2 cup frozen peas and carrots – The classic combo! No need to thaw – they cook perfectly during stir-frying and add that pop of color. (Though if you’re feeling fancy, fresh julienned carrots work too.)
- 2 cloves garlic – Minced fine enough that you don’t get big chunks, but not so fine it disappears. That golden, fragrant garlic is half the flavor magic here.
- 2 green onions – Chopped, with the whites for cooking and greens for garnish. Pro tip: slice diagonally for fancy presentation points.
- 2 tbsp soy sauce – Regular or low-sodium, your call. I like to splash in a bit extra at the end if it needs more oomph.
- 1 tsp sesame oil – The secret weapon! Adds that deep, nutty flavor right at the end. Don’t skip this – it’s what makes people say “Wow, this tastes just like a restaurant!”
- Salt and pepper – To taste, but go easy – the soy sauce brings plenty of saltiness already.
See? Nothing crazy or hard-to-find. Just good, simple ingredients that transform into something spectacular when they hit that hot pan!
How to Make Shrimp Fried Rice
Alright, let’s get cooking! I know fried rice can seem intimidating, but trust me – it’s just a matter of getting everything in the pan in the right order. Here’s my foolproof method that never lets me down:
Step 1: Cook the Shrimp
First things first – grab your biggest skillet or wok and get it screaming hot over medium-high heat. Add 1 tablespoon of oil and let it shimmer for about 30 seconds (you should see little waves forming in the oil). Now toss in those beautiful shrimp in a single layer – don’t crowd them or they’ll steam instead of sear!
Here’s the magic: shrimp cook FAST. Just 2-3 minutes total, flipping once when the bottoms turn pink. You’ll know they’re done when they curl into cute little “C” shapes. Immediately transfer them to a clean plate – they’ll keep cooking if you leave them in the hot pan!
Step 2: Scramble the Eggs
Same pan, no need to wash it (that’s flavor gold in there!). Add another tablespoon of oil and pour in your beaten eggs. The second they hit the pan, start scrambling with a spatula – quick, confident strokes to create fluffy curds. This takes literally 30 seconds! Once they’re just set but still slightly soft, scoop them onto the plate with the shrimp.
Pro tip: I like to leave my eggs slightly underdone because they’ll finish cooking later when we mix everything back in. Nobody likes rubbery eggs in their fried rice!
Step 3: Stir-Fry Vegetables and Rice
Now the fun begins – crank the heat back up to medium-high and toss in your garlic. Stir constantly for about 15 seconds until fragrant (don’t let it burn!). Then dump in the frozen peas and carrots – they’ll sizzle and start thawing immediately.
After about a minute, it’s rice time! Add your cold rice and start breaking up any clumps with your spatula. I press down gently then flip sections – it should take about 3 minutes to get everything evenly heated and slightly crispy in spots. That’s when you’ll start getting those amazing toasty aromas!
Step 4: Combine Everything
The grand finale! Return the shrimp and eggs to the pan, then drizzle soy sauce and sesame oil over everything. Add most of your green onions (save some for garnish) and give it all a big, happy toss. Cook for just another minute to let the flavors marry – you’ll see the rice turning that perfect golden brown color.
Final taste test? Maybe a tiny pinch of pepper if it needs it, but be careful with extra salt – the soy sauce usually does the job. And that’s it! Scoop it into bowls, sprinkle with those reserved green onions, and prepare for compliments.
See? I told you it was easy. Now go forth and fry some rice like the kitchen rockstar you are!
Tips for Perfect Shrimp Fried Rice
After making this dish more times than I can count (seriously, my wok has permanent fried rice seasoning), I’ve picked up some game-changing tricks that’ll take your shrimp fried rice from good to “can you open a restaurant?” levels of amazing:
- Cold rice is non-negotiable – I spread freshly cooked rice on a baking sheet and pop it in the fridge uncovered for at least 2 hours. This dries it out just enough so it fries up beautifully instead of turning to mush.
- High heat = better flavor – That sizzle when ingredients hit the pan? Music to my ears! Don’t be shy with the heat – it creates those delicious crispy bits that make fried rice so addictive.
- Soy sauce control – Start with 2 tablespoons, then taste before adding more. Different brands vary in saltiness! I keep mine in a small bowl nearby so I can drizzle gradually.
- Prep everything first – Fried rice moves FAST once you start cooking. I chop all my veggies, measure sauces, and have eggs beaten before I even turn on the stove.
- The shrimp timing trick – Cook shrimp just until pink, then remove immediately. They’ll finish cooking when added back at the end, staying perfectly tender instead of rubbery.
- Sesame oil last – Its flavor disappears if cooked too long. I add it in the final toss so that nutty aroma hits you right when you take the first bite.
My biggest “aha” moment? Realizing that fried rice actually gets better when you’re not fussing over it constantly. A little confident neglect creates those perfect crispy-chewy textures we all love!
Shrimp Fried Rice Variations
Here’s the beautiful thing about fried rice – it’s practically begging for your personal touch! I love playing around with different versions depending on what’s in my fridge or who I’m cooking for. These are my favorite twists that keep things exciting:
Protein Swaps That Work Like a Charm
Not feeling shrimp? No problem! I’ve made killer versions with:
- Chicken – Diced small and cooked through first (about 5-6 minutes). Thigh meat stays juicier than breast
- Tofu – Extra-firm, pressed and cubed, then pan-fried until golden. Soaks up flavors beautifully
- Pork – Tiny chunks of leftover roast pork or even diced ham add amazing savory depth
- Scallops – For special occasions when I want to feel fancy (cook them like shrimp – just 2 minutes!)
Veggie Party in Your Pan
That frozen pea-carrot mix is just the beginning! When my crisper drawer needs cleaning out, I’ll toss in:
- Bell peppers – Diced small, added with the garlic for crunch
- Broccoli – Tiny florets that cook quickly
- Zucchini – Julienned or diced, so good!
- Bean sprouts – Stirred in at the very end for fresh crunch
Pro tip: If using watery veggies like mushrooms or zucchini, sauté them separately first to remove excess moisture.
Spice It Up (Or Not!)
My sister likes hers mild, while I crave heat – here’s how we customize:
- For mild – Just a pinch of white pepper adds warmth without burn
- For medium – Red pepper flakes or sriracha to taste
- For “whoa!” – Minced fresh chili or a spoonful of chili garlic sauce
- For umami bombs – A drizzle of oyster sauce or fish sauce at the end
The best part? These variations are all one-pan wonders just like the original. Last week I made a “kitchen sink” version with leftover rotisserie chicken, half a bell pepper, and some sad-looking scallions – my husband swore it was the best batch yet. That’s the magic of fried rice – it’s always delicious and never the same twice!
Serving Suggestions for Shrimp Fried Rice
Okay, let’s talk about turning this already-amazing shrimp fried rice into a full-on feast! Sure, it’s fantastic all on its own (I’ve definitely eaten it straight from the pan more than I’d care to admit), but here are my favorite ways to serve it when I want to impress—or just treat myself extra nice:
Classic Takeout Duos
When I’m craving that full Chinese takeout experience at home, I’ll whip up a quick batch of:
- Egg rolls – The crispy crunch is perfect with the rice. Store-bought or homemade, no judgment here!
- Steamed dumplings – Those little flavor pockets make everything feel like a celebration
- Hot and sour soup – For when I want that restaurant-style starter course
Bonus points if you serve it all on those cute little Asian-style dishes you impulse-bought that one time.
Simple, Fresh Sides
Sometimes I keep it light and fresh with:
- Quick-pickled cucumbers – Just sliced cukes with rice vinegar, sugar, and salt. So refreshing!
- Steamed bok choy – Drizzled with a tiny bit of oyster sauce if I’m feeling fancy
- Simple green salad – With a ginger-soy dressing to keep the Asian flavors going
These are my go-tos when I want veggies but don’t feel like doing much extra work.
For Special Occasions
When it’s date night or I have friends over:
- Peking duck pancakes – Okay, fine, store-bought rotisserie duck with hoisin sauce. Still magical!
- Salt and pepper shrimp – Because you can never have too much shrimp
- Lychee martinis – Because why not make it a party?
Honestly? The shrimp fried rice always steals the show anyway. But the extras make it feel like an event!
My #1 rule? There are no wrong answers here. Some nights it’s just me, my fried rice, and a really good Netflix show—and that’s absolutely perfect too.
Storing and Reheating Shrimp Fried Rice
Here’s the beautiful truth about shrimp fried rice – it might taste even better the next day! I’ve perfected my storing and reheating methods through years of “oops, I made too much” situations (though let’s be real – is there really such a thing as too much fried rice?). Here’s how to keep those leftovers tasting fresh and delicious:
Storing Like a Pro
First rule: let your fried rice cool slightly before storing (but don’t leave it out more than 2 hours – food safety first!). I transfer mine to an airtight container and press plastic wrap directly onto the surface before sealing. This genius trick prevents that weird dried-out layer on top. It keeps perfectly in the fridge for 3-4 days – though in my house, it never lasts that long!
Reheating for Maximum Crispiness
The microwave is tempting, but I always go for the stovetop method to revive that perfect texture:
- Pan method – Heat a nonstick skillet over medium, add a tiny splash of water (1 tsp max!), then add your rice. Stir occasionally until steaming hot (about 3-5 minutes). The water creates steam to reheat without drying out, while the pan restores that slight crispiness.
- For microwave emergencies – Place rice in a microwave-safe bowl, cover with a damp paper towel, and heat in 30-second bursts, fluffing between each. The steam from the damp towel works wonders!
Freezer-Friendly Magic
Yes, you can freeze fried rice! I portion it into freezer bags (squeeze out all the air) or small containers. When the craving hits, I thaw overnight in the fridge, then reheat using the pan method above. The texture stays surprisingly good – though the shrimp might be slightly less firm (still totally worth it!).
Pro tip: If your reheated rice seems dry, a quick drizzle of sesame oil at the end brings back that luscious mouthfeel. And whatever you do, don’t add more soy sauce while reheating – it’ll make everything way too salty. Season at the table instead!
These methods have saved me countless lunches and lazy dinners. Now when I make a big batch, I actually look forward to leftovers – which says a lot coming from someone who normally forgets about food in the back of the fridge!
Shrimp Fried Rice Nutritional Information
Okay, let’s talk numbers – but first, full disclosure: these are estimates based on my exact recipe. Your counts might vary a smidge depending on your shrimp size, soy sauce brand, or how heavy-handed you are with that delicious sesame oil!
For one generous serving (about 1 cup) of my shrimp fried rice, you’re looking at:
- 320 calories – Perfectly balanced for a satisfying meal
- 18g protein – Thanks to those plump shrimp and eggs
- 40g carbs – Mostly from the rice (comfort food, baby!)
- 10g fat – Only 2g saturated from the eggs and oil
- 2g fiber – Those veggies doing their thing
- 800mg sodium – Mostly from the soy sauce (use low-sodium if you’re watching this)
Here’s what makes me feel good about this dish – it’s packed with protein and veggies, and the rice gives you that carb comfort without being crazy heavy. When I want to lighten it up, I’ll sometimes do half rice and half riced cauliflower (don’t tell my husband – he never notices!).
Remember, nutrition isn’t just numbers – it’s about enjoying real, delicious food that makes you feel good. And this shrimp fried rice? It makes me feel amazing every single time!
Frequently Asked Questions About Shrimp Fried Rice
Over the years, I’ve gotten so many questions about my shrimp fried rice that I could probably write a book! Here are the ones that pop up most often – with all my hard-earned answers that’ll save you from making my early mistakes:
What’s the best rice to use for fried rice?
Day-old jasmine rice is my absolute favorite – it’s slightly sticky but still separates beautifully when fried. That said, any long-grain white rice works (basmati, regular long-grain). The real magic happens when the rice has had time to dry out in the fridge overnight. Freshly cooked rice turns mushy – trust me, I learned that the hard way during my soggy fried rice phase!
Can I use something besides shrimp?
Absolutely! I’ve made killer versions with:
- Diced chicken (cook it through first – about 5-6 minutes)
- Extra-firm tofu (pressed and cubed, then pan-fried)
- Leftover pork or ham (already cooked, just needs warming)
- Even just extra eggs for a vegetarian option
The cooking method stays the same – just swap in your protein of choice!
How far in advance can I make this?
The rice itself keeps beautifully in the fridge for 3-4 days (see my storing tips above). For parties, I’ll prep all the ingredients separately – cook the shrimp, scramble the eggs, chop the veggies – then do the actual stir-frying right before serving. That way everything stays fresh and crispy. The longest I’ve kept prepped ingredients (in separate containers) is about 24 hours.
Why does my fried rice turn out mushy?
Three likely culprits:
- Using freshly cooked rice (must be cold and slightly dried out)
- Overcrowding the pan (which steams instead of fries)
- Stirring too much (let it sit occasionally to get crispy bits!)
Fix these, and you’ll have perfect texture every time.
Is there a way to make this gluten-free?
Easy! Just swap the soy sauce for tamari or coconut aminos. Everything else in the recipe is naturally gluten-free. I’ve made it this way for my celiac friend multiple times, and she swears it’s just as delicious as the original.
Still have questions? Drop them in the comments – I love chatting all things fried rice! After years of perfecting this recipe, I’ve probably made (and fixed) every mistake possible, so I’m happy to help.
You can also find more inspiration on my Pinterest page!
Print
20-Minute Shrimp Fried Rice That Tastes Like Takeout
- Total Time: 20 mins
- Yield: 4 servings 1x
- Diet: Low Calorie
Description
A quick and flavorful shrimp fried rice dish that combines succulent shrimp with perfectly cooked rice and vegetables.
Ingredients
- 2 cups cooked rice (preferably day-old)
- 1/2 lb shrimp, peeled and deveined
- 2 tbsp vegetable oil
- 2 eggs, lightly beaten
- 1/2 cup frozen peas and carrots
- 2 cloves garlic, minced
- 2 green onions, chopped
- 2 tbsp soy sauce
- 1 tsp sesame oil
- Salt and pepper to taste
Instructions
- Heat 1 tbsp oil in a large pan or wok over medium-high heat.
- Add shrimp and cook for 2-3 minutes until pink. Remove and set aside.
- Add remaining oil to the pan. Pour in beaten eggs and scramble until set. Remove and set aside.
- Stir-fry garlic, peas, and carrots for 2 minutes.
- Add cooked rice and break up any clumps. Stir-fry for 3 minutes.
- Return shrimp and eggs to the pan. Add soy sauce, sesame oil, and green onions.
- Toss everything together and cook for another minute. Season with salt and pepper.
- Serve hot.
Notes
- Use cold, day-old rice for best texture.
- Substitute shrimp with chicken or tofu if preferred.
- Adjust soy sauce to taste.
- Prep Time: 10 mins
- Cook Time: 10 mins
- Category: Main Dish
- Method: Stir-Fry
- Cuisine: Asian
Nutrition
- Serving Size: 1 cup
- Calories: 320
- Sugar: 2g
- Sodium: 800mg
- Fat: 10g
- Saturated Fat: 2g
- Unsaturated Fat: 6g
- Trans Fat: 0g
- Carbohydrates: 40g
- Fiber: 2g
- Protein: 18g
- Cholesterol: 180mg