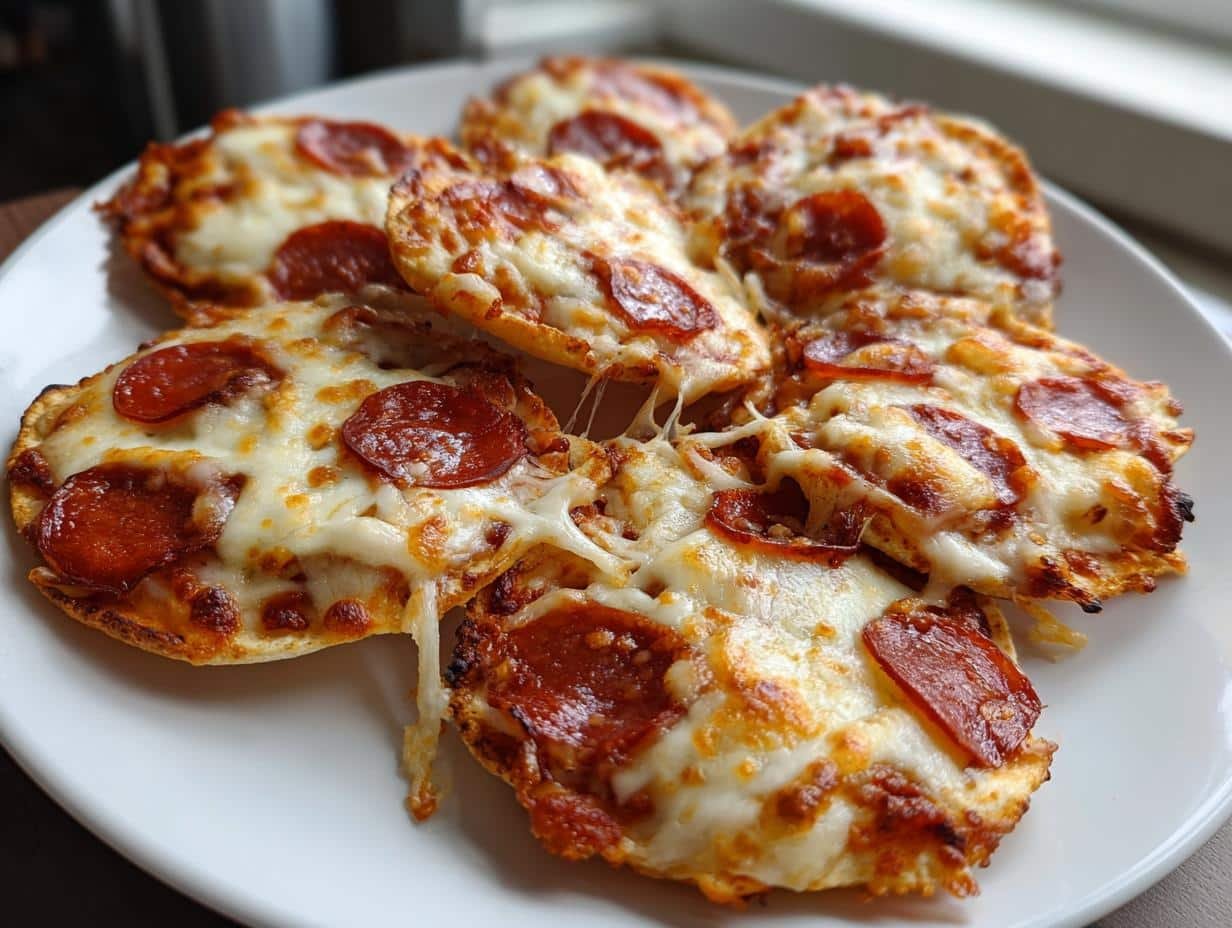
Confession time: I used to buy those pre-packaged pizza lunchables for quick meals until I realized how much tastier (and cheaper!) homemade versions could be. Now my kitchen counter regularly gets taken over by DIY Pizza Lunchables assembly lines – tiny tortillas covered in sauce, towers of shredded cheese everywhere, and the kids arguing over who gets more pepperoni. The best part? These customizable mini pizzas take minutes to make and let you control the ingredients. No mystery preservatives here, just fresh flavors and happy faces. They’ve become our go-to for school lunches, playdates, and even my own “too tired to cook” dinners. Once you try making your own, you’ll never go back to the boxed version again!
Table of Contents
Table of Contents
Why You’ll Love These DIY Pizza Lunchables
Let me tell you why these homemade pizza kits are about to become your new obsession:
- Effortless fun – They come together faster than you can say “pizza night!” (Seriously, 12 minutes start to finish)
- Kid magnet – Little hands love assembling their own creations (messy fingers = happy memories)
- Wallet-friendly – Costs way less than store-bought versions (more cheese for your money!)
- Endless options – Swap toppings based on moods, diets, or whatever’s in your fridge
Honestly? The only problem is deciding who gets the last one!
Ingredients for DIY Pizza Lunchables
Here’s what you’ll need for the most basic (but totally delicious) version – though trust me, you’ll want to play around with these once you get the hang of it!
- 1 whole wheat tortilla or pita bread (the sturdier the better – or grab gluten-free if needed)
- 1/4 cup pizza sauce (I always steal a spoonful straight from the jar first)
- 1/2 cup shredded mozzarella cheese (pre-shredded works, but fresh-grated melts like a dream)
- 10 slices pepperoni (or as my 5-year-old insists, “enough to cover EVERY spot!”)
- 1 tbsp grated Parmesan cheese (the secret sprinkle that makes it taste like a real pizzeria)
That’s it! Though I won’t judge if you add a garlic butter brush at the end – we’ve all got our weaknesses.
How to Make DIY Pizza Lunchables
Okay, let’s get these mini pizza masterpieces going! I’ve made these so many times I could probably do it with my eyes closed (though I don’t recommend that with hot ovens involved). Here’s how we do it:
- Heat things up – Preheat your oven to 375°F (190°C). While it warms up, I usually start cutting my tortillas into fun shapes – circles with a glass, squares with a pizza cutter, or let the kids go wild with cookie cutters!
- Saucing it up – Spread that glorious pizza sauce evenly on each piece. Pro tip: leave just a tiny border so the sauce doesn’t make the edges soggy (learned that the messy way).
- Cheese avalanche – Sprinkle mozzarella generously over the sauce. Don’t skimp – this is what makes them so gooey and delicious!
- Top it off – Add your pepperoni or other toppings. My kids like making patterns, while I just pile ’em on.
- Bake magic – Pop them in the oven for 5-7 minutes until the cheese is all melty and bubbly with those perfect golden spots.
- Final touch – Sprinkle with Parmesan right when they come out – it sticks better when the cheese is still warm.
- Cool down – Let them sit for a minute (I know, the hardest part!) so little fingers don’t get burned. The cheese sets perfectly this way too.
Customization Ideas
The real fun begins with toppings! Try these favorites:
- Veggie party – Bell peppers, mushrooms, or spinach (sneak those greens in!)
- Protein boost – Cooked chicken, crumbled sausage, or even turkey pepperoni
- Dairy-free – Vegan cheese with roasted garlic and zucchini
- Hawaiian twist – Ham and pineapple (fight me, pineapple-on-pizza haters!)
- Breakfast style – Scrambled eggs and bacon bits (trust me on this one)
Tips for Perfect DIY Pizza Lunchables
After making approximately 8,427 of these (okay, maybe a slight exaggeration), here are my hard-earned secrets for pizza lunchable perfection:
- Sauce with a light touch – Use the back of a spoon to spread sauce thinly and evenly. Too much and you’ll get soggy tortillas (ask me how I know).
- Crisp is key – For extra crunch, lightly toast the tortillas before topping or bake directly on the oven rack instead of a pan.
- Pack smart – Store cooled lunchables with parchment between layers in an airtight container – they’ll keep their texture better than plastic bags.
Bonus tip: Let kids assemble their own at mealtime – way more fun and no soggy pre-made ones to pack!
Storing and Reheating
These DIY Pizza Lunchables store like a dream! Just pop cooled mini pizzas in an airtight container (I use my trusty glass meal prep ones) with parchment between layers. They’ll stay fresh in the fridge for 2 days max – any longer and the tortillas get sad. When reheating, 30 seconds in the microwave works in a pinch, but the oven at 350°F for 3-5 minutes brings back that perfect crispness we all love. Pro tip: If you’re packing them cold, they’re just as tasty at room temperature!
DIY Pizza Lunchables FAQs
I get questions about these little pizza bites all the time! Here are the answers to the ones that pop up most:
Can I make these ahead? Absolutely! Assemble the mini pizzas (without baking) and store them in an airtight container in the fridge for up to 24 hours. When you’re ready, just pop them in the oven – they might need an extra minute or two since they’re cold.
Are they freezer-friendly? You bet! Freeze unbaked mini pizzas on a sheet pan first, then transfer to freezer bags. They’ll keep for 2 months. No need to thaw – just add 2-3 minutes to the baking time straight from frozen.
Best toppings for kids? From my picky-eater experiments: stick with classic pepperoni, mild cheese blends, or fun shapes with cookie cutters. Mini meatballs and shredded chicken always disappear fast too. The key? Let them choose – they’re more likely to eat what they “created!”
Nutritional Information
Just a heads up – these numbers are estimates and will vary based on your specific toppings and ingredients. For our basic version with whole wheat tortilla and pepperoni, here’s the scoop per serving:
- Calories: 350
- Fat: 18g (8g saturated)
- Protein: 15g
- Carbs: 30g (4g fiber)
Packed with protein and fiber, these actually make a pretty balanced lunch! (But let’s be honest – we’re really here for the cheesy goodness.)
Print
Master DIY Pizza Lunchables in Just 12 Minutes or Less
- Total Time: 12 minutes
- Yield: 1 serving 1x
- Diet: Vegetarian
Description
Make your own pizza lunchables at home with fresh ingredients. Perfect for a quick and fun meal.
Ingredients
- 1 whole wheat tortilla or pita bread
- 1/4 cup pizza sauce
- 1/2 cup shredded mozzarella cheese
- 10 slices pepperoni or other toppings of choice
- 1 tbsp grated Parmesan cheese
Instructions
- Preheat oven to 375°F (190°C).
- Cut tortilla or pita bread into small rounds or squares.
- Spread pizza sauce evenly on each piece.
- Sprinkle mozzarella cheese over the sauce.
- Add pepperoni or other toppings.
- Bake for 5-7 minutes until cheese melts.
- Remove from oven and sprinkle with Parmesan cheese.
- Let cool slightly before serving.
Notes
- Store leftovers in an airtight container for up to 2 days.
- Customize with your favorite toppings like veggies or cooked chicken.
- Use gluten-free tortillas for a gluten-free option.
- Prep Time: 5 minutes
- Cook Time: 7 minutes
- Category: Lunch
- Method: Baked
- Cuisine: Italian-American
Nutrition
- Serving Size: 1 serving
- Calories: 350
- Sugar: 3g
- Sodium: 800mg
- Fat: 18g
- Saturated Fat: 8g
- Unsaturated Fat: 7g
- Trans Fat: 0g
- Carbohydrates: 30g
- Fiber: 4g
- Protein: 15g
- Cholesterol: 35mg


