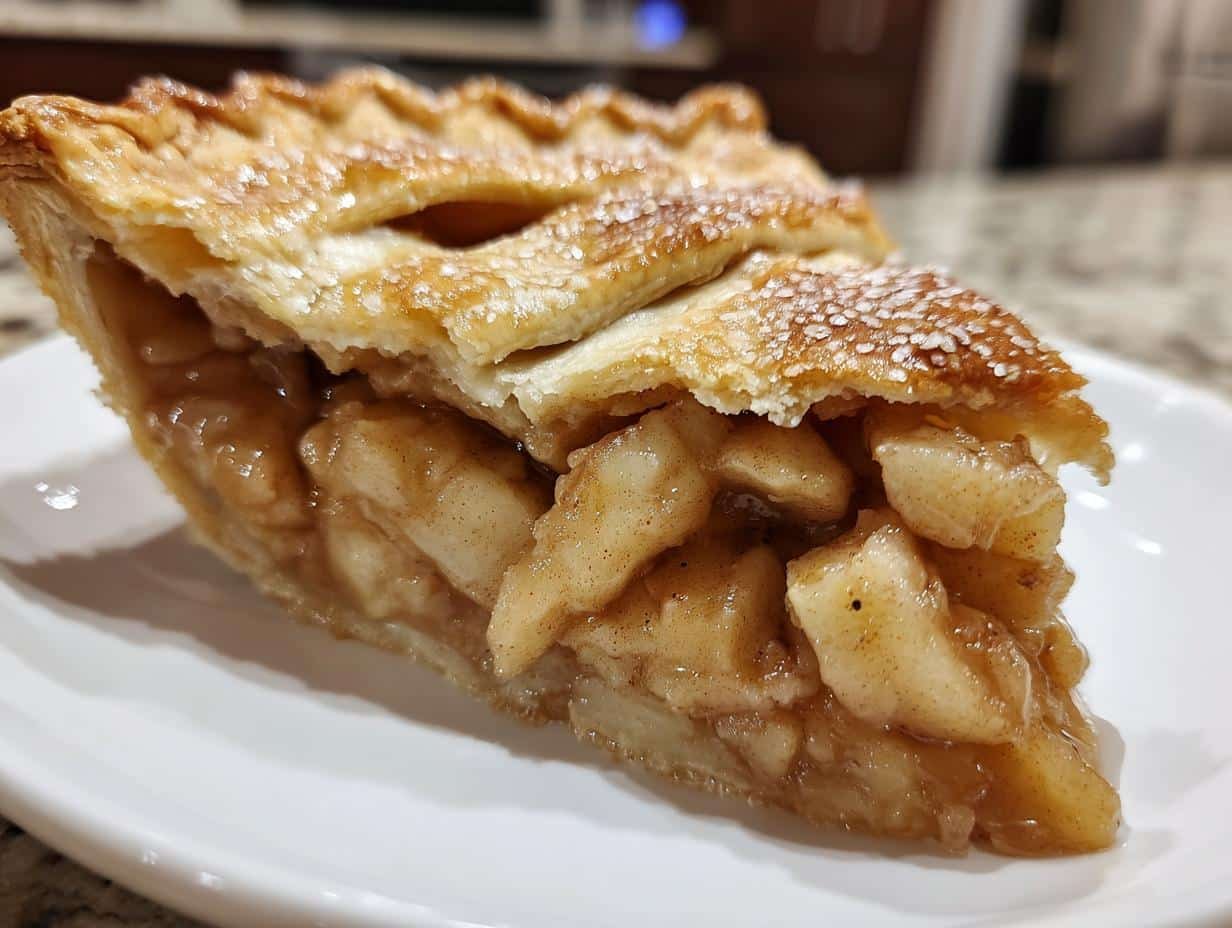
There’s nothing quite like the smell of a Classic Double-Crust Apple Pie with Cinnamon and Nutmeg baking in the oven—that warm, buttery crust mingling with sweet apples and spices is pure comfort. Every fall, my grandma would let me help roll out the dough while she tossed the apple slices in that perfect cinnamon-nutmeg blend. “Just enough to make it sing,” she’d say, winking as she added an extra pinch. Even now, one bite takes me back to her kitchen, where the pie was always served still slightly warm, with vanilla ice cream slowly melting into the flaky crust. It’s the taste of home.
Table of Contents
Table of Contents
Ingredients for Classic Double-Crust Apple Pie with Cinnamon and Nutmeg
Gather these simple ingredients, and you’re halfway to pie perfection! Trust me, using quality ingredients makes all the difference here.
For the crust:
- 2 1/2 cups all-purpose flour (spooned and leveled – no packing!)
- 1 teaspoon salt (I always use fine sea salt)
- 1 cup unsalted butter, chilled and diced (keep it cold!)
- 6-8 tablespoons ice water (yes, actual ice cubes in the water!)
For the filling:
- 6-7 medium apples, peeled and sliced (about 8 cups – I use a mix of Granny Smith and Honeycrisp for that perfect sweet-tart balance)
- 3/4 cup granulated sugar (adjust to your apples’ sweetness)
- 2 tablespoons lemon juice (fresh squeezed if you can – it brightens everything up)
- 1 1/2 teaspoons ground cinnamon (the good stuff – none of that dusty old spice!)
- 1/4 teaspoon ground nutmeg (freshly grated if possible – the aroma is incredible)
- 2 tablespoons unsalted butter, diced (for dotting the filling – because more butter is always better)
For finishing:
- 1 egg, beaten (for that gorgeous golden crust – save a tiny bit for sealing edges if you’re fancy)
See? Nothing too crazy – just honest ingredients that work together beautifully. Now let’s make some magic!
How to Make Classic Double-Crust Apple Pie with Cinnamon and Nutmeg
Alright, let’s get our hands floury! Making this pie is easier than you think – I’ve broken it down into simple steps that’ll guide you to golden, flaky perfection. Just follow along, and don’t stress about making it look perfect. Some of my best pies have been the slightly lopsided ones – they’ve got character!
Preparing the Pie Crust
First things first – we need to treat our dough right. In a large bowl, whisk together the flour and salt. Now grab that chilled butter – cubes should be about the size of small peas. Use your fingers, a pastry cutter, or even two forks to work the butter into the flour mixture until it looks like coarse crumbs with some larger butter pieces remaining. This is what’ll give us those beautiful flaky layers!
Here’s my trick: sprinkle the ice water over the mixture one tablespoon at a time, gently tossing with a fork after each addition. Stop when the dough just holds together when pinched – you might not need all the water. Divide the dough in half, flatten into disks, wrap in plastic, and chill for at least an hour. Seriously, don’t skip the chilling – it makes rolling so much easier!
Making the Apple Filling
While the dough chills, let’s tackle those apples. Peel and slice them about 1/4-inch thick – not too thin or they’ll turn to mush. In a big bowl, toss the apple slices with sugar, lemon juice, cinnamon, and nutmeg until evenly coated. The lemon juice isn’t just for flavor – it keeps those apples from browning while you work.
Let this mixture sit for about 15 minutes. You’ll see some juice collect at the bottom – that’s perfect! We want that syrupy goodness, just not too much. If it looks really wet, you can drain off a tiny bit, but keep most of it for flavor.
Assembling and Baking the Pie
Preheat your oven to 375°F (190°C) and place a baking sheet on the lower rack – this catches any drips and helps prevent a soggy bottom. Roll out one dough disk on a lightly floured surface to about 12 inches in diameter. Carefully transfer it to your pie plate, letting the edges hang over.
Pour in the apple filling and dot with those butter pieces – this adds richness and helps thicken the juices. Roll out the second dough disk and place it over the filling. Trim the edges to about 1 inch overhang, then tuck both crusts together underneath and crimp however you like. Cut several slits in the top crust – these are crucial for steam to escape!
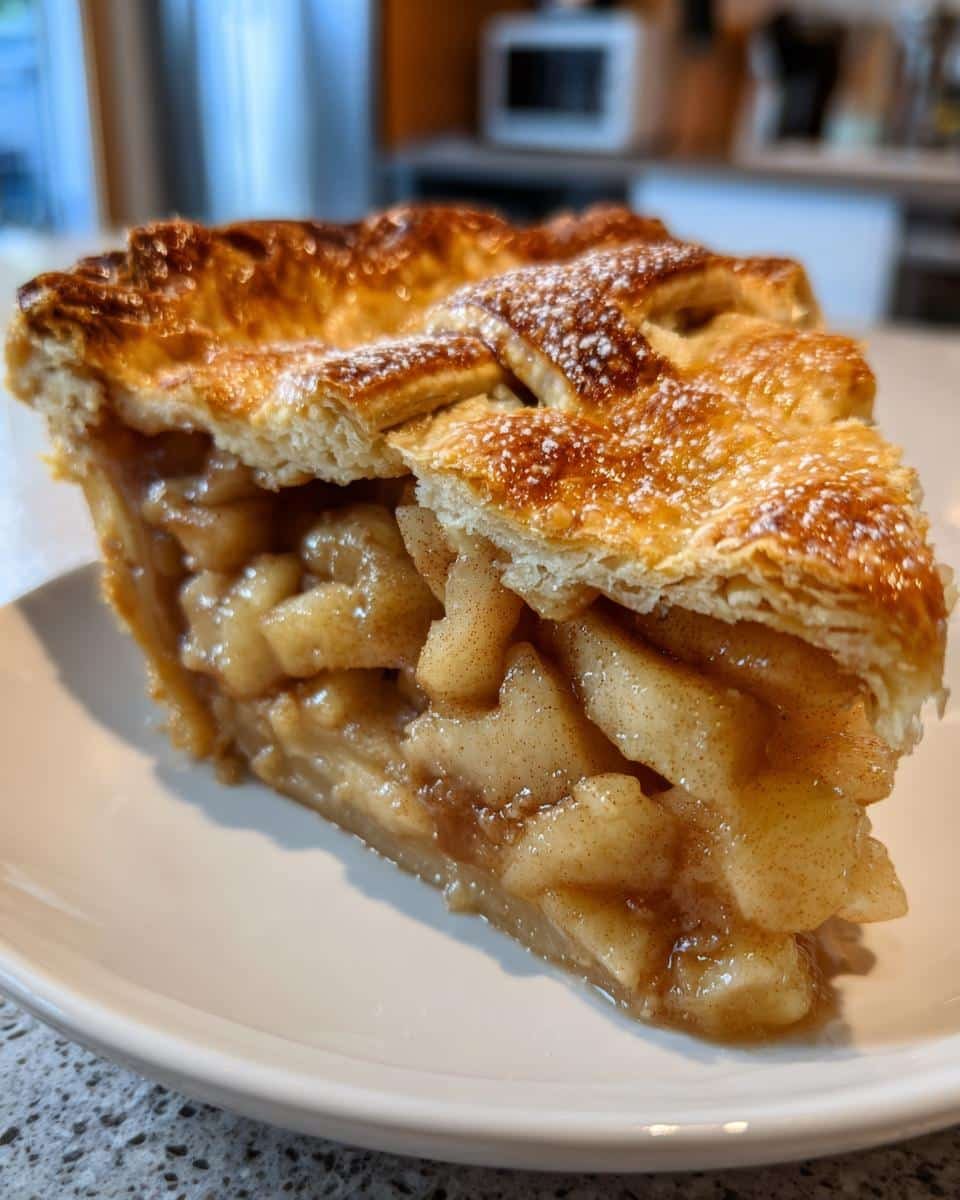
Brush the top with beaten egg (this gives that gorgeous golden color) and if you’re feeling fancy, sprinkle with coarse sugar. Bake for 45-55 minutes until the crust is deeply golden and the juices are bubbling through the vents. The smell will drive you crazy – try to let it cool for at least an hour before slicing so the filling sets!
Tips for the Best Classic Double-Crust Apple Pie with Cinnamon and Nutmeg
After making more apple pies than I can count (and eating my fair share of “learning experiences”), here are my foolproof tips to guarantee pie perfection every time:
- Keep everything cold, cold, cold! I can’t stress this enough – your butter should be straight-from-the-fridge cold, and even chill your flour if your kitchen is warm. This prevents the crust from getting tough and ensures those beautiful flaky layers we all love.
- Don’t skimp on venting! Those slits in the top crust aren’t just decorative – they let steam escape so your filling thickens properly. Make at least 4-5 good-sized openings, or get creative with a lattice or decorative cutouts.
- Let it cool (I know, it’s hard)! As tempting as it is to slice into that piping hot pie, resist! Letting it cool for at least an hour allows the juices to thicken. Otherwise, you’ll have apple soup in a crust – still tasty, but messy.
- Use a baking sheet. Place your pie plate on a rimmed baking sheet before it goes in the oven. It catches any bubbling-over juices (saving you from oven cleaning nightmares) and helps the bottom crust crisp up evenly.
- Trust your nose. When those spicy apple juices start bubbling through the vents and the whole kitchen smells like heaven, your pie is usually done – even if the timer hasn’t gone off yet. A deep golden crust is what you’re aiming for.
And here’s my bonus tip: always make two pies – one to impress your guests, and one to keep all for yourself. You’re welcome!
Variations for Classic Double-Crust Apple Pie with Cinnamon and Nutmeg
While I adore the traditional version, sometimes it’s fun to play around with this classic recipe! Here are some delicious twists I’ve tried over the years – all guaranteed to impress while keeping that comforting apple pie soul:
Sweet Additions
For an extra-indulgent treat, try stirring in 1/4 cup of caramel sauce with the apples – the way it bubbles up with the juices is magical. My kids beg for this version topped with chopped pecans before baking. Or, for a sophisticated touch, sprinkle 1/2 cup of dried cranberries into the filling – their tartness plays beautifully with the sweet apples.
Spice It Up
If you’re feeling adventurous with spices, add a pinch of cardamom or allspice along with the cinnamon and nutmeg. My favorite autumn version includes 1/2 teaspoon of ginger for a warming kick. Just remember – spices intensify as they bake, so start small and adjust next time!
Crust Creativity
A simple lattice crust makes any pie look fancy (and lets you peek at that glorious filling). Or, mix 1 tablespoon of coarse sugar with your cinnamon and sprinkle it between the crust layers before sealing – creates this amazing caramelized crunch. For holidays, I’ll sometimes use cookie cutters to make decorative shapes from the top crust – little leaves for Thanksgiving or stars for Christmas.
The beauty of apple pie is how adaptable it is – once you’ve mastered the basic recipe, the sky’s the limit! What variations will you try first?
How to Store and Reheat Classic Double-Crust Apple Pie with Cinnamon and Nutmeg
Now, let’s talk about keeping your masterpiece fresh and delicious – because let’s be honest, apple pie is just as good (maybe better?) the next day! Here’s exactly how I store and revive leftovers to keep that crust crisp and filling flavorful.
Room Temperature Storage: If you’ll be eating it within 2 days (and in my house, we usually do!), simply cover the pie loosely with aluminum foil or place it under a cake dome at room temperature. The crust stays beautifully crisp this way. Just be sure it’s completely cooled first – trapping heat leads to soggy sadness.
Refrigerator Storage: For longer storage (up to 4 days), wrap tightly in plastic wrap or foil and refrigerate. The crust will soften a bit, but don’t worry – we’ll fix that when reheating. Pro tip: Place wax paper between the pie and wrap to prevent sticking to those beautiful crimped edges.
Freezing: Yes, you can freeze this pie! Wrap the cooled pie tightly in plastic, then foil, and freeze for up to 3 months. Thaw overnight in the fridge before reheating. I’ve even frozen unbaked pies – just assemble, freeze solid, then wrap well. Bake straight from frozen, adding about 20 extra minutes.
Reheating Like a Pro
Here’s my secret for bringing back that just-baked magic:
- Oven method: Preheat to 350°F (175°C). Place pie on a baking sheet and loosely tent with foil. Heat for about 15-20 minutes until warmed through. For extra crispness, remove foil for the last 5 minutes.
- Air fryer hack: For single slices, 320°F (160°C) for 4-5 minutes works wonders! The circulating air crisps the crust beautifully.
- No microwave! (Unless you enjoy soggy crust – then by all means, zap away.)
One last tip: If the edges seem dry after storage, brush them lightly with melted butter before reheating. It’s like giving your pie a little spa treatment before its encore performance!
Nutritional Information for Classic Double-Crust Apple Pie with Cinnamon and Nutmeg
Now, let’s be real – we don’t eat apple pie for its nutritional benefits! But in case you’re curious (or keeping track), here’s the approximate breakdown per generous slice. Remember, these numbers can vary based on your exact ingredients and portion sizes – apples differ in sweetness, and let’s be honest, who actually measures their slice perfectly?
- Calories: 320 (worth every one!)
- Total Fat: 14g (hey, butter makes it better)
- Saturated Fat: 9g
- Carbohydrates: 45g
- Fiber: 3g (thank you, apple skins!)
- Sugar: 25g (mostly from the apples and a little extra love)
- Protein: 3g
- Sodium: 150mg
A quick note: These values are estimates based on standard ingredients. If you use different apple varieties (like all Granny Smiths versus all Honeycrisps), swap in coconut oil for butter, or adjust sugar amounts, your numbers will change. My philosophy? Enjoy a slice (or two) of this homemade goodness – life’s too short to stress over dessert nutrition facts when it’s made with real ingredients and lots of love!
Now, who’s ready for seconds?

Common Questions About Classic Double-Crust Apple Pie with Cinnamon and Nutmeg
Over the years, I’ve gotten all sorts of pie questions from friends and family – here are the ones that come up most often with my tried-and-true answers!
Can I use store-bought pie crust to save time?
Absolutely! While homemade is heavenly, a good-quality pre-made crust works in a pinch (I won’t tell grandma). Just be sure to still chill it before rolling out, and maybe brush with that egg wash for extra golden goodness.
Help! My bottom crust is always soggy. What am I doing wrong?
Two tricks: First, place your pie plate on a preheated baking sheet – the extra heat helps crisp the bottom. Second, sprinkle a thin layer of crushed graham crackers or breadcrumbs on the bottom crust before adding filling – they’ll absorb excess juice like little flavor sponges!
What’s the best apple variety for pie?
I swear by a mix – my go-to is 2 parts tart Granny Smith for structure and 1 part sweet Honeycrisp for flavor. But any firm apple works; just avoid super juicy ones like Red Delicious that turn to mush.
Can I make this pie ahead and bake it later?
You bet! Assemble the pie completely, then freeze it solid before wrapping tightly. When ready, bake straight from frozen – just add 15-20 minutes to the baking time. The crust actually comes out extra flaky this way!
Why did my filling bubble over and make a mess?
Ah, the classic pie volcano! Next time, leave more space between the filling and crust rim (about 1/2 inch), and place a foil-lined baking sheet on the rack below to catch drips. And remember – juicy spills mean people will know your pie is homemade!
There you have it – everything you need to create the most amazing Classic Double-Crust Apple Pie with Cinnamon and Nutmeg! From my grandma’s kitchen to yours, this recipe is all about that perfect balance of flaky crust, sweet-spiced apples, and cozy memories. I can’t wait for you to experience that magical moment when you pull your golden, bubbling masterpiece from the oven and your whole house smells like love. So what are you waiting for? Grab those apples and let’s get baking! Try this recipe and share your results in the comments – I’d love to hear about your pie adventures!
For more delicious recipes and inspiration, check out our recent posts or follow us on Pinterest!
Print
Irresistible Classic Double-Crust Apple Pie with Cinnamon & Nutmeg – 7 Perfect Tips
- Total Time: 1 hour 20 minutes
- Yield: 1 pie (8 servings) 1x
- Diet: Vegetarian
Description
A traditional double-crust apple pie with warm cinnamon and nutmeg flavors. Perfect for holidays or family gatherings.
Ingredients
- 2 1/2 cups all-purpose flour
- 1 teaspoon salt
- 1 cup unsalted butter, chilled and diced
- 6–8 tablespoons ice water
- 6–7 medium apples, peeled and sliced
- 3/4 cup granulated sugar
- 2 tablespoons lemon juice
- 1 1/2 teaspoons ground cinnamon
- 1/4 teaspoon ground nutmeg
- 2 tablespoons unsalted butter, diced
- 1 egg, beaten (for glaze)
Instructions
- Mix flour and salt in a bowl. Cut in butter until crumbly.
- Add water gradually until dough forms. Divide into two disks and chill for 1 hour.
- Preheat oven to 375°F (190°C).
- Toss apples with sugar, lemon juice, cinnamon, and nutmeg.
- Roll out one dough disk and place in a pie dish. Add apple filling and dot with butter.
- Roll out the second dough disk and place on top. Seal edges and cut slits for ventilation.
- Brush with beaten egg and bake for 45-55 minutes until golden brown.
- Cool before serving.
Notes
- Use a mix of tart and sweet apples for balanced flavor.
- Chill dough to prevent shrinking.
- Place pie on a baking sheet to catch drips.
- Prep Time: 30 minutes
- Cook Time: 50 minutes
- Category: Dessert
- Method: Baking
- Cuisine: American
Nutrition
- Serving Size: 1 slice
- Calories: 320
- Sugar: 25g
- Sodium: 150mg
- Fat: 14g
- Saturated Fat: 9g
- Unsaturated Fat: 4g
- Trans Fat: 0g
- Carbohydrates: 45g
- Fiber: 3g
- Protein: 3g
- Cholesterol: 45mg