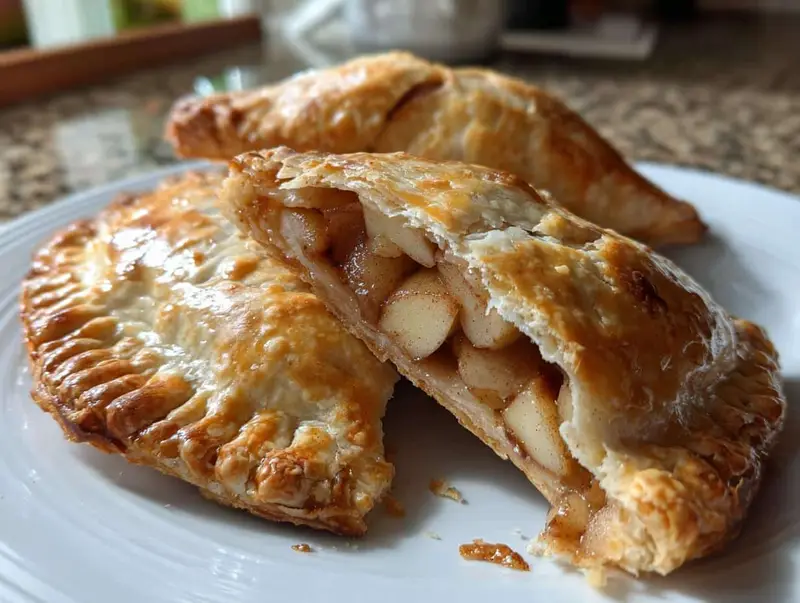
There’s something magical about handheld desserts—no plates, no fuss, just pure, flaky, buttery joy. My love for Apple Hand Pies started when I was a kid, watching my grandma roll out dough on her flour-dusted countertop. The smell of cinnamon and caramelized apples would fill the kitchen, and I’d sneak bites of filling when she wasn’t looking. These little pies are everything you want in a dessert: golden, crisp crust hugging a sweet-tart apple filling, warm with spice. Perfect for lunchboxes, picnics, or just eating over the sink because, let’s be real, sometimes you can’t wait. Trust me, once you try them, you’ll never go back to store-bought.
Table of Contents
Table of Contents
Why You’ll Love These Apple Hand Pies
Let me tell you why these little pockets of joy will become your new obsession:
- They’re ridiculously flaky: That buttery crust shatters with every bite—just like grandma’s pie, but portable!
- Ready in under an hour: No fancy equipment needed, and the dough comes together faster than you can peel an apple.
- Kid (and adult) approved: My niece calls them “apple tacos” and begs for them in her lunchbox. No crumbs, no mess.
- Customizable fillings: Add a drizzle of caramel or swap in pears if you’re feeling wild—they’re impossible to mess up.
- They freeze like a dream: Bake a batch on Sunday, and you’ve got instant desserts all week. Just pop one in the toaster oven—boom, warm pie magic.
Seriously, these are the ultimate grab-and-go treat. You’ll want to make a double batch—they disappear fast!
Ingredients for Apple Hand Pies
Here’s everything you’ll need to make these flaky little wonders – and yes, that butter must be cold! I learned that the hard way after my first attempt turned into a sticky mess.
- For the crust: 2 cups all-purpose flour (spooned and leveled), 1/2 teaspoon salt, 1/2 cup unsalted butter (chilled and diced into small cubes), 4 tablespoons ice water
- For the filling: 2 medium Granny Smith apples (peeled and diced small), 1/4 cup packed brown sugar, 1 teaspoon cinnamon, 1 tablespoon fresh lemon juice
- For finishing: 1 large egg (beaten with 1 teaspoon water for egg wash)
Pro tip: Keep everything cold – I even chill my mixing bowl sometimes. Warm dough equals tough pies, and nobody wants that!
How to Make Apple Hand Pies
Okay, here’s where the magic happens! Don’t let the steps intimidate you – I promise it’s easier than it looks. Just follow along and soon you’ll be biting into warm, flaky perfection.
Preparing the Dough
First things first – preheat that oven to 375°F (190°C). While it’s heating up, let’s make the dough. In a big bowl, whisk together the flour and salt. Now grab your chilled butter cubes (I keep mine in the freezer until the last second) and start cutting them into the flour using a pastry cutter or two knives. You’re looking for pea-sized crumbs – don’t overmix!
Here’s my trick: sprinkle in the ice water one tablespoon at a time, mixing with a fork until the dough just comes together. It should look shaggy but hold when pinched. Form it into a disk, wrap in plastic, and chill for at least 30 minutes. This rest time is crucial – it relaxes the gluten and makes rolling easier.
Making the Apple Filling
While the dough chills, let’s make the filling. Toss your diced apples with brown sugar, cinnamon, and lemon juice in a bowl. The lemon juice keeps the apples from browning and adds a nice little zing. I like to let this mixture sit for 10 minutes so the apples release some juices – just drain any excess before filling the pies or you’ll get soggy bottoms (and nobody likes that!).
Assembling and Baking
Time to roll! Dust your surface lightly with flour and roll the dough to about 1/8-inch thickness. Use a round cutter (I use a 4-inch wide-mouth jar lid in a pinch!) to cut circles. Place a heaping tablespoon of filling on one half of each circle, leaving a border. Brush the edges with egg wash, fold over, and crimp with a fork to seal. Poke a couple steam holes in the top – this prevents explosions!
Brush the tops with more egg wash for that gorgeous golden shine. Bake for 20-25 minutes until they’re puffed and golden brown like little suns. Let them cool slightly before devouring – that filling gets hot!
Tips for Perfect Apple Hand Pies
After burning my fingers on one too many “apple lava pies,” I’ve learned a few secrets. Always use Granny Smith apples – their tartness balances the sweetness perfectly and they hold their shape during baking. Make the dough the night before (it actually improves the texture!). And whatever you do, resist overfilling – that tablespoon measure isn’t a suggestion! Too much filling guarantees leaky pies and a messy oven.
Bonus tip: If your edges aren’t sealing well, chill the assembled pies for 10 minutes before baking. Cold dough = better crimps!
Apple Hand Pies Variations
Oh, the possibilities! Once you’ve mastered the classic, try these fun twists: drizzle warm caramel over the baked pies for extra indulgence (my nephew calls them “apple-caramel bombs”). Swap in ripe pears with a pinch of cardamom for an elegant twist. Feeling savory? Fold in shredded cheddar cheese with the apples – trust me, that sweet-salty combo is magic. For holiday flair, add dried cranberries and orange zest to the filling. The dough’s your canvas – go wild!
Serving and Storing Apple Hand Pies
Here’s the hardest part – waiting! Let your hand pies cool for at least 15 minutes before biting in, unless you enjoy molten apple lava burns (I speak from experience). They’re divine warm with a scoop of vanilla ice cream melting over the top. Store leftovers in an airtight container at room temp for up to 3 days – though mine never last that long! To reheat, just pop them in a 350°F oven for 5 minutes to crisp up the crust again. Pro tip: Freeze unbaked pies on a tray, then transfer to a freezer bag. Bake straight from frozen, adding a few extra minutes to the cooking time – instant homemade dessert anytime!
Apple Hand Pies Nutrition
Each little hand pie packs about 240 calories – not bad for a buttery, flaky treat! You’re looking at 10g fat (6g saturated), 35g carbs with 2g fiber, and 3g protein. Of course, these numbers might shift slightly depending on your apple size or if you go wild with caramel drizzle (no judgment here!). Just remember – they’re small but mighty satisfying.
FAQs About Apple Hand Pies
Can I freeze apple hand pies? Absolutely! My freezer always has a stash. You’ve got two options: freeze unbaked pies on a tray before transferring to bags (add 3-5 extra minutes when baking from frozen), or freeze baked ones and reheat in a 350°F oven. Either way, they’ll taste freshly made.
What are the best apples to use? Granny Smith is my go-to – their tartness cuts through the sweetness and they hold up beautifully when baked. But if you’re out, Honeycrisp or Braeburn work too. Just avoid super soft varieties like Red Delicious unless you like mushy filling!
Why did my pies leak everywhere? Oh honey, we’ve all been there! Usually means: too much filling (stick to that 1 tablespoon measure!), not enough crimping (press those edges hard with a fork), or forgot the steam holes (those little vents are crucial). Next batch will be perfect!
Can I make the dough ahead? You bet – in fact, I prefer it! The dough keeps refrigerated for 2 days or frozen for a month. Just thaw overnight in the fridge if frozen. The resting time actually makes the crust flakier. Win-win!
How do I keep the bottom from getting soggy? Two tricks: drain any excess juice from the apple mixture before filling, and bake on a preheated baking sheet. That extra heat blast gives the bottom crust a head start. Works like a charm!
Print
Flaky Apple Hand Pies You’ll Crave in Just 30 Minutes!
- Total Time: 55 minutes
- Yield: 8 hand pies 1x
- Diet: Vegetarian
Description
Delicious, flaky hand pies filled with sweet apple cinnamon filling. Perfect for on-the-go snacking or dessert.
Ingredients
- 2 cups all-purpose flour
- 1/2 teaspoon salt
- 1/2 cup unsalted butter, chilled and diced
- 4 tablespoons ice water
- 2 apples, peeled and diced
- 1/4 cup brown sugar
- 1 teaspoon cinnamon
- 1 tablespoon lemon juice
- 1 egg, beaten (for egg wash)
Instructions
- Preheat oven to 375°F (190°C).
- Mix flour and salt in a bowl. Cut in butter until mixture resembles coarse crumbs.
- Add ice water, 1 tablespoon at a time, until dough comes together. Chill for 30 minutes.
- In another bowl, mix apples, brown sugar, cinnamon, and lemon juice.
- Roll out dough and cut into circles. Place apple filling on half of each circle.
- Fold dough over filling and crimp edges with a fork. Brush with egg wash.
- Bake for 20-25 minutes or until golden brown. Let cool before serving.
Notes
- Use Granny Smith apples for best results.
- Dough can be made ahead and refrigerated overnight.
- Store leftovers in an airtight container for up to 3 days.
- Prep Time: 30 minutes
- Cook Time: 25 minutes
- Category: Dessert
- Method: Baking
- Cuisine: American
Nutrition
- Serving Size: 1 hand pie
- Calories: 240
- Sugar: 12g
- Sodium: 150mg
- Fat: 10g
- Saturated Fat: 6g
- Unsaturated Fat: 3g
- Trans Fat: 0g
- Carbohydrates: 35g
- Fiber: 2g
- Protein: 3g
- Cholesterol: 40mg


