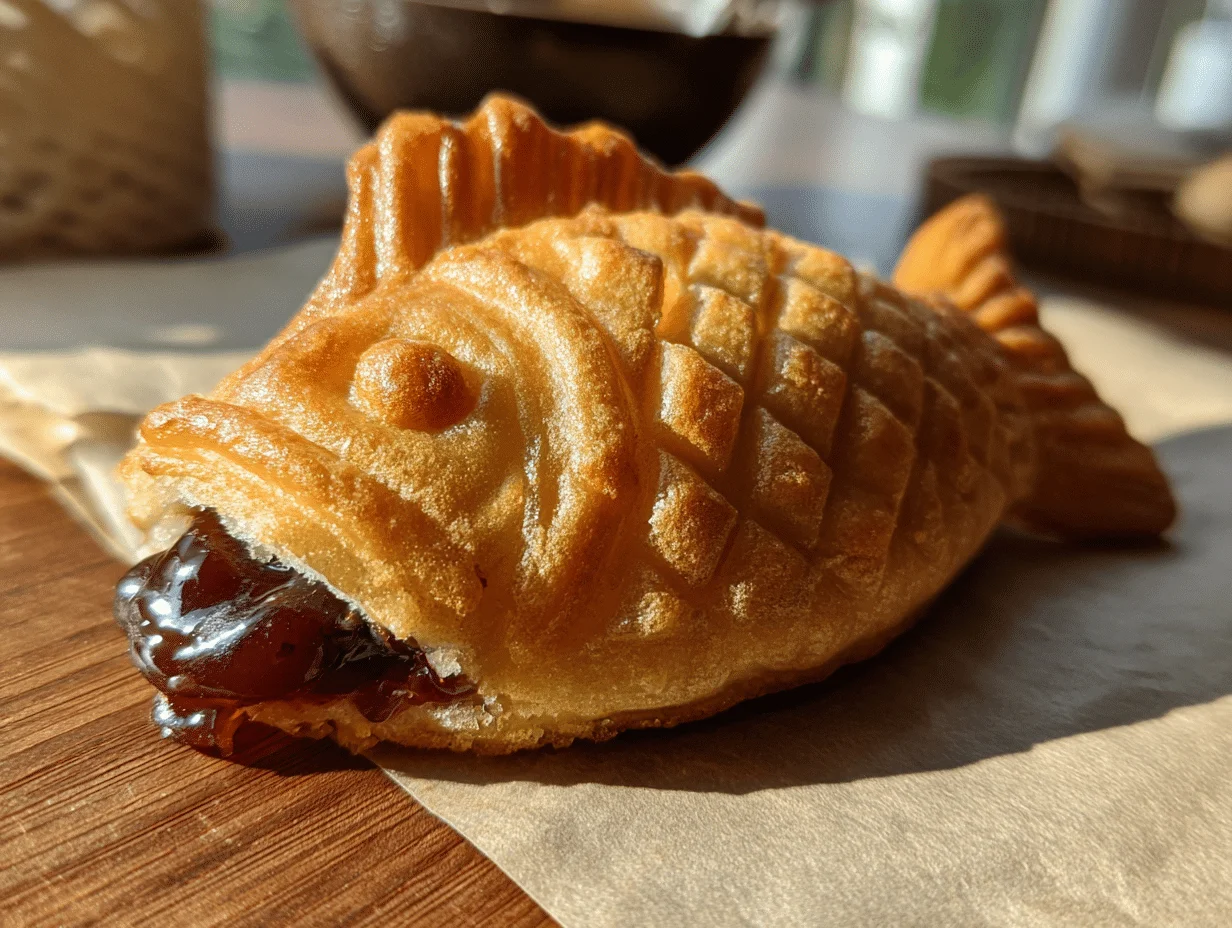
Oh, taiyaki! Just saying the name makes me smile. These adorable fish-shaped cakes stole my heart on my first trip to Tokyo, where street vendors sold them piping hot with that irresistible crispy shell giving way to sweet, molten red bean paste. I still remember burning my fingertips because I couldn’t wait to take that first bite!
What I love most about taiyaki (besides how downright cute they are) is how they perfectly balance textures. The outside gets beautifully golden and crisp from the special cast iron molds, while the inside stays fluffy and warm. And that sweet surprise in the center? Absolute magic.
When I finally got my hands on a taiyaki pan, my first attempts were… let’s call them “abstract fish art.” But after many happy kitchen experiments (and a few wonky-looking taiyaki), I nailed down the perfect batter consistency and cooking time. Now my kids beg me to make them almost every weekend!
Why You’ll Love This Taiyaki Recipe
Trust me, once you try making taiyaki at home, you’ll wonder why you ever waited! Here’s why this recipe is about to become your new favorite:
- So easy even kids can help – The batter comes together in minutes with simple pantry staples
- Endless filling possibilities – While red bean paste is classic, we’ll explore other delicious options
- That perfect texture contrast – Crispy golden shell hugging a soft, cakey interior
- Instant crowd-pleaser – Who can resist these adorable fish-shaped treats?
- Fun to customize – Add matcha powder to the batter or drizzle with chocolate for extra flair
The best part? You don’t need to be a pastry chef to master these. My first batch looked more like abstract art than fish, but even those “special” ones tasted amazing!
Ingredients for Taiyaki
Gathering your ingredients is the first step to taiyaki success! Here’s what you’ll need for that perfect crispy-on-the-outside, fluffy-on-the-inside texture:
- 200g all-purpose flour (sifted) – Sifting makes the batter extra light and lump-free
- 1 tsp baking powder – Our little rising helper for that perfect puff
- 1 large egg (beaten) – Room temperature eggs incorporate better
- 200ml whole milk (room temperature) – Cold milk can make the batter too thick
- 2 tbsp sugar – Just enough sweetness to balance the fillings
- 1 tbsp honey – My secret for that gorgeous golden color
- 200g sweet red bean paste (anko) – Store-bought works great, or make your own if you’re feeling adventurous
- Vegetable oil – For greasing – just a light brush does the trick
Pro tip from my many kitchen experiments: measure everything before you start mixing. There’s nothing worse than realizing you’re out of milk when your batter’s half-made! The red bean paste can be found at Asian markets or online – I like the smooth version, but chunky works too if you prefer more texture.
Equipment Needed for Taiyaki
Alright, let’s talk tools! The star of the show is obviously the taiyaki pan – that adorable fish-shaped cast iron griddle that gives these treats their signature look. Mine’s become one of my most-used kitchen gadgets! If you don’t have one yet (or can’t find one), a regular waffle iron or even pancake griddle can work in a pinch – you’ll just get “abstract fish” shapes instead.
Beyond that, you’ll need:
- Mixing bowls – One for dry ingredients, one for wet
- Whisk – A simple one works great for blending the batter
- Piping bag or spoon – For neat filling distribution (I started with a spoon but switched to piping for better control)
- Spatula – To help release your taiyaki from the pan without breaking them
That’s it! No fancy equipment needed – just basics you probably already have in your kitchen. Well, except maybe that cute fish pan…
How to Make Taiyaki Step by Step
Ready to make some adorable fish-shaped magic? Don’t worry if your first few don’t come out picture-perfect – mine certainly didn’t! Here’s my tried-and-true method after many happy (and sometimes hilarious) kitchen experiments.
Preparing the Taiyaki Batter
First things first – let’s make that perfect batter! In one bowl, whisk together your sifted flour, baking powder, and sugar. In another bowl, mix the egg, milk, and honey until smooth. Now, here’s the key – pour the wet ingredients into the dry and gently fold together. Don’t overmix! A few lumps are totally fine – they’ll disappear during cooking. Let the batter rest for about 10 minutes while you prep everything else.
Cooking the Taiyaki
Heat your taiyaki pan over medium heat – this is crucial! Too hot and they’ll burn; too low and they won’t crisp up. Lightly brush the molds with oil using a pastry brush. Pour batter to fill each fish mold about 2/3 full – I use a measuring cup for consistency. Now the fun part – add about 1-2 teaspoons of red bean paste right in the center. Top with more batter until the mold is nearly full (but not overflowing!). Close the lid and resist peeking for at least 3 minutes.

Flipping and Finishing
After about 3-4 minutes, carefully open the pan – the edges should look set and golden. Here comes the tricky part: flip the entire pan (I hold the handle with both hands for this). Cook another 3-4 minutes until both sides are beautifully bronzed. Gently remove with a spatula – if they resist, give them another minute. That first whiff of sweet, toasty goodness? Pure happiness!
Tips for Perfect Taiyaki
After making more taiyaki than I can count (and yes, plenty of “special” shaped ones), I’ve learned some tricks that make all the difference:
- Medium heat is your friend – Too hot and they burn before cooking through; too low and they won’t get crispy
- Let the batter rest 10 minutes – This lets the flour hydrate for a smoother texture
- Tap the pan gently – Helps release air bubbles for even cooking
- Don’t overfill! – About 2/3 full prevents messy spills when closing
- Use room temp ingredients – Colder batter doesn’t spread as evenly in the molds
My golden rule? The first taiyaki is always the test fish – adjust timing or heat as needed. Even the “oops” ones still taste amazing with a cup of tea!
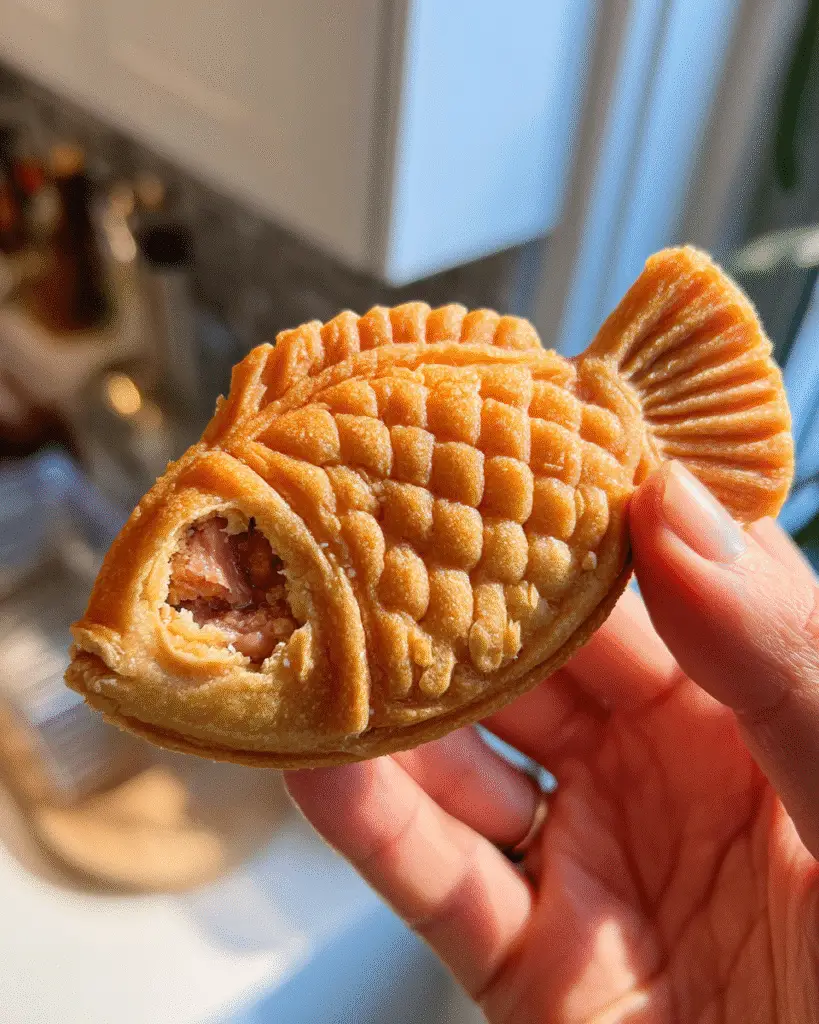
Taiyaki Variations and Fillings
Oh, the fun really begins when you start playing with different fillings! While sweet red bean paste will always have my heart (it’s classic for a reason), I love getting creative with other options. Here are some of my family’s favorites:
- Chocolate lovers’ dream – Nutella or melted chocolate chips make an indulgent center that oozes beautifully when warm
- Custard cream – Store-bought pastry cream or homemade custard brings a lovely creamy texture
- Cheese surprise – A mix of cream cheese and sugar makes a slightly tangy twist
- Fruit jams
– Strawberry, apricot, or even yuzu marmalade add bright, fruity notes
My latest experiment? A scoop of vanilla ice cream inside while the taiyaki is still warm – messy but absolutely worth it! The beauty is you can mix and match to suit any taste. Next time I’m trying peanut butter and banana – because why not?
Serving and Storing Taiyaki
Oh, you’ll want to eat these warm – that’s when the crispy shell is at its best and the filling turns gloriously gooey! I always serve my taiyaki fresh from the pan with a dusting of powdered sugar or a drizzle of honey. If you must save some (who has that kind of willpower?), pop them in an airtight container for up to 2 days. For longer storage, freeze them in a single layer – they’ll keep for about a month. Just reheat in a toaster or 300°F oven for 5 minutes to bring back that fresh-baked magic!
Taiyaki FAQ
Over the years, I’ve gotten so many great questions about making taiyaki – here are the ones that pop up most often with all my hard-earned answers!
Can I make taiyaki without a special pan?
Absolutely! While the fish shape is part of the charm, you can use a waffle iron or even a regular skillet. The texture won’t be quite the same, but you’ll still get that delicious crispy exterior. Pro tip: If using a waffle iron, cook them like pancakes – just spoon smaller portions and flip carefully.
Is there a vegan version of this recipe?
Yes! Swap the egg for 1/4 cup applesauce or mashed banana, and use plant-based milk. For the filling, red bean paste is naturally vegan (just check the label). I’ve had great results with almond milk and flax eggs – the texture comes out perfect!
What’s the best flour substitute?
If you’re out of all-purpose flour, cake flour works beautifully for extra tenderness. For gluten-free, I’ve had success with a 1:1 gluten-free blend (add 1/2 tsp xanthan gum if your mix doesn’t include it). The batter might be slightly thinner, so adjust cooking time.
How do I prevent sticking?
The magic combo: properly seasoned cast iron, medium heat, and just enough oil. I lightly brush the molds before each batch – too much oil makes them greasy. If one sticks, don’t panic! Let it cook another minute and gently loosen with a thin spatula.
Can I prepare the batter ahead?
You bet! The batter keeps well in the fridge for up to 24 hours (just give it a quick stir before using). I often mix it up in the morning for an easy afternoon treat. The resting time actually improves the texture!
Got more questions? I love helping fellow taiyaki enthusiasts – drop them in the comments!
Nutritional Information for Taiyaki
Okay, let’s talk numbers – but remember, these are estimates since your exact ingredients might vary slightly. One standard taiyaki (made exactly as written in this recipe) comes in at about 180 calories with 3g fat and 15g sugar. They’ve got a nice little protein boost too at 4g per fish! The red bean paste adds 2g fiber – not bad for a sweet treat.
Now, here’s my little disclaimer: swap in different fillings or adjust sugar amounts, and these numbers will dance around. That Nutella-filled version I love? Let’s just say it’s a “sometimes food” in our house! But honestly, when something tastes this good and makes you smile this much, who’s counting?
For more delicious recipes and inspiration, check out our Pinterest page!
Print
3-Ingredient Taiyaki Magic: Irresistible Fish Dessert Delight
- Total Time: 18 mins
- Yield: 6 taiyaki 1x
- Diet: Vegetarian
Description
Taiyaki is a popular Japanese fish-shaped dessert filled with sweet red bean paste or other fillings. It has a crispy exterior and soft interior.
Ingredients
- 200g all-purpose flour
- 1 tsp baking powder
- 1 egg
- 200ml milk
- 2 tbsp sugar
- 1 tbsp honey
- 200g sweet red bean paste (anko)
- Vegetable oil (for greasing)
Instructions
- Mix flour, baking powder, and sugar in a bowl.
- Add egg, milk, and honey. Whisk until smooth.
- Heat the taiyaki pan and lightly grease with oil.
- Pour batter into one side of the fish mold.
- Add 1-2 tsp of red bean paste in the center.
- Cover with more batter and close the mold.
- Cook for 3-4 minutes on medium heat, then flip.
- Cook another 3-4 minutes until golden brown.
- Remove and let cool slightly before serving.
Notes
- Use a piping bag for easier batter filling.
- Adjust sweetness by reducing sugar if needed.
- Experiment with fillings like Nutella or custard.
- Keep heat medium to avoid burning.
- Prep Time: 10 mins
- Cook Time: 8 mins
- Category: Dessert
- Method: Stovetop
- Cuisine: Japanese
Nutrition
- Serving Size: 1 taiyaki
- Calories: 180
- Sugar: 15g
- Sodium: 50mg
- Fat: 3g
- Saturated Fat: 1g
- Unsaturated Fat: 2g
- Trans Fat: 0g
- Carbohydrates: 35g
- Fiber: 2g
- Protein: 4g
- Cholesterol: 30mg