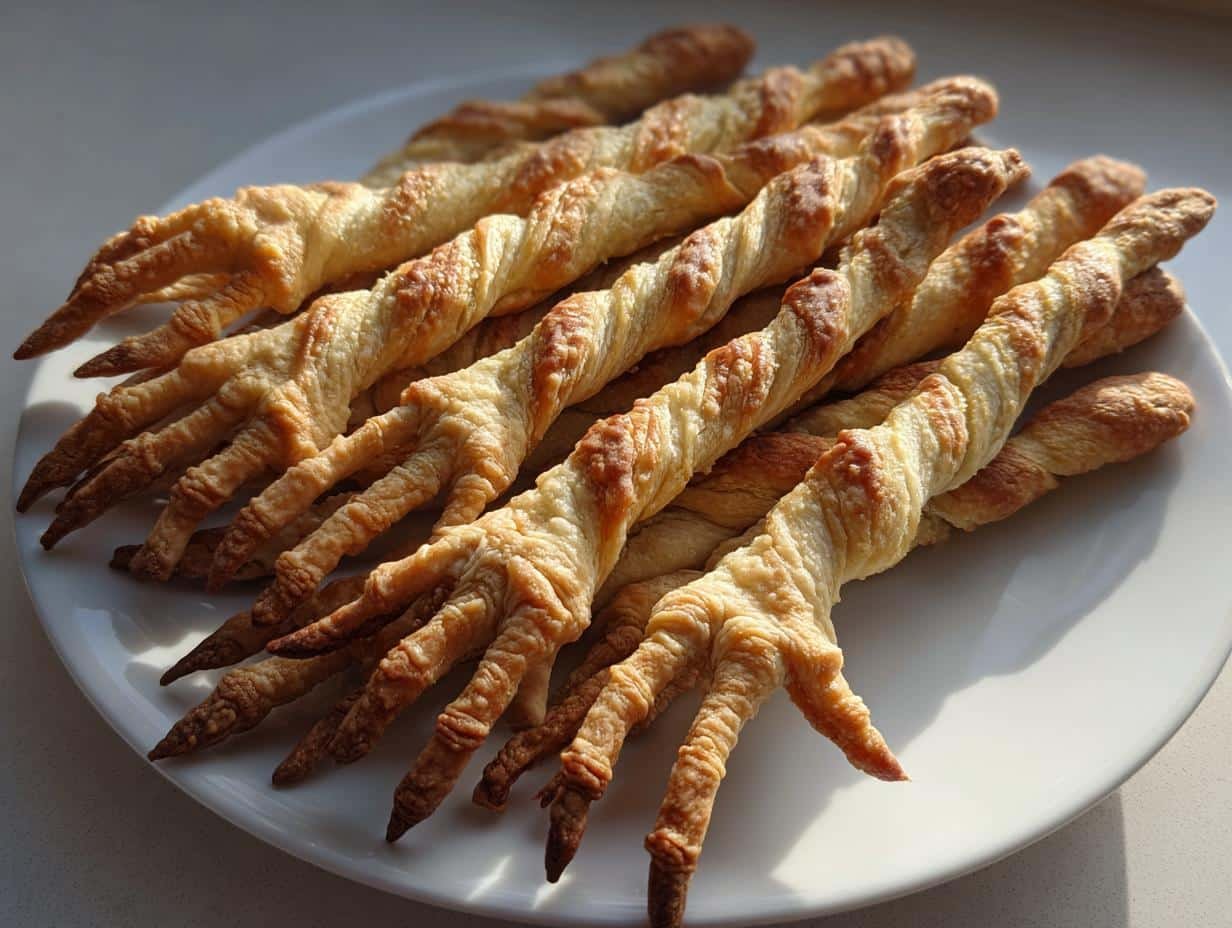
Oh my gosh, you should’ve seen the looks on everyone’s faces last Halloween when I brought out a tray of these Witch’s Fingers Breadsticks! My niece actually screamed—then immediately grabbed three because they smelled so good. That’s the magic of these creepy little guys: they’re just spooky enough to make your party unforgettable, but so delicious that no one can resist sneaking a second (or fifth) one.
I’ve been making these breadsticks for years, ever since my sister dared me to create something “gross but tasty” for her annual Halloween bash. The trick is in the details—the way the almonds look like jagged fingernails, those unsettling knuckle creases, and if you’re feeling extra festive, a hint of green food coloring to really sell the “witchy” vibe. But the real surprise? They’re secretly simple to make. Just basic bread dough shaped into gnarled fingers, with an almond pressed into the tip and a quick egg wash for that eerie sheen.
Trust me, once you serve these at a party, you’ll never hear the end of it. Last year, my neighbor’s kid hid one in his pocket “for later”—that’s how good they are. And the best part? You probably have all the ingredients in your pantry right now.
Why You’ll Love Witch’s Fingers Breadsticks
Listen, I know Halloween recipes can be a hassle—who has time for complicated crafts when you’re juggling costumes and decorations? That’s why these breadsticks are my go-to every October. Let me count the ways they’ll become your new favorite tradition:
- So easy even a zombie could make them: Basic bread dough + simple shaping = maximum creepiness with minimal effort
- Instant party hit: They disappear faster than ghosts at sunrise (I always make double batches now)
- Kid-approved fun: Little hands love helping press in the almond “nails” and carve knuckle wrinkles
- Totally customizable: Go classic with plain dough or freak people out with green-tinted “witch skin”
Seriously, these are the Halloween snack that checks all the boxes—scary enough to get screams, tasty enough to earn recipe requests, and simple enough that you won’t curse like a witch while making them!
Ingredients for Witch’s Fingers Breadsticks
Gather these simple ingredients – I bet you’ve got most in your kitchen already! The magic happens with:
- 1 cup warm water (like bathwater, about 110°F – too hot kills the yeast!)
- 2 1/4 teaspoons active dry yeast (that little packet works perfectly)
- 1 tablespoon sugar (to feed our yeasty friends)
- 3 cups all-purpose flour (plus extra for dusting those creepy fingers)
- 1 teaspoon salt (trust me, it makes all the difference)
- 2 tablespoons olive oil (for that perfect breadstick texture)
- 1 egg (for the spooky egg wash glaze)
- 24 whole almonds (the “nails” – raw ones look most realistic)
Psst—if you want green witch fingers, grab some food coloring too. I use about 10 drops for that properly ghoulish hue!
How to Make Witch’s Fingers Breadsticks
Alright, let’s get our hands doughy! Making these spooky fingers is way easier than you’d think. I’ve broken it down into simple steps that even beginner bakers can follow. Just imagine you’re a mad scientist creating the perfect creepy snack!
Preparing the Dough
First, wake up your yeast in that warm water – it should get all foamy and bubbly after about 5 minutes, like a little yeast Jacuzzi! If it doesn’t bubble, your water might’ve been too hot or cold. Add the sugar, then gradually mix in the flour and salt with your trusty wooden spoon. When it gets too thick to stir, that’s your cue to get hands-on! Knead for about 5 minutes until it’s smooth and elastic – think “baby witch’s bottom” texture. Let it rise in an oiled bowl covered with a damp towel for 1 hour (I stick mine in the microwave with the door cracked for a draft-free spot). The dough should double in size – magic!
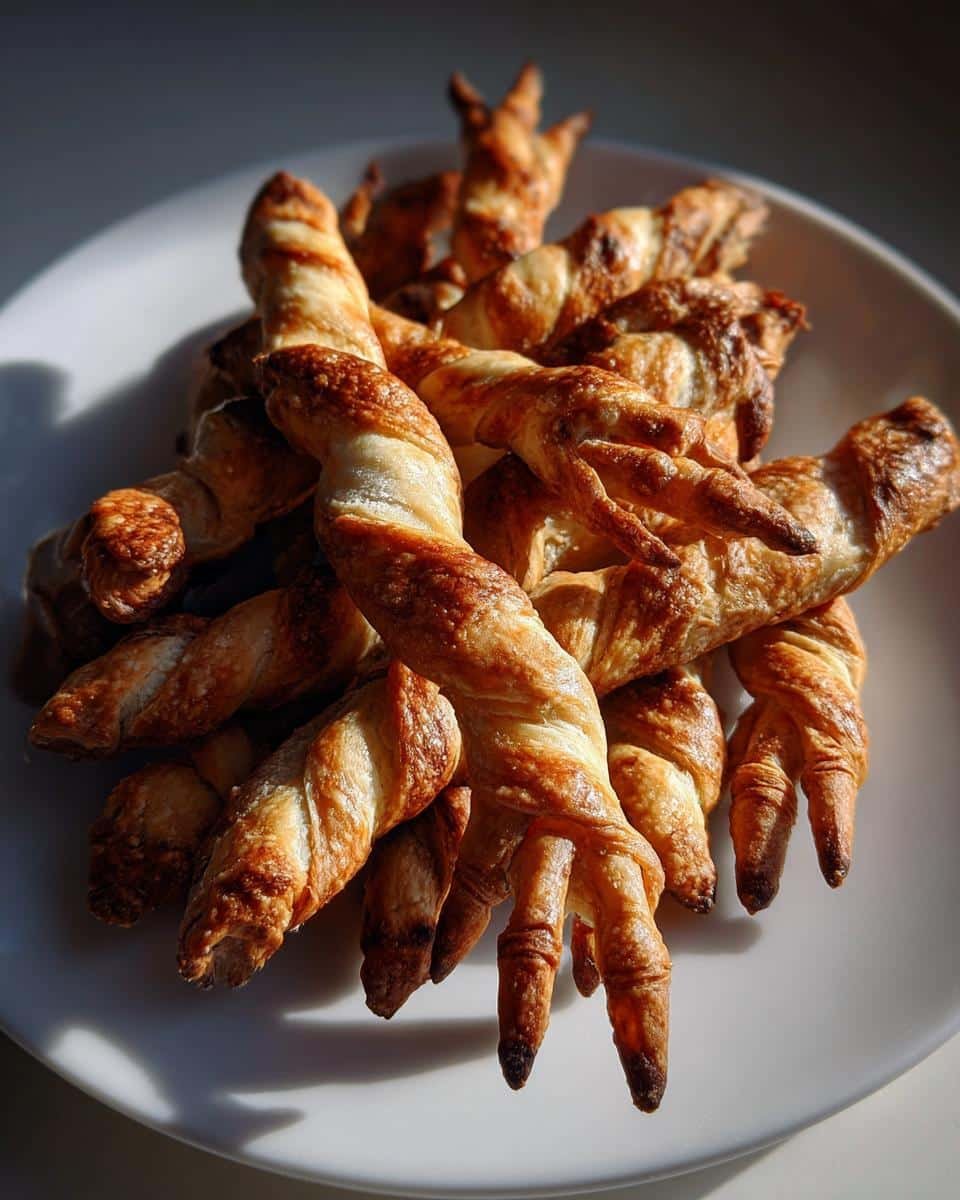
Shaping the Witch’s Fingers
This is where the fun begins! Punch down the dough (great stress reliever) and divide into 24 equal pieces. Roll each piece into a thin snake about 4 inches long – uneven is good here, real fingers aren’t perfect! Pinch the dough near the top to create a knobby “knuckle,” then press an almond firmly into the tip for the nail. Use a sharp knife to make three shallow cuts where knuckles would be. Pro tip: make some fingers bent by folding the dough slightly before baking – extra creepy points!
Baking and Finishing Touches
Whisk that egg with a tablespoon of water for the glaze – this gives them that eerie sheen. Brush it gently over each finger (don’t dislodge your almond nails!). Bake at 375°F for 15-20 minutes until golden. If you went with green food coloring, they’ll look properly ghoulish as they bake! Let cool slightly before serving – warm “fingers” are extra disturbing. Watch your guests’ reactions when they realize these terrifying treats are actually delicious breadsticks!
Tips for Perfect Witch’s Fingers Breadsticks
After years of making these (and many hilarious fails), here are my hard-earned secrets for the most realistic, delicious witch fingers every time:
- Don’t over-knead – Stop when the dough just comes together. Too much kneading makes fingers look sausage-like instead of gnarled.
- Chill the dough 15 minutes if it’s too sticky – cold dough holds those creepy knuckle creases better.
- Use a super sharp knife for knuckles – Dull blades drag instead of making clean cuts. I keep a paring knife just for this!
- Press almonds in deep – Angle them slightly downward so they don’t pop off during baking.
- Go for uneven sizes – Real witch fingers wouldn’t be uniform! Make some fat, some skinny for extra creep factor.
One Halloween, I got carried away and made some fingers with two “nails” – the kids still talk about those mutant fingers!
Serving and Storing Witch’s Fingers Breadsticks
Here’s how to make your witch fingers the talk of the graveyard! Serve them sticking out of a bowl of warm marinara sauce – it looks like they’re crawling out of a bloody pool (the kids go nuts for this). For extra drama, arrange them on a tray with plastic spiders crawling between the fingers. Store leftovers in an airtight container for up to 3 days – if they last that long. A quick 5-minute warm-up in the oven brings back their fresh-baked eeriness!
Witch’s Fingers Breadsticks Variations
Want to put your own spooky spin on these? Try these fun twists that always impress my Halloween crowd! For “bloody” nails, brush the almonds with paprika or beet juice before baking—so gruesome! Gluten-free? Swap in your favorite 1-to-1 flour blend (just add a touch more liquid). Feeling extra wicked? Add black sesame seeds to the dough for “dirty witch skin” texture. My craziest version? Melted mozzarella “skin” peeling off some fingers—disgustingly delicious!
Nutrition Information for Witch’s Fingers Breadsticks
Okay, let’s be real—you’re not eating witch fingers for their health benefits! But since I know some folks like to track these things, here’s the nutritional breakdown per breadstick (remember, these are estimates—your mileage may vary depending on exact ingredients):
- Calories: 90
- Fat: 2g (0.3g saturated)
- Carbohydrates: 15g
- Fiber: 1g
- Protein: 2g
Not too scary, right? Though I can’t promise your waistline won’t scream if you eat the whole batch like I sometimes do—they’re dangerously addictive!
Frequently Asked Questions
Q1. Can I make Witch’s Fingers Breadsticks ahead of time?
Absolutely! These spooky snacks actually taste great made a day in advance. Just bake them completely, let cool, and store in an airtight container. Before serving, pop them in a 350°F oven for 3-5 minutes to refresh. The almonds might loosen slightly, so I press them back in while still warm.
Q2. How do I keep the almond “nails” from falling off?
The trick is pressing them in deep at a slight downward angle before baking. If they still pop off, dab a tiny bit of egg wash on the almond before pressing it in—it acts like edible glue! For extra security, some bakers use a toothpick to make a small hole first.
Q3. Can I use something besides almonds for the nails?
Get creative! Slivered almonds work in a pinch, or try pumpkin seeds for a “dirtier” look. One year I used white chocolate chips for “zombie nails”—just press them in after baking so they don’t melt. Avoid whole peanuts though—they’re too round to look like fingernails.
Q4. My dough isn’t rising—what went wrong?
Usually it’s the yeast! Either your water was too hot (over 110°F kills yeast) or too cold (under 95°F won’t activate it). Also check your yeast’s expiration date—old yeast won’t foam properly. If it’s chilly in your kitchen, let the dough rise in a turned-off oven with the light on for warmth.
Q5. Can kids help make these?
Oh my gosh, yes! Kids love shaping the fingers and adding the “nails.” Just supervise the knife work for knuckles. Little hands might make chunkier fingers—which honestly look even creepier! Pro tip: give each kid their own dough ball to prevent arguments over whose finger is whose.
Share Your Spooky Creations
I live for Halloween food fails and triumphs—tag me in your witch finger photos so I can ooh and ah (or scream in terror)! Did yours turn out extra creepy? Did the kids freak out? Leave a comment below with your best spooky snack stories. And hey—if your breadsticks look more like zombie toes? Own it! That’s half the fun. You can find more fun recipes on our Pinterest page.
Print
24 Spooky Witch’s Fingers Breadsticks That Will Haunt Your Tastebuds
- Total Time: 1 hour 35 minutes
- Yield: 24 breadsticks 1x
- Diet: Vegetarian
Description
Spooky and fun Witch’s Fingers Breadsticks are perfect for Halloween. These creepy yet delicious breadsticks look like gnarled witch fingers and are great for parties.
Ingredients
- 1 cup warm water
- 2 1/4 tsp active dry yeast
- 1 tbsp sugar
- 3 cups all-purpose flour
- 1 tsp salt
- 2 tbsp olive oil
- 1 egg (for egg wash)
- 24 whole almonds
Instructions
- Mix warm water, yeast, and sugar. Let sit for 5 minutes until foamy.
- Add flour, salt, and olive oil. Knead until smooth.
- Cover and let rise for 1 hour.
- Divide dough into 24 pieces. Roll each into a thin finger shape.
- Press an almond into one end for the nail. Use a knife to make knuckle creases.
- Brush with egg wash. Bake at 375°F for 15-20 minutes.
Notes
- For extra creepiness, add green food coloring to the dough.
- Store in an airtight container for up to 3 days.
- Prep Time: 1 hour 15 minutes
- Cook Time: 20 minutes
- Category: Appetizer
- Method: Baking
- Cuisine: American
Nutrition
- Serving Size: 1 breadstick
- Calories: 90
- Sugar: 1g
- Sodium: 100mg
- Fat: 2g
- Saturated Fat: 0.3g
- Unsaturated Fat: 1.5g
- Trans Fat: 0g
- Carbohydrates: 15g
- Fiber: 1g
- Protein: 2g
- Cholesterol: 10mg