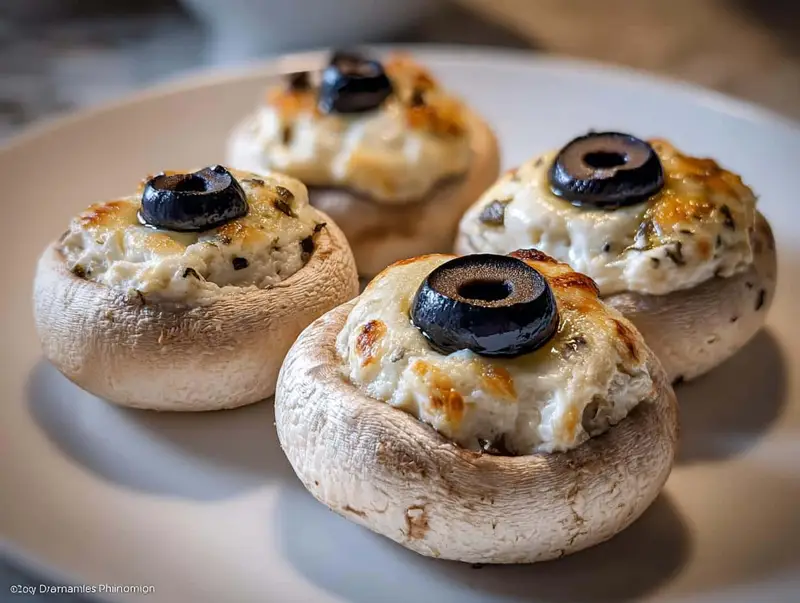
Oh my gosh, you have GOT to try these stuffed mushroom “eyeballs” for your next Halloween party! I first made them on a whim last October when I needed a last-minute appetizer, and now they’re my go-to creepy-cute dish that always gets gasps and giggles. Picture this: plump white mushroom caps filled with creamy cheese, each one staring up at your guests with a perfectly placed olive “pupil.” The best part? They only take about 30 minutes from start to finish, but look like you slaved over them.
I’ll never forget the first time I served these at our neighborhood Halloween potluck. The kids went nuts (in the best way), pretending the mushrooms were watching them as they ate. One little boy even “hid” from them behind his napkin! Adults love them too – the savory garlic-cheese filling balances perfectly with the earthiness of the mushrooms. And get this – they’re so simple that even when I’m running around like a madwoman finishing my witch costume, I can still whip up a batch without breaking a sweat.
Whether you’re throwing a big Halloween bash or just want to surprise your family with something fun at dinner, these stuffed mushroom eyeballs deliver maximum spook factor with minimal effort. Just wait until you see people’s faces when you bring these out!
Ingredients for Stuffed Mushroom “Eyeballs”
Here’s everything you’ll need to create these delightfully creepy appetizers. Trust me, you probably have most of this in your kitchen already!
- 12 large white mushrooms – Look for ones about 2 inches wide with nice round caps (these will be your eyeball bases!)
- 1/2 cup cream cheese, softened – Leave it out for 30 minutes first so it spreads like a dream
- 1/4 cup shredded mozzarella – This adds just the right amount of stretchy goodness
- 1 clove garlic, minced – Fresh is best for that punch of flavor
- 1/4 tsp salt and 1/4 tsp black pepper – Simple but essential flavor boosters
- 12 pitted black olives – The small, round ones work best for perfectly creepy “pupils”
- 1 tbsp olive oil – Just a light drizzle to keep things from sticking
See? Nothing too crazy! The olives are really the only special ingredient, and even those are easy to find. I always grab an extra can just in case I eat a few while prepping (oops!).
How to Make Stuffed Mushroom “Eyeballs”
Okay, let’s get these creepy little guys ready for your Halloween spread! I promise it’s easier than it looks – just follow these steps and you’ll have eyeballs staring back at you in no time.
- Heat things up: First, preheat your oven to 375°F (190°C). This gives it time to get nice and toasty while you prep everything else.
- Prep your ‘eyeballs’: Gently clean your mushrooms with a damp paper towel (no soaking – they’ll get soggy!). Carefully twist out the stems – I save these for omelets later!
- Make the ‘eye white’: In a bowl, mix together the cream cheese, mozzarella, garlic, salt, and pepper until it’s smooth and dreamy. Taste it – go ahead, I won’t tell! Add more garlic if you’re feeling bold.
- Stuff those caps: Spoon the cheese mixture into each mushroom cap, mounding it slightly. Don’t be shy – really pack it in there!
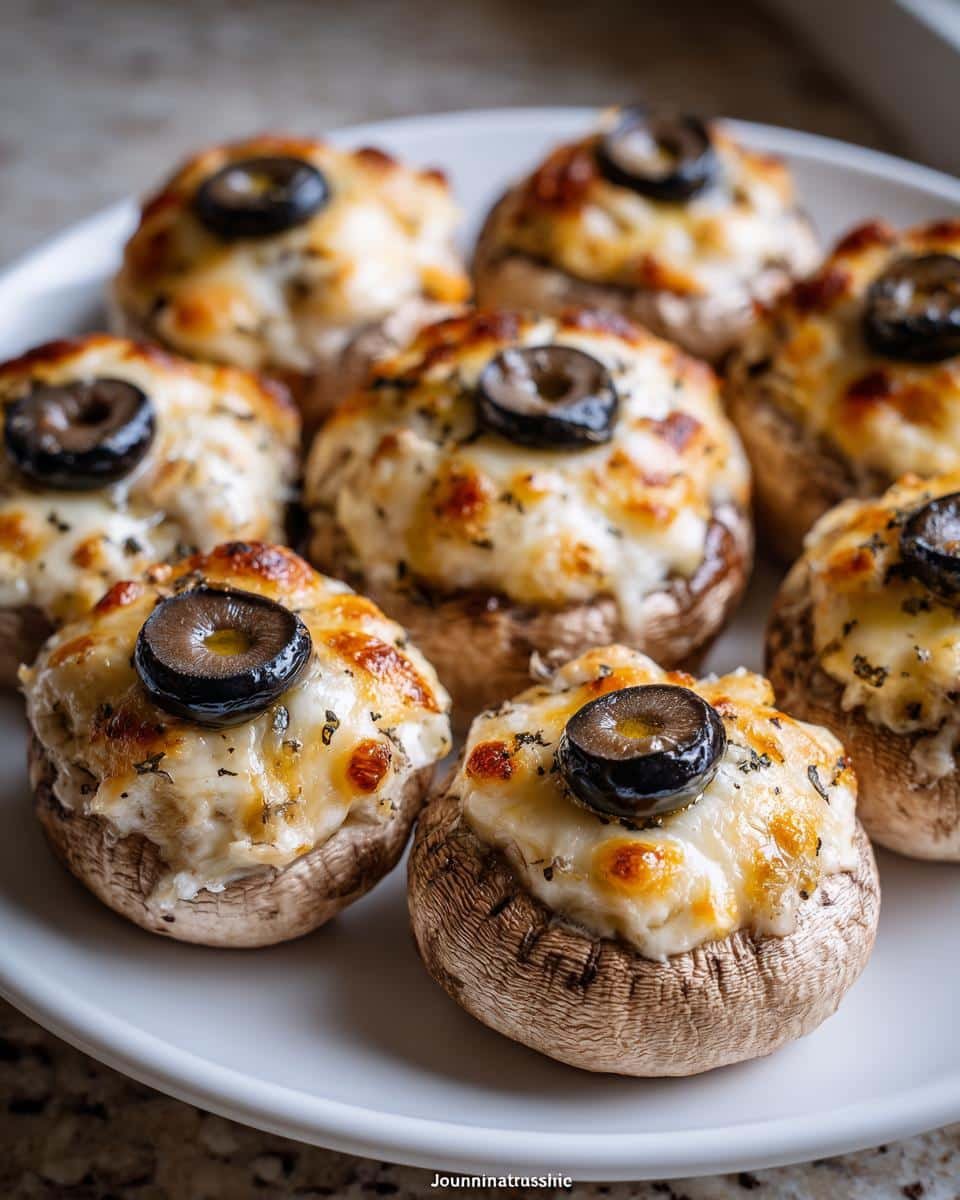
- Add the pupils: Here’s where the magic happens! Press one black olive into the center of each stuffed mushroom. Angle them slightly different directions for extra creepy realism.
- Bake ’em: Arrange your eyeballs on a baking sheet, drizzle lightly with olive oil, and pop them in the oven for about 15 minutes. You’ll know they’re done when the mushrooms are tender and the cheese is just starting to brown at the edges.

Pro Tips for Perfect Stuffed Mushroom “Eyeballs”
- Pick perfect mushrooms: Choose large, round caps with deep cavities – they’ll hold more filling and look more eyeball-like!
- Prep ahead: Make the cheese filling up to a day in advance and store it covered in the fridge. Just give it a quick stir before using.
- Get bloody: For extra horror, use a toothpick to drag tiny lines of red food coloring from the olives outward to create “veins.”
- Keep ’em steady: If your mushrooms wobble, slice a tiny bit off the bottom to create a flat surface before stuffing.
Stuffed Mushroom “Eyeballs” Variations
Once you’ve mastered the basic recipe, try these fun twists to keep your Halloween spread interesting! My friends always beg me to mix it up each year.
- Goat cheese glam: Swap the cream cheese for tangy goat cheese – it gives such a lovely sharp contrast to the earthy mushrooms. Bonus: the white color makes the “eyeballs” look extra eerie!
- Meaty monsters: For carnivorous creatures, mix in some cooked crumbled sausage with the cheese filling. Italian sausage works beautifully, and the flecks of meat look like creepy iris patterns.
- Bloodshot eyes: Instead of black olives, use small pieces of roasted red pepper for the pupils. They look wonderfully sinister against the white cheese “whites” of the eyes.
Honestly, half the fun is coming up with new creepy combinations – what spooky variations can you dream up? Check out more dessert ideas for more inspiration!
Serving Your Stuffed Mushroom “Eyeballs”
Presentation is everything with these little creepers! I always serve them on a dark platter or slate board – the contrast makes the “eyeballs” pop in the most delightfully unsettling way. For extra drama, arrange them so they’re all “looking” in different directions. They pair perfectly with other Halloween treats like “mummy” pigs in a blanket or “witches’ fingers” breadsticks. I sometimes tuck in a few parsley sprigs for a ghoulish “graveyard” effect – trust me, your guests will go wild!
Storing and Reheating Stuffed Mushroom “Eyeballs”
Good news – these little creepers keep beautifully! Just pop any leftovers in an airtight container in the fridge for up to 3 days. When you’re ready to serve again, I’ve found 350°F for about 5 minutes brings them back to life (pun totally intended). The cheese gets melty and the mushrooms stay tender. Pro tip: add fresh olive “pupils” after reheating so they don’t get too soft. Trust me, they’ll disappear faster than a ghost in a haunted house!
Stuffed Mushroom “Eyeballs” Nutrition
Now, I’m no nutritionist, but let’s be real – these stuffed mushroom eyeballs are way more about fun than counting calories! The nutrition info will vary slightly based on your exact ingredients, but each savory bite packs a decent amount of protein from the cheese along with those good mushroom nutrients. They’re definitely on the lighter side as far as party appetizers go – no food coma here! Just remember, these estimates are based on standard ingredients, so your mileage may vary depending on how generous you are with the cheese (I know I can’t help myself sometimes).
FAQs About Stuffed Mushroom “Eyeballs”
Can I make these stuffed mushroom eyeballs vegan?
Absolutely! I’ve had great success using dairy-free cream cheese alternatives – just look for one that melts well. For the mozzarella, try shredded vegan cheese or even a sprinkle of nutritional yeast for that cheesy flavor. The olives stay the same, of course. My vegan friends couldn’t believe how close they tasted to the original!
How far in advance can I prepare them?
You can prep these little creepers up to a day ahead, which is perfect for party planning. I like to stuff the mushrooms and add the olive pupils, then cover and refrigerate them until showtime. Just pop them in the oven about 20 minutes before serving – the extra chill time might add a few minutes to the baking.
Can I freeze stuffed mushroom eyeballs?
Honestly, I don’t recommend it. Mushrooms get weirdly watery when thawed, and the texture just isn’t the same. They’re so quick to make fresh that it’s worth the 30 minutes! If you must freeze, do it before baking and expect some sogginess when reheated.
For more fun recipes and ideas, follow us on Pinterest!
Print
Spooky Stuffed Mushroom “Eyeballs” in 30 Minutes Flat
- Total Time: 30 minutes
- Yield: 12 stuffed mushrooms 1x
- Diet: Vegetarian
Description
Spooky and delicious stuffed mushroom ‘eyeballs’ perfect for Halloween. These savory bites are easy to make and look eerily realistic.
Ingredients
- 12 large white mushrooms
- 1/2 cup cream cheese, softened
- 1/4 cup shredded mozzarella
- 1 clove garlic, minced
- 1/4 tsp salt
- 1/4 tsp black pepper
- 12 pitted black olives
- 1 tbsp olive oil
Instructions
- Preheat oven to 375°F (190°C).
- Clean mushrooms and remove stems.
- Mix cream cheese, mozzarella, garlic, salt, and pepper in a bowl.
- Stuff each mushroom cap with the cheese mixture.
- Press one black olive into the center of each stuffed mushroom to resemble a pupil.
- Place on a baking sheet and drizzle with olive oil.
- Bake for 15 minutes until mushrooms are tender.
- Serve warm or at room temperature.
Notes
- Use large, round mushrooms for the best eyeball effect.
- For extra spookiness, add a drop of red food coloring to make veins.
- These can be made ahead and reheated before serving.
- Prep Time: 15 minutes
- Cook Time: 15 minutes
- Category: Appetizer
- Method: Baking
- Cuisine: American
Nutrition
- Serving Size: 1 mushroom
- Calories: 45
- Sugar: 1g
- Sodium: 120mg
- Fat: 3.5g
- Saturated Fat: 1.5g
- Unsaturated Fat: 2g
- Trans Fat: 0g
- Carbohydrates: 2g
- Fiber: 0.5g
- Protein: 2g
- Cholesterol: 5mg