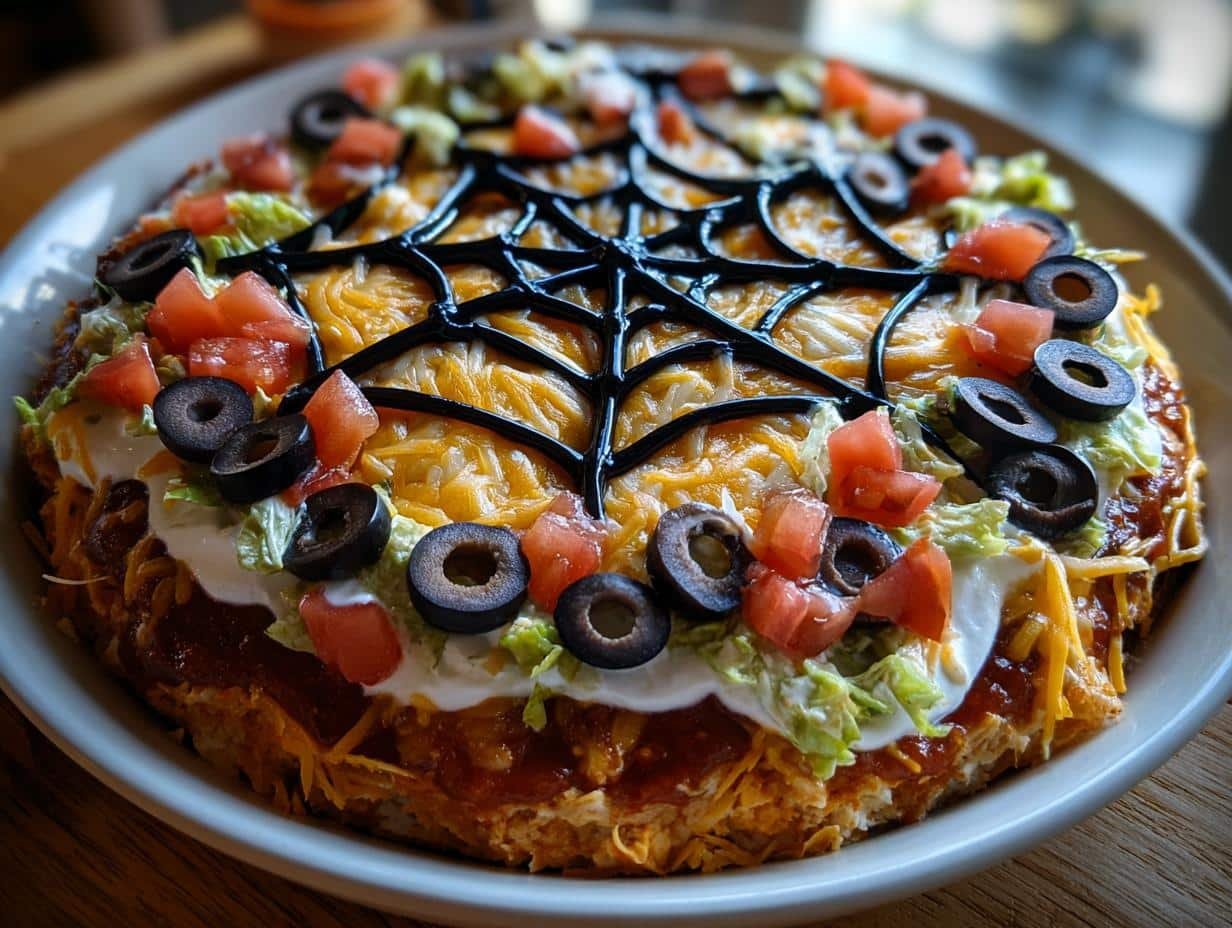
Halloween parties call for showstopping snacks, and this spider web taco dip never fails to steal the spotlight! I still remember the first time I brought it to a costume party – grown adults were snapping pictures before they’d even taken a bite. As someone who’s catered dozens of themed events, I can tell you this is the easiest way to impress a crowd with minimal effort. The creamy layers peek through that dramatic black olive web design, creating an edible centerpiece that disappears faster than kids’ trick-or-treat candy. Best part? You probably have most ingredients in your fridge already.
Why You’ll Love This Spider Web Taco Dip
This dip isn’t just delicious – it’s downright magical for so many reasons:
- Five-minute assembly: No cooking means you can whip this up while your kids are picking out costumes
- Halloween superstar: That spider web design gets more compliments than any store-bought decoration
- Crowd-pleasing layers: Everyone from vegetarians to picky eaters goes crazy for the creamy, crunchy combo
- Endlessly customizable: Swap in spicy salsa or add a layer of taco meat if you’re feeling fancy
- Stress-free entertaining: Make it ahead and focus on more important things (like perfecting your zombie makeup)
Trust me, this will become your go-to party trick – I make at least three batches every October!
Ingredients for Spider Web Taco Dip
Here’s everything you’ll need to create this spooky masterpiece. The secret to perfect layers? Using the right ingredients at the right temperature – trust me, cold refried beans are a nightmare to spread!
- 1 can (16 oz) refried beans – Room temperature (I let mine sit out for 30 minutes)
- 1 cup sour cream – Full-fat works best for that luxurious texture
- 1 cup guacamole – Homemade or store-bought (my quick tip? Buy pre-made but stir in extra lime juice)
1 cup salsa – Mild or medium – your choice! (Drain excess liquid if it looks watery)
- 1 cup shredded cheddar cheese – The orange color makes the web pop
- 1/4 cup black olives – Sliced paper-thin for the web design
- Tortilla chips – For serving (blue corn chips make an awesome color contrast)
See? Nothing fancy – just pantry staples transformed into something spectacular. Keep reading and I’ll show you how to turn these simple ingredients into the talk of your Halloween party!
Equipment Needed
- Large serving platter – At least 12 inches across (trust me, you’ll need the real estate!)
- Offset spatula or butter knife – For those perfect, smooth layers
- Piping bag or ziplock bag – Optional, but makes the spider web design foolproof
- Small bowl – For your sliced olives before decorating
How to Make Spider Web Taco Dip
Alright, let’s dive into the fun part – transforming those simple ingredients into a spooky showstopper! I’ve made this spider web taco dip more times than I can count, and I’ll walk you through every step so yours turns out picture-perfect. The key is taking your time with the layers – rushing leads to messy swirls instead of those gorgeous, defined stripes that make the web pop. Ready? Let’s get creepy!
Layering the Base Ingredients
First things first – grab that room temperature refried beans (cold beans are my nemesis for smooth spreading!). Here’s how I build my perfect foundation:
- Bean base: Plop those beans right in the center of your platter. Use your offset spatula to spread them evenly to about 1/4-inch thickness, going all the way to the edges. Pro tip: make small circular motions to avoid pulling up the beans as you spread.
- Sour cream blanket: Dollop sour cream over the beans in little mounds – this makes spreading easier. Gently smooth it from the center outward, covering the beans completely. I like to leave about 1/2-inch border of beans showing – it creates a cool layered effect when served.
- Guacamole magic: Here’s where most people mess up – they mix the layers! Spoon small amounts of guacamole across the sour cream and spread gently with the back of a spoon, barely touching the surface. Let the weight of the guac do the work.
- Salsa splash: Spoon your salsa right in the center – no spreading needed! Let it naturally cascade outward to about 2 inches from the edge. The weight will create a perfect gradient.
- Cheese crown: Sprinkle cheese evenly over the salsa. I use my hands to distribute it – you want just enough to cover without burying those beautiful layers underneath.
Creating the Spider Web Design
Now for the dramatic finale – that iconic spider web! This is easier than it looks, I promise. Here’s my foolproof method:
- Circle game: Arrange your sliced olives in 3-4 concentric circles on top of the cheese. Start with a small circle near the center (about 2 inches across), then space the next ones about 1.5 inches apart. Don’t stress about perfection – uneven circles look more like real webs!
- Web weaving: Take a clean butter knife (a toothpick works too). Starting dead center, gently drag lines outward to the edge, spacing them like pizza slices. Do about 8 lines total – this creates that classic web look. Wipe the knife between drags for clean lines.
- Piping bag hack: If you’re nervous about freehanding, put olives in a piping bag with a small round tip (or ziplock with corner snipped). Pipe the circles first, then do the lines. This gives you more control, especially if you’re making mini versions.
Pop it in the fridge for at least 30 minutes before serving – this helps the layers set so your web stays picture-perfect when the chips start diving in!
Tips for Perfect Spider Web Taco Dip
After making this spooky dip more times than I can count, I’ve picked up some tricks that’ll take your spider web taco dip from good to ghoulishly perfect. These little hacks make all the difference between a messy dip and a showstopper that’ll have your guests howling for more!
- Chill layers separately if making ahead – I like to prep my beans, sour cream, and guac in individual bowls and refrigerate them. Cold layers spread like a dream and won’t mix together when assembling.
- Blot that salsa! Just like I blot my face before applying makeup (TMI?), I always drain excess liquid from salsa with a paper towel. Soggy dip is the real Halloween horror here.
- Full-fat dairy is your friend – I know, I know, but trust me, the low-fat stuff makes for weepy layers that smear when you’re creating your web. Save the diet for January!
- Add plastic spiders last minute – I learned this the hard way when my creepy crawlies sank into the dip during chilling. Now I pop them on right before serving for maximum scare factor.
- Warm your knife for cleaner cuts – Run your knife under hot water and dry it before slicing through the layers. It glides through like a ghost through walls!
- Extra web drama – For a super bold web, mix a spoonful of sour cream with black food coloring and pipe it instead of olives. Works like a charm when you’re out of olives!
There you have it – my tried-and-true secrets for a dip that’s as stunning as it is delicious. Now go forth and spook your guests with your newfound dip wisdom!
Serving Suggestions
Now that you’ve created this spooky masterpiece, let’s talk about how to serve it up right! Presentation is everything with this spider web taco dip – you want those dramatic layers and that creepy web to shine. Here are my favorite ways to turn this dip into a full-on Halloween experience:
- Blue corn chips – The deep blue color makes an awesome contrast against the orange cheese and green guacamole. Plus, they’re sturdier for scooping up those thick layers!
- Veggie “fingers” – Cut carrot sticks and bell pepper strips to look like creepy fingers reaching for the dip. Bonus points if you add almond “nails”!
- Halloween cocktail pairing – Serve with a pitcher of “Witch’s Brew” (just limeade with green food coloring) or “Vampire’s Kiss” (cranberry juice and ginger ale) for a complete theme.
- Mini versions – Use small ramekins to make individual spider web dips – perfect for keeping portions controlled (or so people think – they’ll come back for seconds!).
The golden rule? Serve immediately after decorating! That web looks its absolute best right after you finish it. After about an hour, the lines start to soften (still tasty, just less photogenic). I like to set mine on a black serving tray with some fake cobwebs draped around the edges – total witchy vibes!
Storage and Make-Ahead Instructions
Okay, let’s talk about keeping your spider web taco dip fresh and fabulous! I’ve learned through many Halloween parties that timing is everything with this dip. Here’s the scoop on storing it like a pro:
Make-ahead magic: You can totally assemble this beauty up to 2 hours before your party. Just press plastic wrap directly onto the dip’s surface (this prevents that weird skin from forming) before refrigerating. Trust me, I once skipped this step and ended up with a sad, dried-out web – lesson learned!
Leftovers? Honestly, this dip rarely survives past party time, but if you do have leftovers, they’ll keep in the fridge for about a day. The texture won’t be as perfect (the layers start to mingle), but it still tastes amazing stirred into scrambled eggs the next morning – my secret hangover cure!
Freezer warning: I know it’s tempting to freeze extras, but don’t do it! The dairy separates and the guac turns into a sad, brown mess. Speaking from experience here – frozen taco dip is a horror story you don’t want to tell.
Pro tip: If you’re prepping for a big bash, make the components separately (beans, guac, etc.) and store them in individual containers. Then assemble your spider web masterpiece right before guests arrive for maximum freshness and that perfect web definition!
Nutrition Information
Okay, let’s be real – we’re not eating this spider web taco dip for its health benefits! But since some folks like to know what they’re diving into (especially after second helpings), here’s the nutritional breakdown per serving. Remember, these values are estimates – your actual numbers might dance around a bit depending on the brands you use and how generous you are with that cheese!
- Serving Size: 1/8 of the recipe (about 1/2 cup)
- Calories: 180
- Total Fat: 12g (5g saturated, 6g unsaturated)
- Cholesterol: 20mg
- Sodium: 320mg
- Total Carbohydrates: 14g
- Dietary Fiber: 3g
- Sugars: 2g
- Protein: 5g
Now, if you’re like me and go back for “just one more chip” about seven times, well… let’s just say I don’t track those extra servings! The good news? All that protein from the beans and cheese means this dip actually keeps you satisfied longer than your average party snack. And hey, guacamole has healthy fats – that’s practically a health food in my book!
Frequently Asked Questions
Over the years, I’ve gotten the same questions about this spider web taco dip more times than I can count – so let me save you the trouble of wondering! Here are the answers to everything that might be haunting your mind:
Can I use Greek yogurt instead of sour cream?
Absolutely! The tang is similar, but Greek yogurt tends to be thinner. I recommend straining it through cheesecloth for 15 minutes first, or your layers might get a little… adventurous. For every cup of sour cream, use 3/4 cup Greek yogurt.
How early can I assemble this masterpiece?
Two hours max before serving is my golden rule. Any longer and your beautiful web starts to “melt” into the dip (still tasty, just less spooky). If you need more lead time, prep ingredients separately and assemble last minute – takes just 5 minutes!
Got a meatless alternative for carnivores?
Oh honey, just add a layer of seasoned ground beef (cooled!) between the beans and sour cream. I brown mine with taco seasoning and let it drain thoroughly – nobody wants a greasy spider web! Vegetarians? They’ll never know the difference.
Help! My web lines keep smudging!
Been there! Make sure your cheese layer isn’t too thick (it should barely cover the salsa), and chill the dip for 15 minutes before adding olives. Cold layers = crisp lines. Also, wipe your knife between each drag – game changer!
Can I make mini versions?
Yes, and they’re adorable! Use 4-inch ramekins and cut the olive slices smaller. Pipe the web with a toothpick instead of a knife. Perfect for portion control (or so people think – they’ll take three!).

Creepy 5-Minute Spider Web Taco Dip Will Wow Everyone
- Total Time: 15 minutes
- Yield: 8 servings 1x
- Diet: Vegetarian
Description
A fun and easy-to-make spider web taco dip perfect for Halloween or themed parties. Layers of creamy ingredients topped with a spider web design.
Ingredients
- 1 can (16 oz) refried beans
- 1 cup sour cream
- 1 cup guacamole
- 1 cup salsa
- 1 cup shredded cheese
- 1/4 cup black olives (for spider web design)
- Tortilla chips (for serving)
Instructions
- Spread refried beans evenly on a serving platter.
- Layer sour cream over the beans.
- Spread guacamole over the sour cream.
- Top with salsa and shredded cheese.
- Use black olives to create a spider web design on top.
- Serve with tortilla chips.
Notes
- Chill for 30 minutes before serving for best flavor.
- Use a piping bag for cleaner spider web lines.
- Add plastic spiders for extra decoration.
- Prep Time: 15 minutes
- Cook Time: 0 minutes
- Category: Appetizer
- Method: No-Cook
- Cuisine: Mexican-American
Nutrition
- Serving Size: 1/8 of recipe
- Calories: 180
- Sugar: 2g
- Sodium: 320mg
- Fat: 12g
- Saturated Fat: 5g
- Unsaturated Fat: 6g
- Trans Fat: 0g
- Carbohydrates: 14g
- Fiber: 3g
- Protein: 5g
- Cholesterol: 20mg