Halloween baking always brings back memories of my kitchen turning into a mad scientist’s lab—except instead of bubbling potions, I’ve got melted chocolate everywhere! My Spiderweb Chocolate Bark became our family’s favorite spooky tradition after one particularly chaotic Halloween party. The kids went wild for it, and honestly? It’s so ridiculously easy that even my most kitchen-challenged friends can pull it off.
This no-bake treat combines rich dark chocolate with delicate white chocolate webs for a dramatic effect that looks way fancier than it actually is. Trust me, when you break into those crisp pieces and see the intricate web design, you’ll feel like a pastry wizard. Plus, it’s the perfect project for little helpers who want to “help” (read: lick the bowl).
Why You’ll Love This Spiderweb Chocolate Bark
Honestly, this recipe is a total win for so many reasons—here’s why I’m obsessed with it:
- No-bake magic: No oven, no fuss—just melt, drizzle, and done. Perfect for last-minute Halloween panic (we’ve all been there).
- Impressively easy: The spiderweb looks fancy, but it’s just a quick swirl with a toothpick. Foolproof, I promise.
- Kid-approved: Little hands love helping pipe the white chocolate “webs” (and sneaking sprinkles).
- Endlessly customizable: Swap in orange candy melts, add crushed cookies for “dirt,” or go wild with edible glitter.
It’s the kind of treat that disappears faster than a ghost in the night—every single time.
Ingredients for Spiderweb Chocolate Bark
Here’s everything you’ll need to whip up this spooky-simple treat—I promise it’s all basic stuff you might already have!
- 12 oz dark chocolate, chopped (I splurge on Ghirardelli or Guittard for extra smoothness)
- 12 oz white chocolate, chopped (same quality rule applies!)
- 1 tsp coconut oil (optional, but it helps the white chocolate flow beautifully)
- Orange and black sprinkles (optional, for extra Halloween flair)
Pro tip: Chop your chocolate roughly the same size so it melts evenly—nobody wants stubborn lumps in their spiderwebs!
Equipment You’ll Need
Don’t worry—you won’t need any fancy gadgets for this one! Here’s what I always grab:
- Microwave-safe bowls (one for dark, one for white chocolate—trust me, you’ll want separate bowls)
- Parchment paper (the ultimate no-stick superhero)
- Piping bag or zip-top bag (snip a tiny hole for precision drizzling)
- Toothpick (for creating those creepy-cool webs)
That’s it! Now go raid your kitchen drawers—you’ve probably got everything already.
How to Make Spiderweb Chocolate Bark
Okay, let’s get to the fun part! This might look fancy, but it’s seriously simple—just follow these steps, and you’ll have spiderweb magic in no time.
Step 1: Melt the Dark Chocolate
First, grab that chopped dark chocolate and toss it into a microwave-safe bowl. Here’s my foolproof method: microwave it in 30-second bursts, stirring well after each one. Why? Because chocolate is sneaky—it’ll hold its shape even when it’s almost melted, and you don’t want to scorch it! (Trust me, burnt chocolate smells like regret.)
Keep going until it’s smooth and glossy, usually about 2 minutes total. If it’s still got a few stubborn lumps, just let the residual heat do the work—give it an extra stir, and they’ll melt right in.
Step 2: Spread the Chocolate Base
Now, line a baking sheet with parchment paper—no greasing needed, thank goodness. Pour that luscious dark chocolate onto it and use a spatula to spread it into an even layer, about ¼-inch thick. Don’t stress about perfection here; rustic edges make it look more “haunted house” anyway!
Let it sit for 5 minutes to cool slightly. You want it firm enough that the white chocolate won’t sink in but still soft enough for the toothpick to glide through later. Pro tip: If your kitchen’s warm, pop it in the fridge for 2 minutes—just don’t let it harden completely!
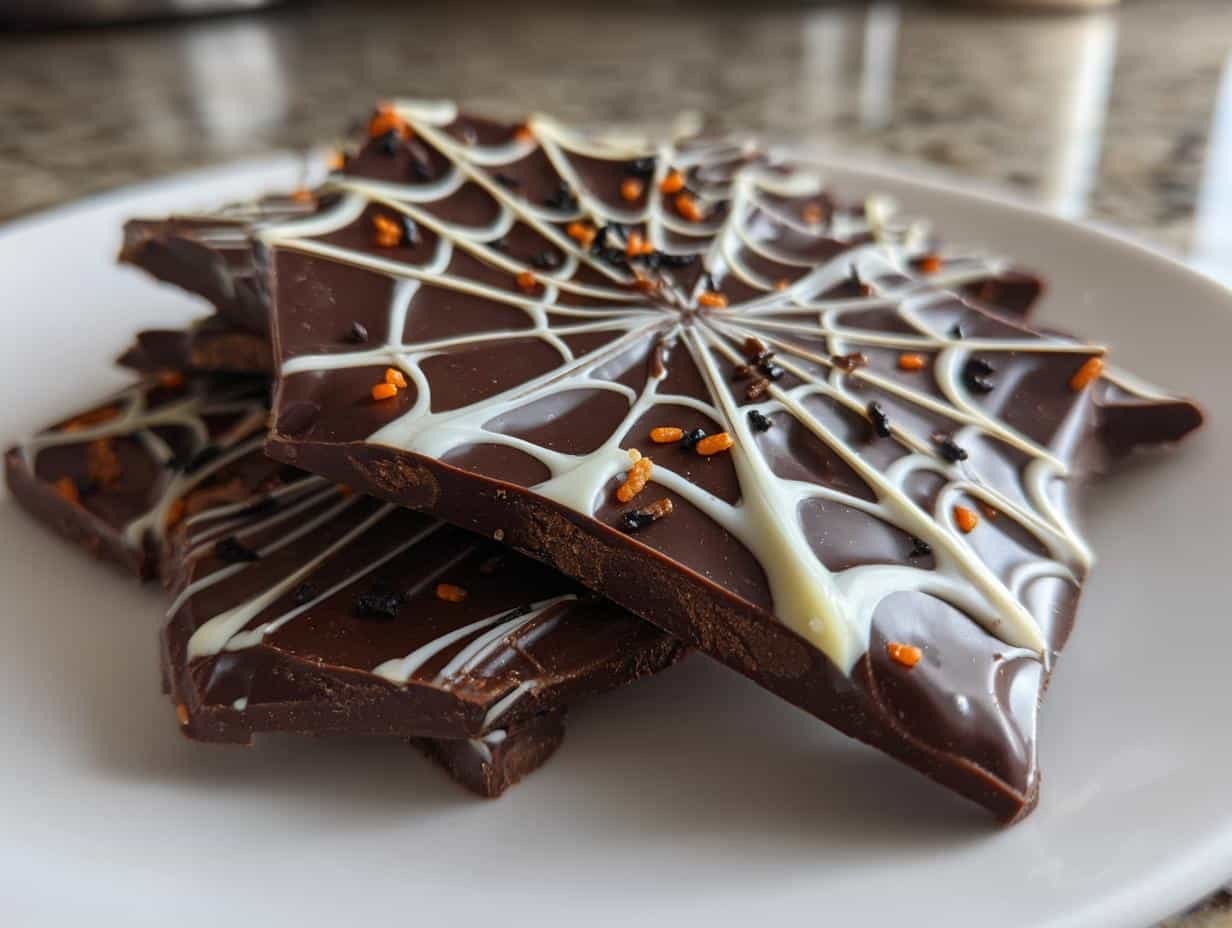
Step 3: Create the Spiderweb Design
Time for the dramatic part! Melt the white chocolate (with the coconut oil, if using) the same way as the dark. Then, pour it into a piping bag or a zip-top bag with a tiny corner snipped off. Now, channel your inner spider:
- Drizzle concentric circles of white chocolate over the dark base—start with a small circle in the center and work outward.
- Next, take a toothpick and drag it gently from the center to the edges, like spokes on a wheel. Turn the pan as you go for even “webs.”
- Want extra drama? Add a few random drizzles and swirls—real spiderwebs aren’t perfect either!
If the white chocolate starts to thicken, just give the bag a quick 10-second zap in the microwave. Sprinkle on any decorations now, then let it set at room temperature (about 1 hour) or speed it up in the fridge (15 minutes). Break into shards, and voilà—spooky edible art!
Tips for Perfect Spiderweb Chocolate Bark
After making this dozens of times (and yes, learning from a few chocolate disasters), here are my can’t-live-without tricks:
- Chocolate matters: Cheap chocolate seizes up faster—spend a little extra on good-quality bars for silky smooth results.
- Drizzle control: Make the piping bag hole tiny! Thick white chocolate lines won’t swirl properly. Test on a spoon first.
- Temperature is key: If the dark chocolate base hardens too much before drizzling, gently warm the pan with your hands to soften slightly.
- Quick fix: Broke the bark? Melt the pieces into hot milk for spooky spiderweb cocoa—kids think it’s magic!
Remember: Imperfect webs look more authentically creepy anyway—have fun with it!
Variations and Substitutions
One of my favorite things about this recipe? You can twist it a million ways to match your mood or what’s in your pantry! Swap the dark chocolate for milk chocolate if you prefer something sweeter—it’ll still look gorgeously spooky. Out of white chocolate? Melted candy melts work just as well for the web (and come in fun colors like neon orange!). For a dairy-free version, use vegan chocolate chips and skip the sprinkles. Honestly, the only limit is your imagination—and how much chocolate you can justify eating in one sitting.
Serving and Storing Spiderweb Chocolate Bark
This bark is almost too pretty to eat—almost! I love breaking it into jagged shards and piling them onto a black platter for maximum Halloween drama. For parties, stick mini plastic spiders into the pieces for an extra creepy touch. Storage couldn’t be easier: just tuck it into an airtight container at room temperature (away from hungry hands!) for up to a week. Though let’s be real—it never lasts that long in my house!
Spiderweb Chocolate Bark FAQs
Got questions? I’ve got answers! Here are the most common things people ask me about this spooky-sweet treat:
Can I use candy melts instead of white chocolate?
Absolutely! Candy melts work great for the web and come in fun colors—orange webs are especially creepy-cute. Just skip the coconut oil since melts are already formulated to flow smoothly.
Help! My chocolate seized up—how do I fix it?
Don’t panic! For grainy chocolate, stir in a teaspoon of vegetable oil or more coconut oil while microwaving in 5-second bursts. If it’s beyond saving? Melt it completely and stir in rice cereal for instant chocolate crunch bars—Halloween save!
How thin should I spread the dark chocolate base?
Aim for about ¼-inch thick—thicker than a chocolate bar but thin enough to snap cleanly. Too thin, and the web design might crack; too thick, and it becomes a chocolate slab (still delicious, just less “bark”).
Can I make this dairy-free?
Totally! Use vegan dark chocolate and dairy-free white chocolate chips. The coconut oil trick works the same way—just check that your sprinkles are plant-based if needed.
Nutritional Information
Now, let’s be real—this is Halloween candy, not a salad! But since folks always ask, here’s the general nutritional scoop (because knowledge is power, even when covered in chocolate). Keep in mind these numbers can vary depending on your specific chocolate brands and how generous you are with those sprinkles!
Per piece (based on breaking the bark into 20 servings):
- Calories: Around 120
- Fat: 8g (mostly from that glorious cocoa butter)
- Sugar: About 10g
Pro tip: If you’re watching sugar, use extra-dark chocolate (70% or higher) and go lighter on the white chocolate drizzle. But hey—it’s Halloween. Sometimes you just need to embrace the sweet, spooky joy!
So what are you waiting for? Grab that chocolate and get swirling—I promise your kitchen will smell amazing, and your Halloween spread will be the talk of the neighborhood. Snap a pic of your spookiest spiderweb creations (messy swirls and all!) and tag me—I live for those chocolatey masterpieces. Now go forth and make some deliciously haunted magic!
Print
Spooky Spiderweb Chocolate Bark in Just 15 Minutes
- Total Time: 15 mins
- Yield: 20 pieces 1x
- Diet: Vegetarian
Description
A sweet and crunchy chocolate bark decorated with a spiderweb design, perfect for Halloween or spooky-themed parties.
Ingredients
- 12 oz dark chocolate, chopped
- 12 oz white chocolate, chopped
- 1 tsp coconut oil (optional)
- Orange and black sprinkles (optional)
Instructions
- Melt dark chocolate in a microwave-safe bowl in 30-second intervals, stirring until smooth.
- Line a baking sheet with parchment paper and spread the melted dark chocolate evenly.
- Let it cool slightly while melting the white chocolate with coconut oil in the same way.
- Transfer white chocolate to a piping bag, cut a small hole, and drizzle lines over the dark chocolate.
- Drag a toothpick from the center outward to create a spiderweb pattern.
- Add sprinkles if desired and let harden at room temperature or in the fridge.
- Break into pieces and serve.
Notes
- Use high-quality chocolate for best results.
- If chocolate hardens too quickly, microwave for a few seconds.
- Store in an airtight container at room temperature for up to a week.
- Prep Time: 10 mins
- Cook Time: 5 mins
- Category: Dessert
- Method: No-Bake
- Cuisine: American
Nutrition
- Serving Size: 1 piece
- Calories: 120
- Sugar: 10g
- Sodium: 5mg
- Fat: 8g
- Saturated Fat: 5g
- Unsaturated Fat: 2g
- Trans Fat: 0g
- Carbohydrates: 12g
- Fiber: 1g
- Protein: 1g
- Cholesterol: 5mg