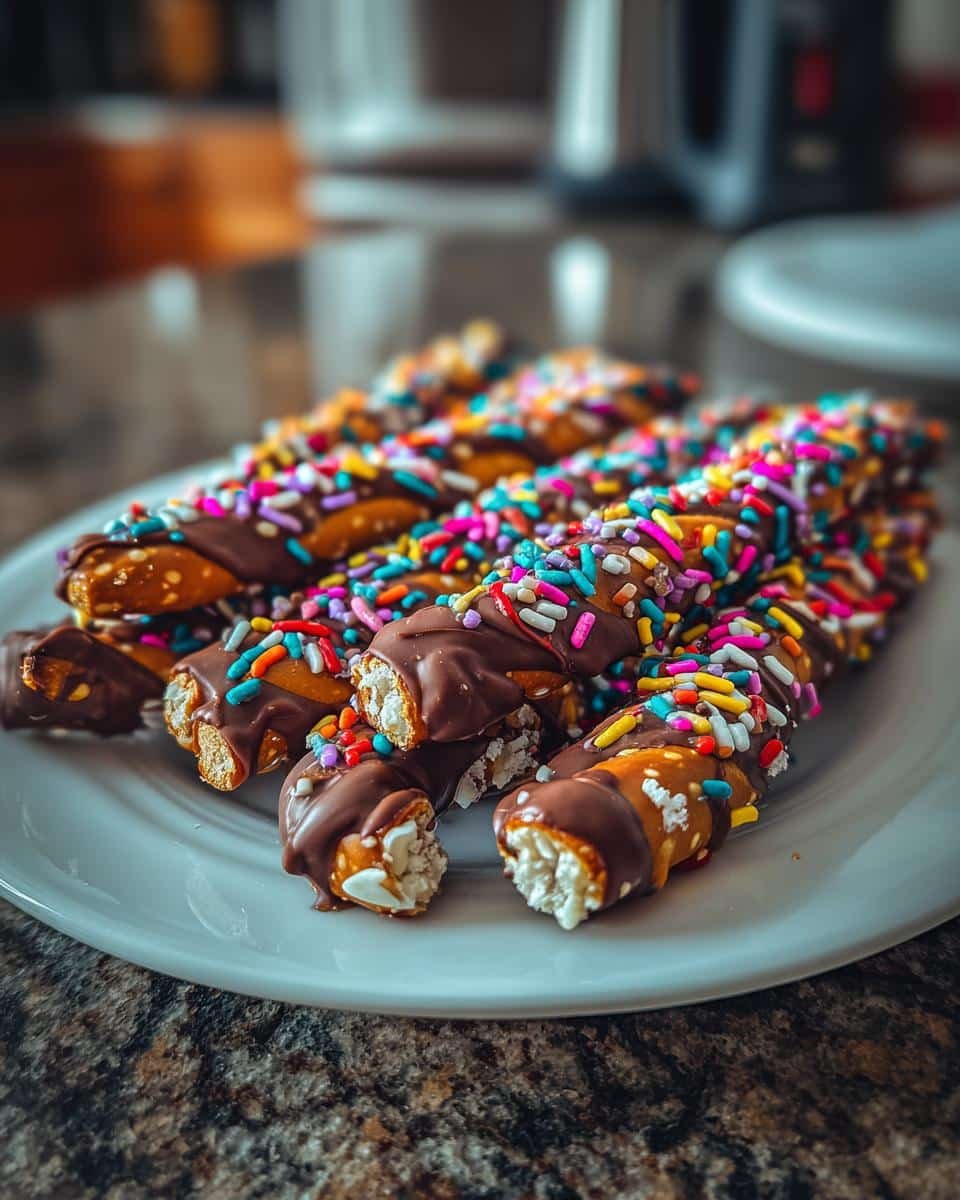
Oh my gosh, you have to try these decorated pretzel rods! They’re my go-to when I need something quick, fun, and totally customizable for parties or last-minute gifts. I first made them with my niece for her school bake sale, and now we whip up batches for every holiday—Christmas sprinkles, pastel colors for Easter, you name it! The best part? Even if you’re not a baker (trust me, I’ve had my share of kitchen disasters), these foolproof treats come together in minutes with just pretzel rods, melted chocolate, and whatever toppings you’ve got on hand. Let’s get started!
Why You’ll Love These Decorated Pretzel Rods
These little guys are my secret weapon for impressing people with minimal effort—and I promise, once you make them, they’ll become your go-to too. Here’s why:
- No baking, no stress: Just melt, dip, and decorate! From start to finish, you’re looking at about 15 minutes of active time—perfect for when you realize you forgot to bring something to the potluck (we’ve all been there).
- Endless ways to customize: Got a bag of random sprinkles from last year’s holiday baking? A half-empty bag of crushed nuts? Toss ‘em on! These pretzel rods are like your kitchen’s art project—let your imagination run wild.
- Total crowd-pleasers: Kids go nuts for the colorful versions (literally—they’ll grab them like candy), while adults love the more sophisticated ones dipped in dark chocolate with sea salt. One batch satisfies everyone.
- They make you look fancy: Bundle them in cellophane with ribbon, and suddenly you’re the person who “whipped up homemade treats.” I won’t tell if you don’t!
Ingredients for Decorated Pretzel Rods
Here’s the beautiful thing about this recipe—you probably have most of this stuff in your pantry already! I love that I can decide to make these on a whim without a special grocery run. Just grab:
- 1 bag (10 oz) pretzel rods: The sturdier, the better! Look for rods that aren’t too thin—they’ll hold up better when dipping. My grocery store sells them in the snack aisle near the chips.
- 1 cup chocolate chips (melted): I’m team semi-sweet, but my sister swears by milk chocolate. Whatever makes your heart happy! Pro tip: The higher quality your chocolate, the smoother it’ll melt.
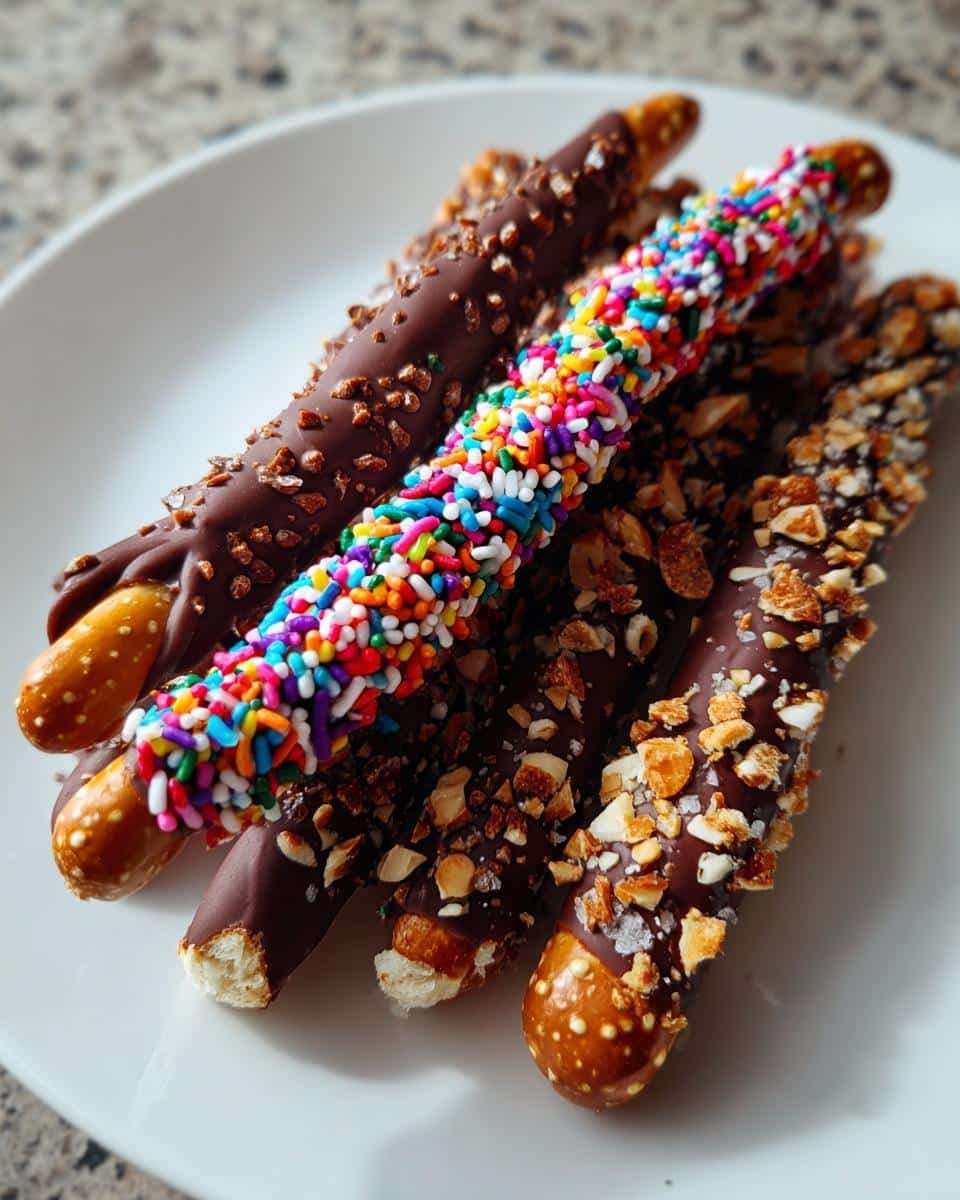
- ½ cup sprinkles: I keep a rainbow mix on hand, but holiday-themed ones make these extra festive. The tiny round “nonpareils” stick best if you’re picky about presentation.
- ¼ cup crushed nuts: Pecans or almonds are my favorites—just give them a rough chop so they don’t all fall off. Skip this if you’re serving someone with allergies.
- ¼ cup mini marshmallows: These are optional but SO fun for s’mores-inspired rods! Give them a quick chop so they adhere better.
See? Nothing fancy! Now check your cabinets—I bet you’ve got at least three of these things already. The pretzels are really just a vehicle for deliciousness anyway. (Oh, and parchment paper! Don’t forget that for drying—wax paper will make a sticky mess.)
How to Make Decorated Pretzel Rods
Okay, let’s get to the fun part—turning those basic ingredients into something magical! I’ve made these so many times I could probably do it in my sleep, but here’s the step-by-step that never fails me. Just remember: the chocolate waits for no one, so have all your toppings ready to go before you start melting!
Step 1: Melt the Chocolate
First things first—get that chocolate silky smooth. My microwave method is foolproof: toss the chips in a microwave-safe bowl (glass works best) and zap them in 30-second bursts, stirring vigorously between each round. Seriously, don’t walk away—burnt chocolate smells like regret! It usually takes about 90 seconds total. If you’re fancy, you can use a double boiler on the stove, but who has time for that when sprinkles are calling your name?
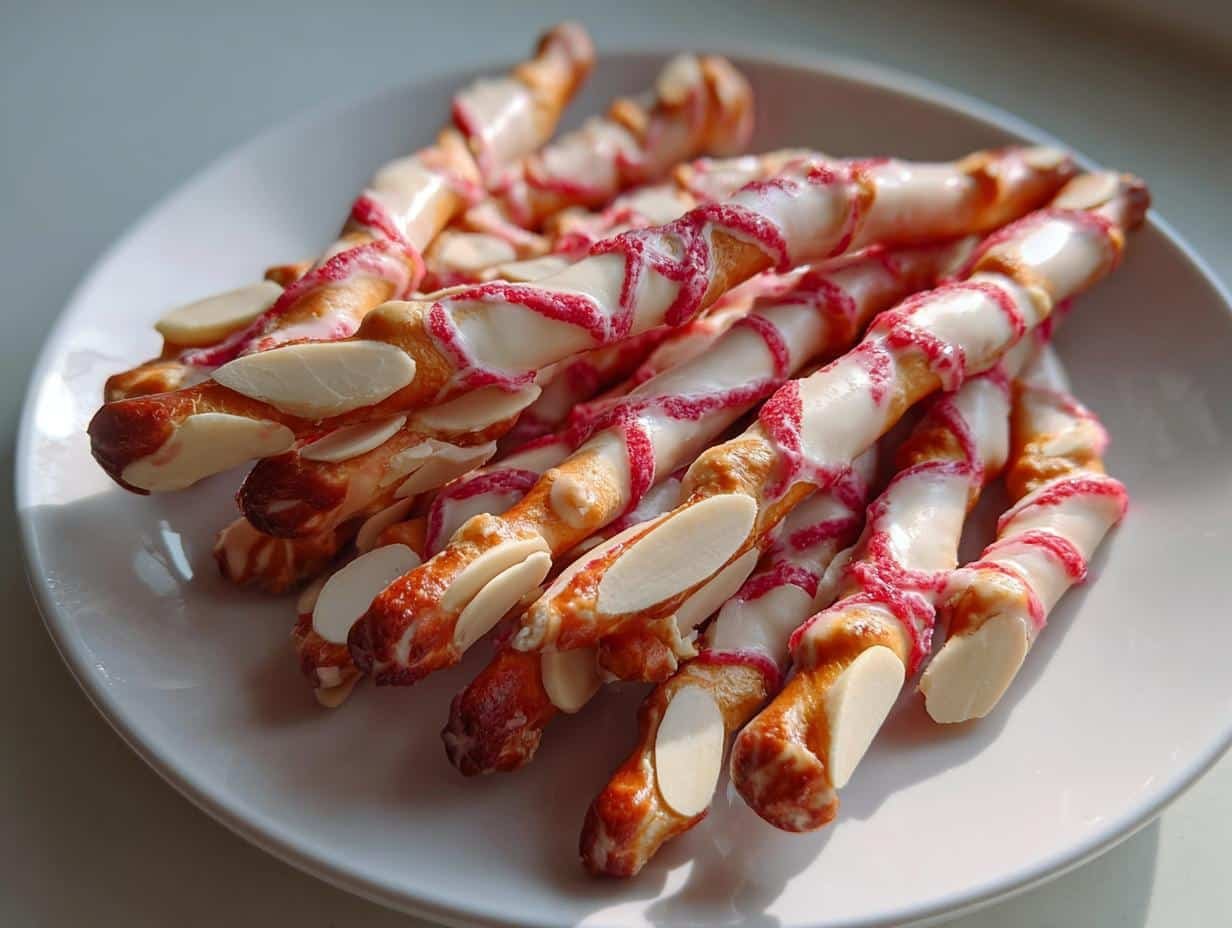
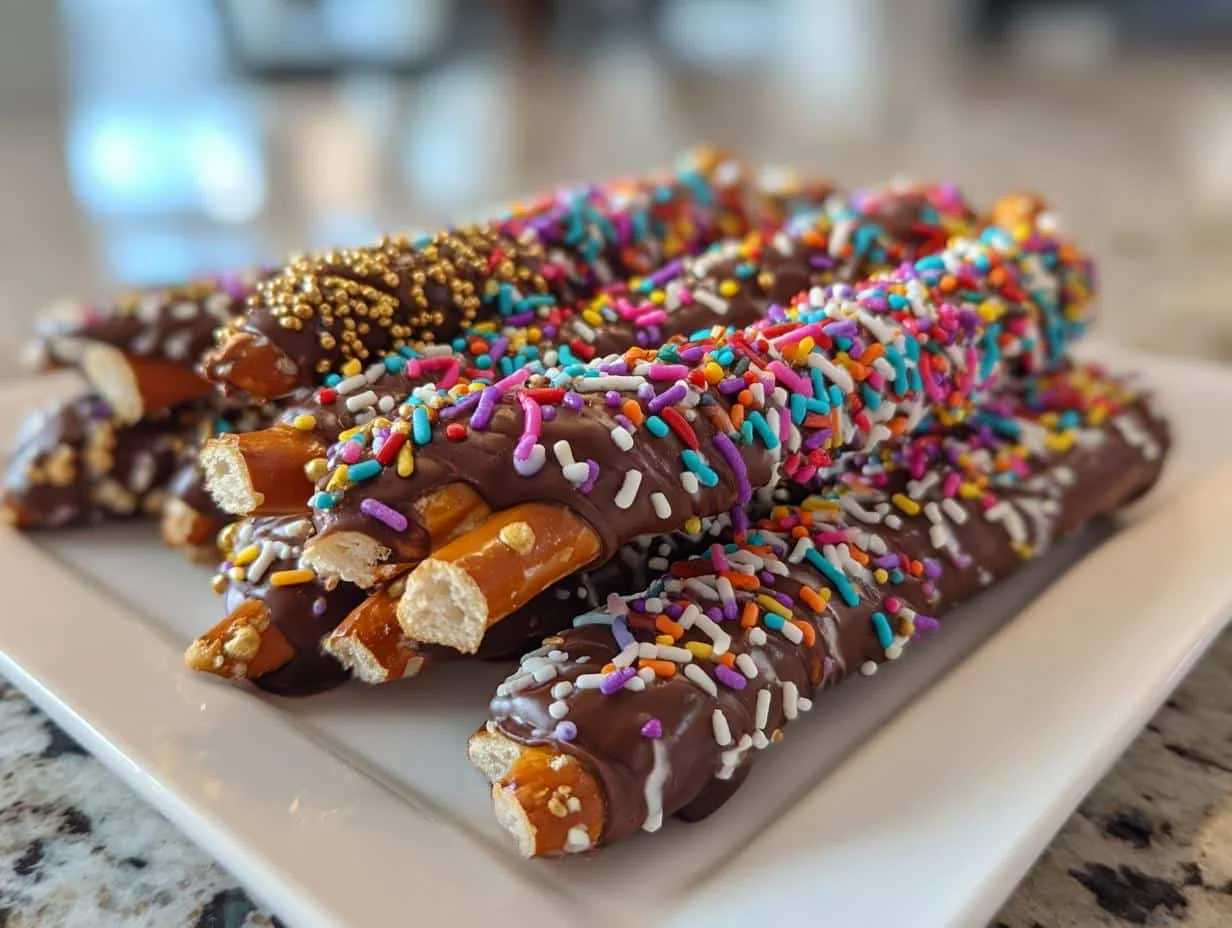
Step 2: Dip and Decorate the Pretzel Rods
Here’s where the magic happens! Grab a pretzel rod and dip it halfway into the melted chocolate—twist it slightly as you pull it out to avoid drips. Now the fun part: immediately roll it in your toppings! I like to pour sprinkles into shallow dishes so I can roll them easily. Pro tip: Hold the rod over the bowl and gently tap your wrist to shake off excess toppings before they set. Work in batches of 3-4 rods at a time so the chocolate doesn’t harden before you decorate.
Step 3: Let the Chocolate Set
Lay your beautiful creations on a parchment-lined baking sheet—not wax paper, unless you enjoy scraping chocolate off your counters later. Let them sit at room temperature for about 15 minutes, or pop them in the fridge for 5 minutes if you’re impatient like me. You’ll know they’re ready when you gently poke the chocolate and it doesn’t leave a fingerprint. Then comes the hardest part: not eating them all immediately!
Tips for Perfect Decorated Pretzel Rods
After making approximately a bazillion of these over the years (okay, maybe hundreds), I’ve picked up some tricks that’ll take your pretzel rods from “cute” to “how did you make these?!” Here are my hard-earned secrets:
- Chocolate matters more than you think: That bargain-bin chocolate might save you 50 cents, but it’ll seize up or turn grainy faster than you can say “kitchen disaster.” Splurge on good quality chips—I find Ghirardelli or Guittard melt like a dream. And if your chocolate starts thickening? A tiny drizzle of coconut oil (½ teaspoon per cup) brings it back to dipping perfection.
- The “tap and twist” move: When dipping, gently tap the rod against the bowl’s edge to remove excess chocolate, then give it a little twist as you lift it out. This creates a smooth base for toppings to stick to and prevents those awkward chocolate puddles at the bottom (we’ve all been there).
- Toppings need prep too: For nuts or cookies, crush them finely but not into dust—you want texture! For sprinkles, pour them into a shallow bowl wider than your pretzel rods. My aha moment? Laying a sheet of parchment under my topping bowls catches spills, and I can funnel the excess right back into containers. Waste not, want not!
- Dry rods = happy chocolate: Any moisture makes chocolate clump up weirdly. If your pretzels have been open awhile or it’s humid, give them a quick 5-minute toast in a 250°F oven to crisp them up. Cool completely before dipping—trust me on this one!
Bonus tip from my niece: Keep a damp (not wet!) paper towel nearby to wipe chocolate off your fingers between rods. Otherwise, you’ll end up with rainbow-fingered sprinkles everywhere… which is fun until you have to explain your technicolor hands at the grocery store.
Decorated Pretzel Rods Variations
Once you’ve mastered the basic version, the fun really begins—I love playing around with different flavors and themes! These decorated pretzel rods are like little edible canvases. Here are some of my favorite twists that always wow guests (and honestly, sometimes I make them just for myself while binge-watching reality TV):
- Cookie monster rods: Crush up your favorite cookies—Oreos, graham crackers, or even chocolate chip cookies—and roll the chocolate-dipped rods in the crumbs. My nephew goes wild for the Oreo version with white chocolate drizzle!
- Caramel delight: After the initial chocolate dip sets, drizzle melted caramel over the top. Sprinkle with sea salt if you’re feeling fancy. Pro tip: Warm the caramel just enough to drizzle—too hot and it’ll melt your chocolate layer (learned that the hard way!).
- PB&J nostalgia: Swap half the chocolate for melted peanut butter chips, then roll in crushed freeze-dried strawberries. Tastes just like the lunchbox classic, but way more fun to eat.
- Mocha madness: Add 1 teaspoon instant espresso powder to your melted dark chocolate for grown-up flavor. Top with crushed toffee bits—perfect with after-dinner coffee.
- Birthday cake vibes: Use pastel candy melts instead of chocolate, coat with rainbow sprinkles, and add tiny round confetti sprinkles. I make these for every kid’s party—they disappear faster than you can sing “Happy Birthday!”
The best part? These variations don’t require any extra time—just swap one ingredient or add one extra step. Last Valentine’s Day, I did dark chocolate rods with crushed peppermint candies (red and white ones, of course) and tied them with pink ribbons. My friends thought I’d spent hours when really… it took less time than scrolling through my phone that morning!
Serving and Storing Decorated Pretzel Rods
Now that you’ve created these little masterpieces, let’s talk about how to show them off and keep them fresh! I’ve learned a few tricks the hard way—like discovering chocolate-covered pretzels turn into sad, sticky blobs when left in a hot car (RIP, summer picnic batch).
How to Store Your Pretzel Rods Like a Pro
These guys stay crisp and delicious for up to a week if you store them right. My golden rule? Airtight is everything! I stash mine in a plastic container with parchment between layers—those cute holiday tins work great too. Just avoid the fridge unless your kitchen feels like a sauna; chocolate can “sweat” and make toppings slide off.
Brilliant Ways to Serve Them
Presentation turns these from snacks into event snacks! For parties, I stand them upright in a tall glass or mason jar filled with decorative beads or coffee beans—instant centerpiece! For gifting, bundle 5-6 rods with twine and tuck them into cellophane bags (dollar store finds!). My neighbor still talks about the Christmas batch I delivered in repurposed Pringles cans wrapped in festive paper.
Traveling With Your Creations
Taking these to potlucks? Nestle them snugly in a shallow container with parchment paper, then crinkle extra parchment around them like edible wrapping paper. If it’s warm out, toss an ice pack underneath—just don’t let it touch the chocolate. Learned that one the hard way when my “cooling trick” left condensation streaks!
One last tip: Always make extras. Between sneaky taste-testing and last-minute “Oh these would be perfect for Sarah’s baby shower!” moments, you’ll be glad you did!
Decorated Pretzel Rods Nutritional Info
Okay, let’s be real—we’re not eating these for their health benefits, but it’s good to know what you’re snacking on! Keep in mind these numbers can change a lot depending on your toppings. I’ve calculated this for one rod dipped in semi-sweet chocolate and sprinkles (because that’s how I eat approximately 80% of my batches).
- Calories: About 120 per rod—not bad for something that feels like a treat! Skip the nuts and it drops to around 110.
- Sugar: 8g (blame the chocolate and sprinkles, but hey, it’s less than a soda!). Using dark chocolate? That’ll shave off about 2g.
- Sodium: 150mg from the pretzel itself—surprisingly not crazy for something so salty-crunchy.
- Fat: 5g total, with 3g being saturated (thank you, delicious chocolate). Swap to nuts instead of sprinkles? The healthy fats bump this up but make it more filling.
Pro tip: If you’re watching sugar, try dipping just the top third of the rod—you still get that magical chocolatey bite with half the calories. And don’t stress about exact numbers too much; life’s too short not to enjoy sprinkles sometimes!
FAQs About Decorated Pretzel Rods
Over the years, I’ve gotten so many questions about these decorated pretzel rods—from panicked texts (“Help! My chocolate seized!”) to curious DMs (“Can I use X instead of Y?”). Here are the answers to all the burning questions I’ve collected, plus a few things I wish I’d known when I first started making them!
Can I use white chocolate or candy melts instead?
Absolutely! White chocolate works beautifully—just be aware it’s more temperamental when melting. Keep the heat low and stir constantly. As for candy melts? They’re practically foolproof for beginners since they’re designed to melt smoothly. Pro tip: Add a teaspoon of coconut oil to thin them out for perfect dipping consistency.
How far ahead can I make these?
They’re best within 3 days, but I’ve successfully kept them fresh for a week in an airtight container at room temperature (not the fridge—humidity is the enemy!). The pretzels might lose a tiny bit of crunch after day 5, but let’s be honest… they rarely last that long in my house!
Help! My toppings won’t stick—what am I doing wrong?
Timing is everything! You’ve got about a 10-second window after dipping where toppings adhere best. If the chocolate starts looking dull, it’s already setting. Two fixes: 1) Work in smaller batches (3-4 rods at a time), or 2) Briefly rewarm your chocolate if it thickens too much. Also—lightly pressing toppings into the chocolate with clean fingers helps them stay put!
Can I make these with kids?
Oh my gosh, YES—this is my favorite kitchen activity with little ones! Just melt the chocolate yourself (safety first), then let them handle the dipping and decorating. Pro tip: Put toppings in shallow bowls and lay down parchment paper everywhere. The messier the better—some of our best memories come from rainbow-sprinkled kitchen disasters!
What’s the best way to fix broken pretzel rods?
Don’t panic—broken rods become “pretzel bites”! Dip the broken ends in chocolate, decorate as usual, and voilà: fancy snack mix. Or—my personal favorite—use them as stirrers for hot chocolate. Just saying… a marshmallow-topped pretzel rod makes any mug Instagram-worthy!
Share Your Decorated Pretzel Rod Creations!
Okay, I need to see what you come up with! Half the fun of making these decorated pretzel rods is getting creative with colors and toppings—I swear, every time I make them, I discover a new favorite combination. Snap a pic of your masterpiece (even if some turned out a little… abstract… we’ve all had those batches!) and tag me on Instagram @PretzelRodQueen. Bonus points if you catch your cat trying to steal one—mine has developed a worrying obsession with rainbow sprinkles.
I always share my favorite reader creations in my stories—last month, someone made galaxy-themed rods with edible glitter that blew my mind. Whether you’re a first-timer or a seasoned pro, I’d love to cheer you on! Use #SprinkleHappyPretzels so we can all find inspiration (and maybe steal your brilliant ideas). Now go forth and decorate—your snack game is about to level up!
Print
15-Minute Decorated Pretzel Rods: Irresistible Party Magic
- Total Time: 15 minutes
- Yield: 20 pretzel rods 1x
- Diet: Vegetarian
Description
Decorated Pretzel Rods are a fun and easy snack to make for parties or gifts. You can customize them with different toppings and colors.
Ingredients
- 1 bag pretzel rods
- 1 cup chocolate chips (melted)
- 1/2 cup sprinkles
- 1/4 cup crushed nuts
- 1/4 cup mini marshmallows
Instructions
- Melt the chocolate chips in a microwave-safe bowl.
- Dip each pretzel rod halfway into the melted chocolate.
- Roll the chocolate-coated part in sprinkles, nuts, or marshmallows.
- Place the decorated pretzel rods on a baking sheet lined with parchment paper.
- Let them cool until the chocolate hardens.
- Serve or store in an airtight container.
Notes
- Use white or dark chocolate for variety.
- Add food coloring to melted chocolate for festive colors.
- Store in a cool place to prevent melting.
- Prep Time: 10 minutes
- Cook Time: 5 minutes
- Category: Snack
- Method: No-Bake
- Cuisine: American
Nutrition
- Serving Size: 1 pretzel rod
- Calories: 120
- Sugar: 8g
- Sodium: 150mg
- Fat: 5g
- Saturated Fat: 3g
- Unsaturated Fat: 2g
- Trans Fat: 0g
- Carbohydrates: 18g
- Fiber: 1g
- Protein: 2g
- Cholesterol: 5mg