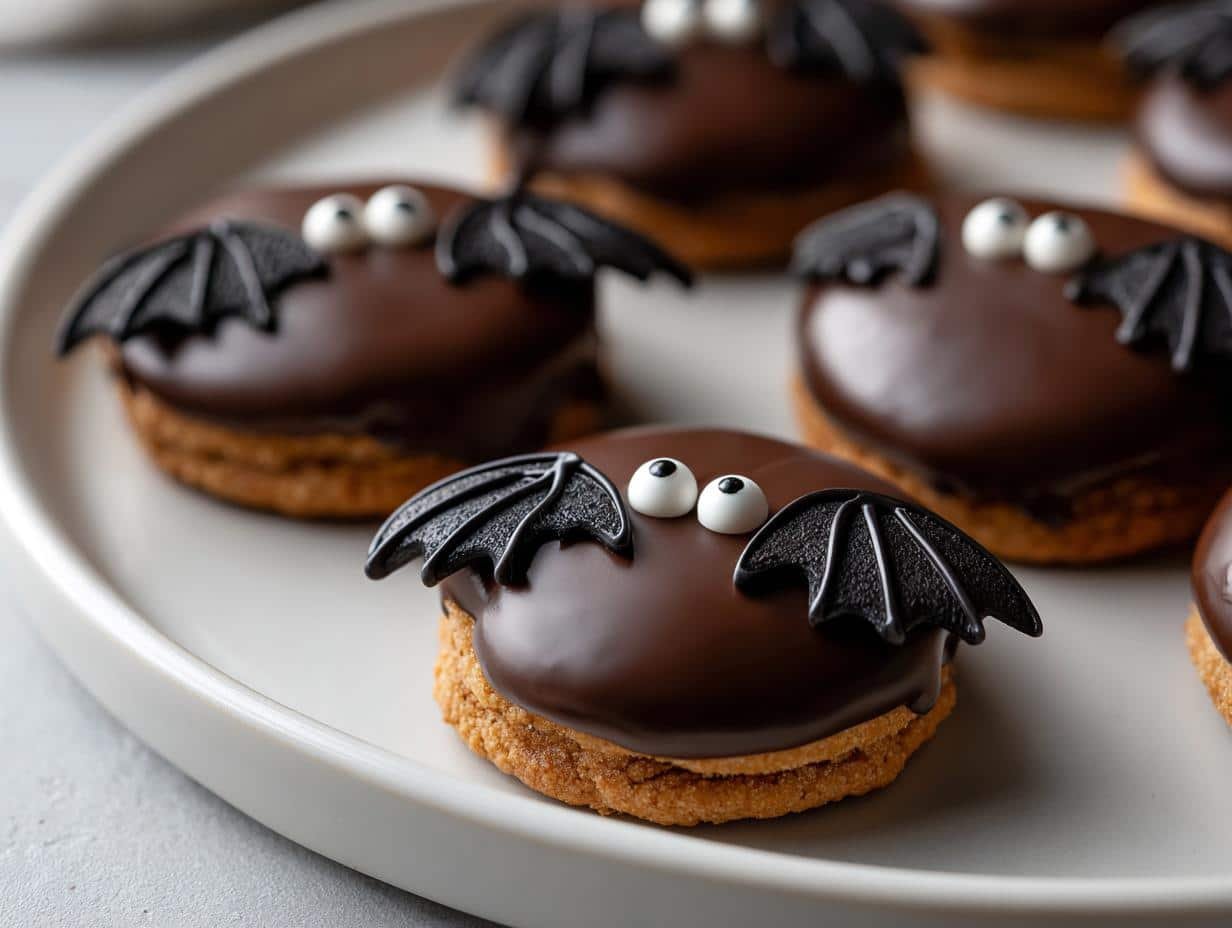
Halloween in our house means two things: costumes that take way too long to put together and a kitchen covered in chocolate. But my absolute favorite tradition? Bat Oreos! These little guys are the easiest, cutest treat you’ll ever make—perfect for last-minute party prep or just a fun afternoon with the kids.
I’ll never forget the first time my niece helped me decorate them. She was convinced we were making “real bats” and kept whispering to them. By the end, we had chocolate smeared everywhere, but her excitement was totally worth it. Now, every year, she asks, “Auntie, when are we making the bat cookies?” And honestly? I wouldn’t have it any other way.
Why You’ll Love These Bat Oreos
Let me tell you why these little bats are about to become your Halloween MVP:
- Seriously easy: No oven, no fuss—just melt, dip, and decorate. Even my 5-year-old nephew can help (mostly).
- Instant crowd-pleaser: The “wow” factor is ridiculous for how simple they are. Last year, adults at our party fought over them!
- Forgiving mistakes: Messy bat wings? Call it “abstract art.” Crooked eyes? Now they’re “quirky bats.” Trust me, they’ll disappear either way.
- Customizable: Swap white chocolate for spooky contrast, or use mint Oreos for a creepy-cool twist.
Basically, if you want maximum Halloween fun with minimum effort, these are your new best friends.
Ingredients for Bat Oreos
Here’s the magical shortlist you’ll need to create your bat squadron—I promise it’s all super basic stuff! The exact quantities matter here, so measure carefully (or, you know, eyeball it like I sometimes do when the kids are impatient).
- 24 Oreo cookies: Whole and perfect—no broken ones allowed! The classic kind works best, but feel free to experiment with flavors.
- 1 cup melted chocolate: Dark or white—your call! I prefer dark for that gothic bat look, but white chocolate makes those wings POP.
- Edible candy eyes: Small ones—about 1/8 inch. Trust me, big eyes make them look startled instead of spooky.
- Black icing: In a piping bag or zip-top bag with the tiniest corner snipped off. Gel icing works better than the runny stuff.
See? Told you it was simple! Now let’s get those bats ready to take flight.
Equipment You’ll Need
No fancy gadgets required here—just a few basics you probably already have in your kitchen. Here’s the short and sweet list:
- Microwave-safe bowl: For melting that chocolate without drama (glass works best).
- Parchment paper: Lifesaver for easy cleanup and no-stick bat landing zones.
- Baking tray: Any flat surface where your bats can dry without smudging their wings.
That’s it! Now let’s make some magic happen.
How to Make Bat Oreos
Alright, let’s turn those ordinary Oreos into a whole bat colony! I’ll walk you through each step—it’s foolproof, I promise. Just follow along, and you’ll have a whole swarm of these cuties in no time.
Step 1: Melt the Chocolate
First things first—that chocolate needs to be silky smooth. Here’s my no-fail method:
- Chop your chocolate into small pieces (or use chips—I won’t tell).
- Microwave in 30-second bursts, stirring well between each round. This prevents scorching—burnt chocolate is a Halloween horror we don’t need!
- Stop when it’s almost fully melted. The residual heat will finish the job as you stir. If it’s too thick, add a tiny bit of coconut oil (1/4 tsp at a time) to thin it.
Pro tip: If you’re using white chocolate, be extra careful—it seizes up faster than dark. When in doubt, under-microwave!
Step 2: Dip and Decorate
Now for the fun part—let’s give these cookies their bat bodies!
- Hold each Oreo by the edges and dip one side halfway into the chocolate. A gentle twist as you lift helps excess chocolate drip off cleanly.
- Place them chocolate-side up on parchment paper. Immediately add two candy eyes near the top before the chocolate sets. Press gently—they’ll stick like magic!
Work quickly but don’t stress if things get messy. My first batch looked like they’d flown through a tornado, but they still tasted amazing.
Step 3: Add Bat Wings
Time for the pièce de résistance—those iconic bat wings!
- Turn the undipped side toward you. Starting near the center, pipe two curved lines outward to make wing shapes—think crescent moons with pointy tips.
- Connect them at the bottom with a little “V” to complete the bat silhouette. If your lines aren’t perfect, call it “rustic charm.”
Let them set completely—about 15 minutes at room temp, or 5 in the fridge if you’re impatient like me. Then watch them disappear faster than candy on Halloween night!
Tips for Perfect Bat Oreos
After making approximately 3,427 batches of these (okay, maybe 20), I’ve learned all the tricks to bat cookie success:
- Chocolate too thick? Stir in 1/4 tsp coconut oil at a time until it’s dippable. Works like magic!
- Eyes won’t stick? Dab a tiny bit of extra chocolate where you want them—instant edible glue.
- In a hurry? Pop the tray in the fridge for 5 minutes to speed up setting. Just don’t forget about them like I did last year…
- Icing too runny? Thicken it with a pinch of powdered sugar or let it sit for 10 minutes to firm up.
Remember—even “messy” bats still taste delicious. The real secret? Have fun with it!
Variations for Bat Oreos
Want to mix things up? Here are my favorite ways to put a fun spin on these little bats:
- Go neon: Use colored candy eyes for a psychedelic bat effect—green ones look especially creepy!
- Flavor twist: Swap classic Oreos for mint or peanut butter ones. The filling peeking through makes awesome “bat bellies.”
- Drizzle magic: After the wings set, zigzag caramel or melted white chocolate over the tops for extra drama.
The best part? No matter how you customize them, they’ll still disappear just as fast!
Serving and Storing Bat Oreos
Here’s the best way to keep your bat squad fresh and ready for action:
- Stacking carefully: Layer them with parchment paper between each level so those precious wings don’t smudge. I learned this the hard way when my first tower turned into a bat pancake!
- Room temp storage: Tuck them in an airtight container at room temperature—they’ll stay perfect for up to 3 days (if they last that long).
- No fridge needed: Unless your kitchen is super warm, refrigeration can make the cookies soggy. Trust me, room temp keeps that satisfying crunch.
Pro tip: Make extras! These disappear faster than kids when it’s cleanup time.
Bat Oreos Nutritional Information
Here’s the scoop on what’s in these little bat treats—just remember these are estimates since brands vary (especially with different Oreo flavors or chocolate types). Per cookie, you’re looking at:
- Calories: 80
- Sugar: 6g
- Fat: 4g (2g saturated)
- Carbs: 10g
Not bad for something this adorable, right? Now go enjoy your bats guilt-free!
Bat Oreos FAQs
Got questions about these spooky little treats? I’ve got answers! Here are the top things people ask me about Bat Oreos:
Can I use homemade icing instead of store-bought?
Absolutely! My favorite quick black icing is just powdered sugar, a tiny bit of milk, and black food coloring mixed to a thick consistency. Just make sure it’s thick enough to hold its shape—runny icing makes sad, droopy bat wings.
How far ahead can I make these Halloween treats?
They’ll stay fresh for up to 3 days if stored properly (in an airtight container with parchment between layers). But honestly? They rarely last more than a day in my house! The chocolate may lose its shine after 24 hours, but the taste stays perfect.
Are there nut-free options for school parties?
Yes! Regular Oreos are nut-free (but always check labels). Use Enjoy Life chocolate chips to be extra safe. Skip any decorations with nuts, and you’ve got allergy-friendly bats ready to party!
Made your own bat squadron? I’d love to see your creations! Tag us in your Bat Oreos photos—nothing makes me happier than seeing everyone’s spooky (or silly) cookie designs! Follow us on Pinterest for more delicious recipes!
Print
24 Irresistible Bat Oreos for a Spooky Halloween Treat
- Total Time: 20 minutes
- Yield: 24 cookies 1x
- Diet: Vegetarian
Description
A simple and delicious dessert combining Oreo cookies with bat-themed decorations for Halloween or themed parties.
Ingredients
- 24 Oreo cookies
- 1 cup melted chocolate
- Edible candy eyes
- Black icing
Instructions
- Melt the chocolate in a microwave-safe bowl.
- Dip half of each Oreo into the melted chocolate.
- Place two candy eyes near the top of the chocolate-dipped side.
- Use black icing to draw bat wings on the non-dipped side.
- Let the chocolate set before serving.
Notes
- Use white chocolate for a contrasting effect.
- Store in an airtight container to keep fresh.
- Add sprinkles for extra decoration.
- Prep Time: 15 minutes
- Cook Time: 5 minutes
- Category: Dessert
- Method: No-Bake
- Cuisine: American
Nutrition
- Serving Size: 1 cookie
- Calories: 80
- Sugar: 6g
- Sodium: 60mg
- Fat: 4g
- Saturated Fat: 2g
- Unsaturated Fat: 1g
- Trans Fat: 0g
- Carbohydrates: 10g
- Fiber: 0g
- Protein: 1g
- Cholesterol: 0mg