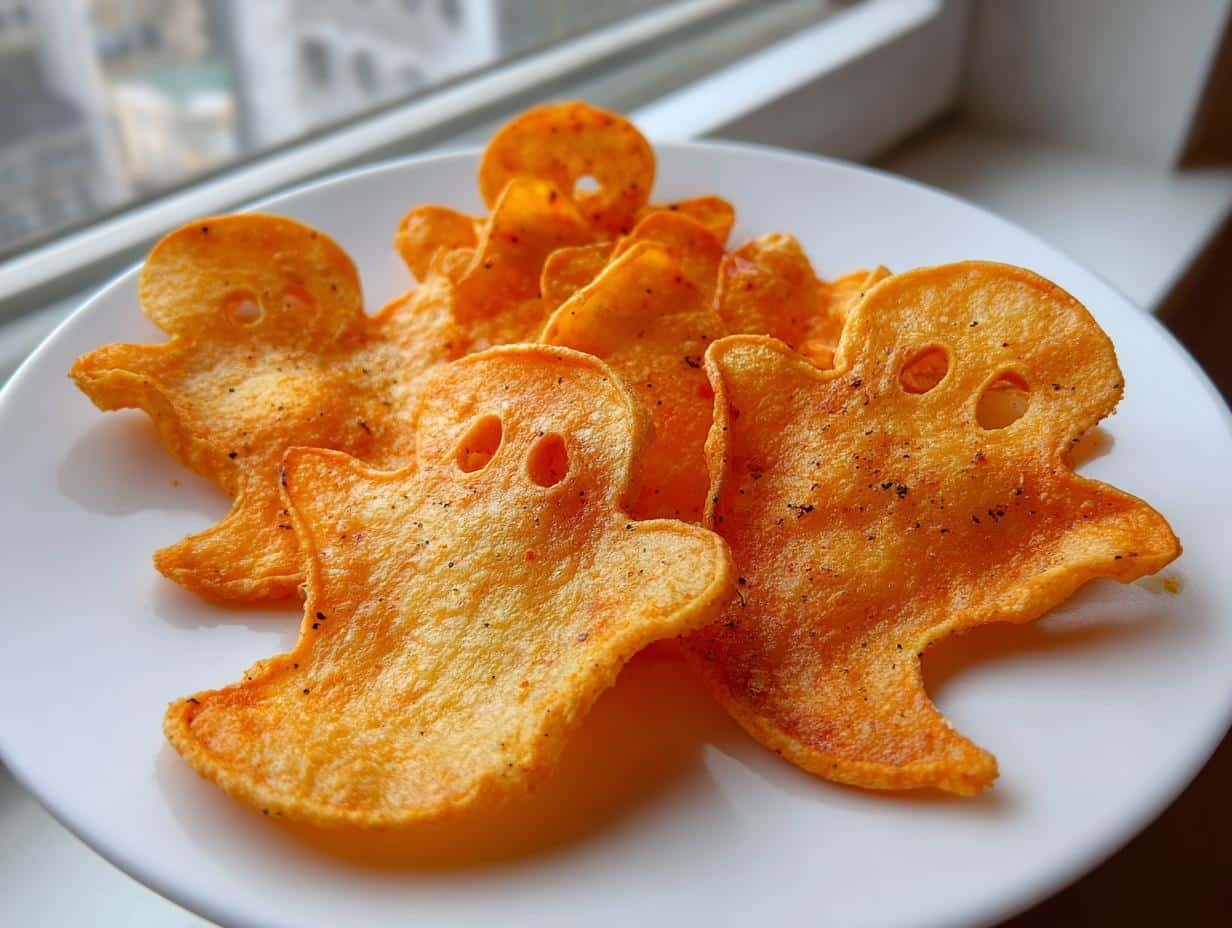
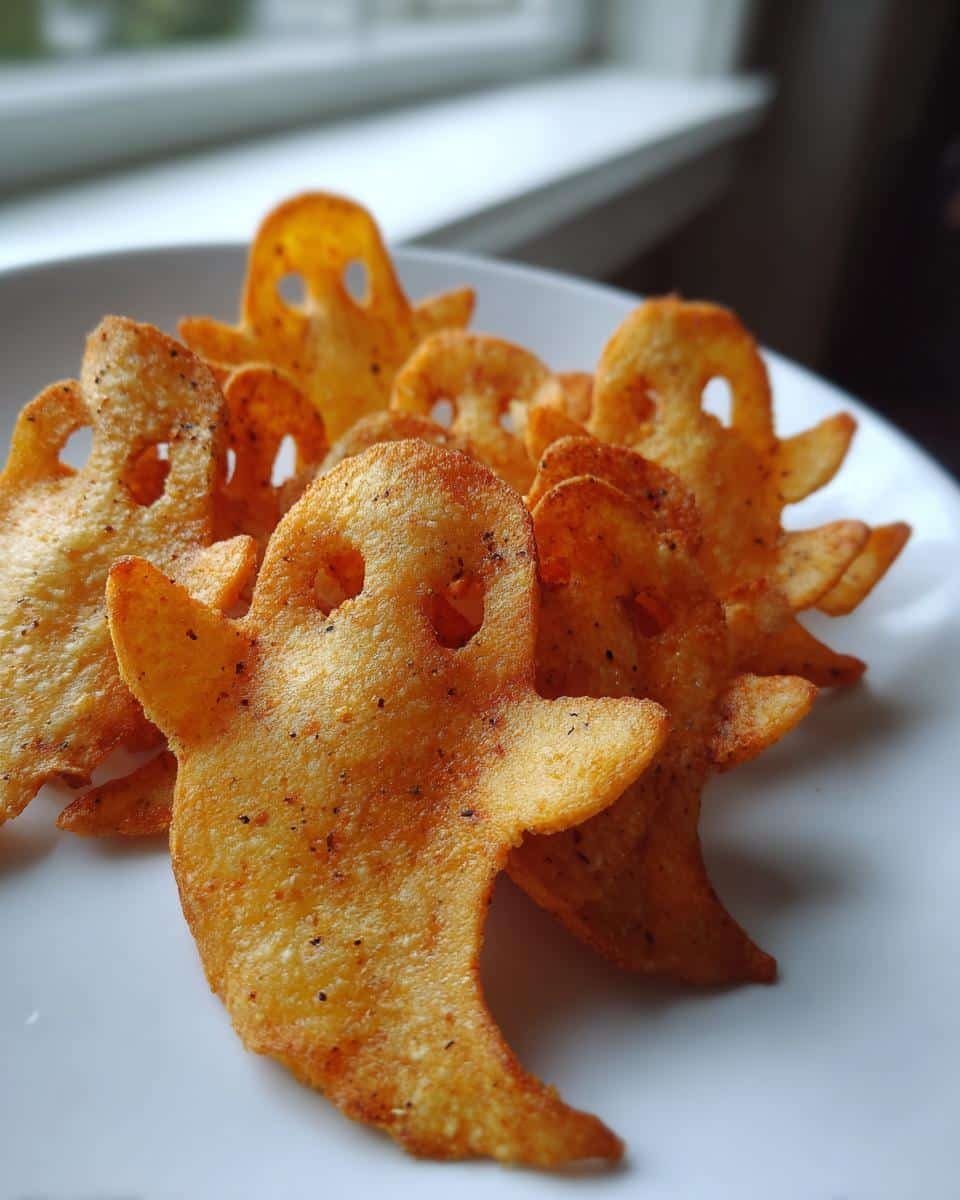
Halloween snacks should be equal parts fun and delicious, and these Spooky Baked Halloween Ghost Chips check every box! I stumbled upon this idea last October when my niece—who’s gluten-free—begged for a “not-too-scary but kinda-spooky” treat. The result? Crispy, ghost-shaped sweet potato chips that vanished faster than, well, ghosts! What I love most (besides how adorable they look) is how simple they are—just a handful of real ingredients, no fancy flours or weird substitutes. They’re naturally gluten-free and paleo-friendly, so everyone at your Halloween party can grab a handful without a second thought. And trust me, once you see those little ghost shapes crisp up in the oven, you’ll be making them every year!
Ingredients for Spooky Baked Halloween Ghost Chips
Gather these simple ingredients, and you’re already halfway to ghostly snacking perfection! I promise these measurements make the crispiest, most flavorful chips—I’ve tested them more times than I can count (mostly because I kept “sampling” the results).
- 2 medium white sweet potatoes – Look for ones about the size of your palm; they slice beautifully and crisp up just right
- 1 tbsp olive oil – The good stuff! It helps those spices stick and makes the ghosts shimmer like, well, ghosts
- 1/2 tsp garlic powder – My secret weapon for that addictive savory kick
- 1/2 tsp onion powder – Adds depth without overwhelming the sweet potatoes
- 1/2 tsp salt – I use fine sea salt for even distribution
- 1/4 tsp black pepper – Freshly ground if you’ve got it, but any will do in a pinch
That’s it! No weird binders, no obscure ingredients—just real food that makes your kitchen smell amazing. Pro tip: Double the batch if you’re serving more than a few ghosts… I mean, guests. These disappear fast!
How to Make Spooky Baked Halloween Ghost Chips
Okay, let’s bring these little ghosts to life! I’ve made this recipe so many times that I could probably do it in my sleep now (and after one particularly enthusiastic Halloween baking marathon, I almost did). Follow these steps, and you’ll have crispy, adorable ghost chips ready to haunt your snack table in no time.
Preparing the Sweet Potatoes
First things first: grab your sweet potatoes and give them a good scrub—no peeling needed! The skins add nice texture and make the ghosts look extra “ghostly” with those little speckles. Now, for the slicing: if you’ve got a mandoline, this is its time to shine. Set it to about 1/8-inch thickness for chips that crisp up perfectly without turning into sweet potato shingles.
No mandoline? No problem! Just use your sharpest knife and take your time—even slices mean even baking. Then comes the fun part: the ghost cutter! Press firmly but gently to get clean shapes. Save those scraps for roasting later (waste not, want not, right?).
Seasoning and Baking
Preheat that oven to 375°F—this is non-negotiable for crispiness. While it heats up, toss your ghostly little shapes in a big bowl with the olive oil. You want them lightly coated, not drowning—think “glistening ghost,” not “oil slick.” Sprinkle in the garlic powder, onion powder, salt, and pepper, then toss again like you’re gently tucking them in for a spicy nap.
Line your baking sheet with parchment (trust me, cleanup is scary enough without stuck-on sweet potatoes). Arrange the ghosts in a single layer with some breathing room—no overlapping, or they’ll steam instead of crisp. Bake for 10 minutes, then flip them carefully with a thin spatula. They’ll be delicate, so channel your inner ghost whisperer here. Another 10-15 minutes, and they’ll be golden and crisp around the edges.
Cooling and Serving
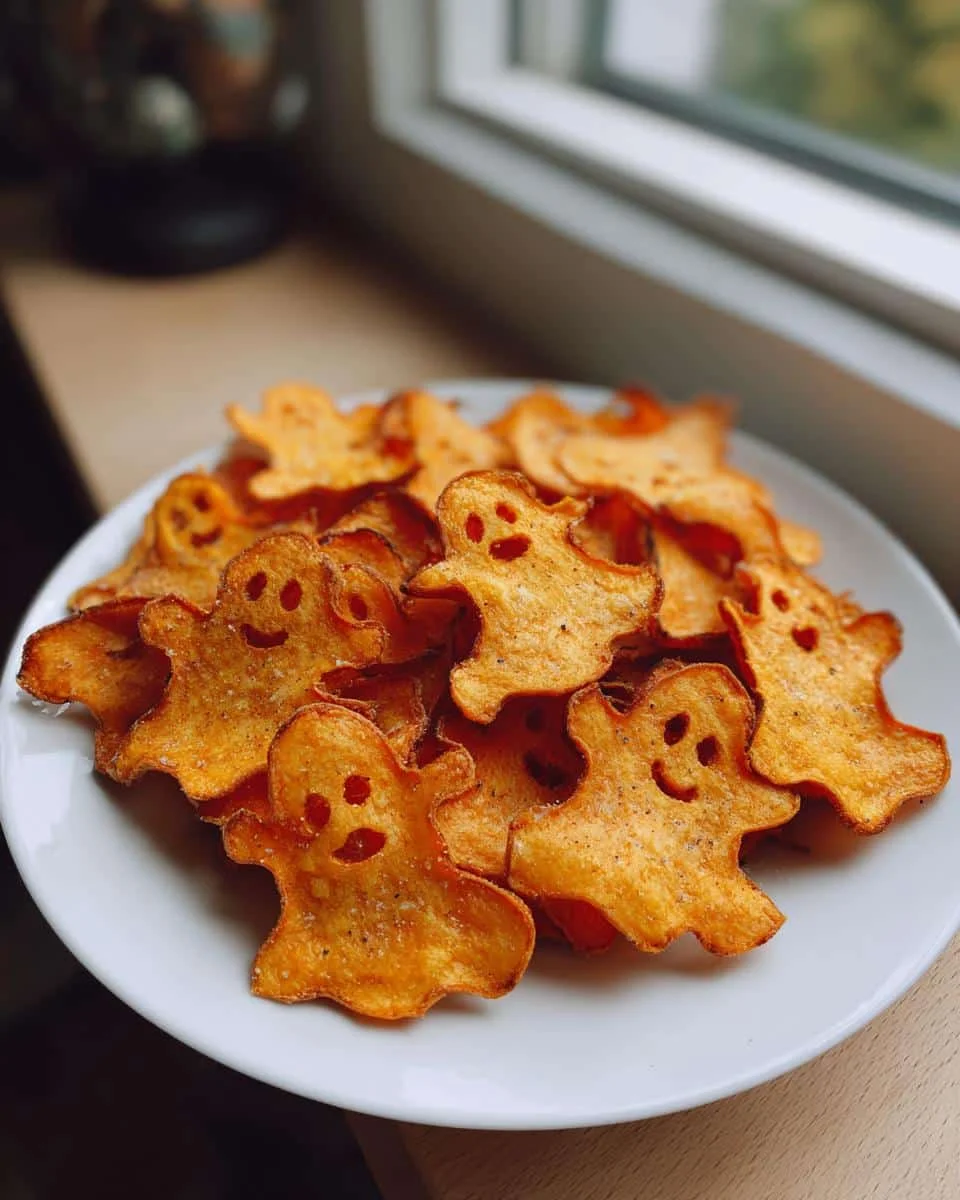
Here’s where patience is key: let them cool completely on the baking sheet. I know, I know—resisting the urge to sneak one is harder than ignoring a bowl of Halloween candy. But cooling is what makes them truly crispy! They’ll firm up as they sit, turning from floppy ghost impressions into sturdy, snackable specters.
When it’s time to serve, pile them high on a platter. They’re fragile, so handle with care—maybe even pretend you’re arranging actual little ghosts. Watch them disappear faster than a spirit at dawn! And if any break? Well, those are just the “casualty” chips… aka the chef’s treat.
Why You’ll Love These Spooky Baked Halloween Ghost Chips
Listen, I don’t just make these every October because they’re adorable (though that’s a big part of it). These little ghosts have won over everyone from my gluten-free sister-in-law to my picky toddler nephew—and here’s why they’ll become your Halloween staple too!
- Naturally gluten-free & paleo-friendly – No weird substitutes or specialty flours needed. Just real, simple ingredients that happen to be allergy-friendly. Even my “I can’t believe it’s gluten-free” friends go back for seconds!
- Instant Halloween magic – That moment when you pull the baking sheet out of the oven? Pure joy. The ghost shapes crisp up with these charming little edges that make everyone at parties gasp (then immediately grab one).
- Kid-approved (and kid-helper approved!) – My niece loves pressing the cookie cutter shapes almost as much as eating them. And since they’re not loaded with sugar, I don’t mind when she sneaks extras.
- Easy cleanup = more time for costumes – One bowl, one baking sheet, and parchment paper means you’re done in minutes. No deep fryer mess or sticky pans—just more time to perfect your zombie makeup!
Seriously, these check every box: cute, crunchy, healthy-ish, and impossible to resist. Even the “I don’t like sweet potatoes” folks in my life get converted after one bite. Consider yourself warned—this recipe might just haunt your Halloween traditions forever!
Expert Tips for Perfect Spooky Baked Halloween Ghost Chips
After making roughly a million batches of these ghost chips (okay, maybe closer to two dozen, but still!), I’ve learned all the tricks to get them crispy, flavorful, and downright adorable every single time. Here are my hard-earned secrets—consider it your cheat sheet for ghost chip mastery!
Mandoline magic for even slices
That mandoline hiding in your cabinet? It’s about to become your new best friend. Uniform slices mean no sad, burnt edges while other pieces stay stubbornly floppy. Just watch those fingertips—I speak from experience when I say ghosts shouldn’t be bloody! If you’re mandoline-shy, try this: use the food processor’s slicing attachment or practice with your knife while the sweet potato is halved lengthwise for stability.
The seasoning shuffle
Here’s my weird-but-works trick: season the oil, not the potatoes. Mix all your spices right into the tablespoon of olive oil first—it creates this amazing seasoned oil that coats every nook and cranny. No more sad, unseasoned ghost bellies! And if you want to get fancy, add a pinch of smoked paprika for a “haunted house” smokiness that’ll have people guessing your secret ingredient.
Flip like you mean it
That halfway flip isn’t just busywork—it’s the difference between ghosts and ghastly uneven browning. Use a thin metal spatula and move fast but gently. Can’t flip them all in time? No worries! Just rotate your baking sheet instead to combat any oven hot spots. And if a few break during flipping? Those are your quality control samples—chef’s privilege!
Parchment is your phantom friend
Skip the fancy silicone mats for this one—old-school parchment paper gives the crispiest results. Here’s why: it allows just enough moisture to escape without letting the ghosts stick like, well, ghosts to a haunted house. Bonus? You can reuse the same sheet for multiple batches—just let it cool between uses so you don’t steam the next round.
One last pro tip: make your first batch early in the day. That way, when you inevitably eat half of them straight off the tray (what, just me?), you’ll still have time to whip up another round before the party starts. Happy haunting—I mean, baking!
Ingredient Substitutions & Notes
Look, I get it—sometimes you’re halfway through a recipe only to realize you’re out of something crucial. Don’t panic! Over the years, I’ve tested every possible swap for these ghost chips (often unintentionally, thanks to my habit of not checking the pantry first). Here are my tried-and-true substitutions that still deliver crispy, delicious results.
Sweet Potato Alternatives
No white sweet potatoes? Regular orange ones work beautifully—they’ll just have more of that classic sweet potato flavor (and a slightly spookier orange hue!). For a fun twist, try parsnips—they crisp up like a dream and have this lovely earthy sweetness that pairs perfectly with the spices. Just slice them a smidge thinner since they’re denser.
Oil Options
Olive oil not your thing? Avocado oil is my go-to substitute—it has a higher smoke point, which means crispier ghosts. Melted coconut oil works too if you don’t mind a subtle coconut flavor (great for tropical-themed Halloween parties, right?). And in a pinch? Good old vegetable oil will do the job, though you might want to bump up the seasonings a bit.
Spice Swaps
Out of garlic powder? A clove of fresh minced garlic mashed into the oil works wonders—just use about half the amount since it’s stronger. No onion powder? A pinch of onion salt can stand in (just reduce the added salt accordingly). And if you’re feeling adventurous, swap the black pepper for cayenne—these ghosts will haunt your taste buds in the best way!
Special Diet Notes
For my Whole30 friends: just double-check that your spices are compliant (some pre-mixed ones have sneaky additives). Vegan? You’re already golden—these are naturally plant-based. And if you’re avoiding nightshades, skip the pepper and paprika-based seasonings entirely—try a dash of cinnamon instead for a sweet-spooky twist!
Remember: substitutions might change the flavor or texture slightly, but that’s part of the fun. Some of my favorite ghost chip variations came from happy accidents in the kitchen. As my grandma used to say when I’d stress over recipe tweaks: “They’re ghosts, honey—they’re supposed to be unpredictable!”
Storing and Reheating Spooky Baked Halloween Ghost Chips
Let’s talk about keeping these little ghosts fresh and crispy—because let’s be honest, you’ll probably have leftovers (said no one ever in my house). But just in case you’ve miraculously resisted eating the whole batch in one sitting, here’s how to store them like a pro!
First rule of ghost chip club: let them cool completely before storing. I know it’s tempting to dump them straight into a container, but trapped steam turns crisp ghosts into sad, soggy spirits. Spread them out on a paper towel-lined plate for about 30 minutes—this absorbs any lingering oil and helps them stay crunchy.
For storage, grab an airtight container and layer the ghosts between parchment paper. Don’t just dump them in—that’s a one-way ticket to broken chip city! The parchment keeps them from sticking together like, well, ghosts in a haunted attic. I’ve had the best luck with glass containers, but a gallon ziplock works in a pinch (just press out all the air first).
Now the hard truth: these are best eaten within 3 days. They won’t go “bad” after that, but they’ll start losing their signature crispness. If you must know my secret for reviving day-old chips? Skip the microwave (it makes them chewy—not in a good way). Instead, pop them in a 300°F oven for 5 minutes to wake up those crispy spirits!
Pro tip: For parties, I bake them the morning of and store at room temperature. But if you must prep ahead, freeze the raw ghost shapes on a baking sheet, then transfer to a bag. When the time comes, bake from frozen—just add 2-3 extra minutes. No one will know they weren’t freshly haunted!
Last warning: however you store them, hide the container in the back of the pantry. Otherwise, you might find them “mysteriously” disappearing… and we all know who the snack ghost in your house really is!
Nutritional Information
Okay, let’s talk numbers—but don’t worry, these ghosts won’t haunt your diet! One serving (about 15 ghostly chips) comes out to roughly:
- 120 calories – Perfect for guilt-free snacking while you carve pumpkins
- 4g sugar – All natural from the sweet potatoes, so no sugar crashes
- 3g fiber – Those potato skins are doing good work for your gut
- 2g protein – Not bad for a veggie chip!
- 4g fat – Just enough from the olive oil to help absorb all those good vitamins
Estimates per serving; values vary by ingredient brands. And here’s my nutritionist friend’s favorite part: these pack a serious vitamin A punch from the sweet potatoes—great for keeping your immune system ready for all those Halloween germs!
Now, full disclosure: I’m not a dietitian, just a snack enthusiast who reads a lot of nutrition labels. If you’re tracking macros closely, definitely run your specific ingredients through an app—especially if you tweak the oil or potato sizes. But compared to store-bought chips? These little phantoms are basically health food with a Halloween costume!
Frequently Asked Questions
Over the years of making these ghost chips (and fielding texts from friends mid-baking panic), I’ve gotten allll the questions. Here are the ones that pop up most often—consider this your ghost chip troubleshooting guide!
Can I make these ahead of time?
Absolutely! I actually prefer baking them the morning of my Halloween bash—they’re crispiest within 24 hours. Just store them as I mentioned earlier (cool completely, parchment between layers in an airtight container). If you must prep further ahead, the seasoned raw ghost shapes keep beautifully in the fridge for 2 days—just pat them dry before baking since sweet potatoes can weep a bit. Pro tip: Double the batch and freeze half the raw shapes; then you can bake fresh ghosts whenever the craving (or unexpected guests) spook you!
What if I don’t have a ghost cookie cutter?
No phantom-shaped tool? No problem! Get creative:
- Freehand cut triangles with a knife for simple ghosts (wonky shapes add character!)
- Use a small pumpkin or bat cutter if you’ve got other Halloween shapes
- Go abstract with a round biscuit cutter—call them “full moon” chips
- My personal hack? Fold parchment paper, sketch half a ghost, cut it out, and use as a stencil
The spices and crispiness make them delicious no matter what shape they haunt your plate in!
Are these chips keto-friendly?
Ah, the eternal low-carb question! While sweet potatoes aren’t traditional keto fare (one serving has about 20g net carbs), here’s how I tweak them for my keto friends:
- Swap sweet potatoes for jicama—slice super thin, soak in water for 30 mins first to remove starch
- Use zucchini (salt slices first, pat ultra dry) for about 3g net carbs per serving
- Increase the oil slightly to up the fat content if that’s your macro focus
They won’t get quite as crisp as the original, but dipped in guac? Spookily good! For strict keto, I’d save these for a “spooky cheat night” and enjoy every bite.
Share Your Spooky Creations!
Nothing makes me happier than seeing your ghostly kitchen creations! Tag me on Instagram @SpookySnacksWithSam—I swear I do a little happy dance every time I see those crispy little ghosts pop up in my feed. Here’s what I love spotting most:
- Creative twists – Did you add paprika for red “haunted” ghosts? Use pumpkin instead of sweet potatoes? I wanna see it all!
- Kitchen fails turned funny – That batch that came out looking more like blobs than ghosts? We’ve all been there. Share the laughs!
- Kids getting involved – Tiny hands holding cookie cutters, flour-dusted aprons—these moments are pure magic to me.
Use #GhostChipSquad so we can all marvel at your spooky snack artistry. And if you’re shy? Just know I’m over here cheering you on—whether your ghosts look ghoulishly perfect or charmingly lopsided. After all, isn’t that what makes Halloween so fun?
Print
20-Minute Spooky Baked Halloween Ghost Chips So Crispy You’ll Freak
- Total Time: 40 minutes
- Yield: 4 servings 1x
- Diet: Gluten Free
Description
Crispy, spooky baked ghost-shaped chips that are gluten-free and paleo-friendly. Perfect for Halloween parties or as a fun snack.
Ingredients
- 2 medium white sweet potatoes
- 1 tbsp olive oil
- 1/2 tsp garlic powder
- 1/2 tsp onion powder
- 1/2 tsp salt
- 1/4 tsp black pepper
Instructions
- Preheat oven to 375°F (190°C).
- Slice sweet potatoes into thin rounds.
- Use a ghost-shaped cookie cutter to cut out shapes.
- Toss with olive oil, garlic powder, onion powder, salt, and pepper.
- Place on a lined baking sheet in a single layer.
- Bake for 20-25 minutes until crispy.
- Let cool before serving.
Notes
- Use a mandoline for even slices.
- Store in an airtight container for up to 3 days.
- For extra crispiness, flip halfway through baking.
- Prep Time: 15 minutes
- Cook Time: 25 minutes
- Category: Snack
- Method: Baking
- Cuisine: American
Nutrition
- Serving Size: 1 serving
- Calories: 120
- Sugar: 4g
- Sodium: 300mg
- Fat: 4g
- Saturated Fat: 0.5g
- Unsaturated Fat: 3.5g
- Trans Fat: 0g
- Carbohydrates: 20g
- Fiber: 3g
- Protein: 2g
- Cholesterol: 0mg