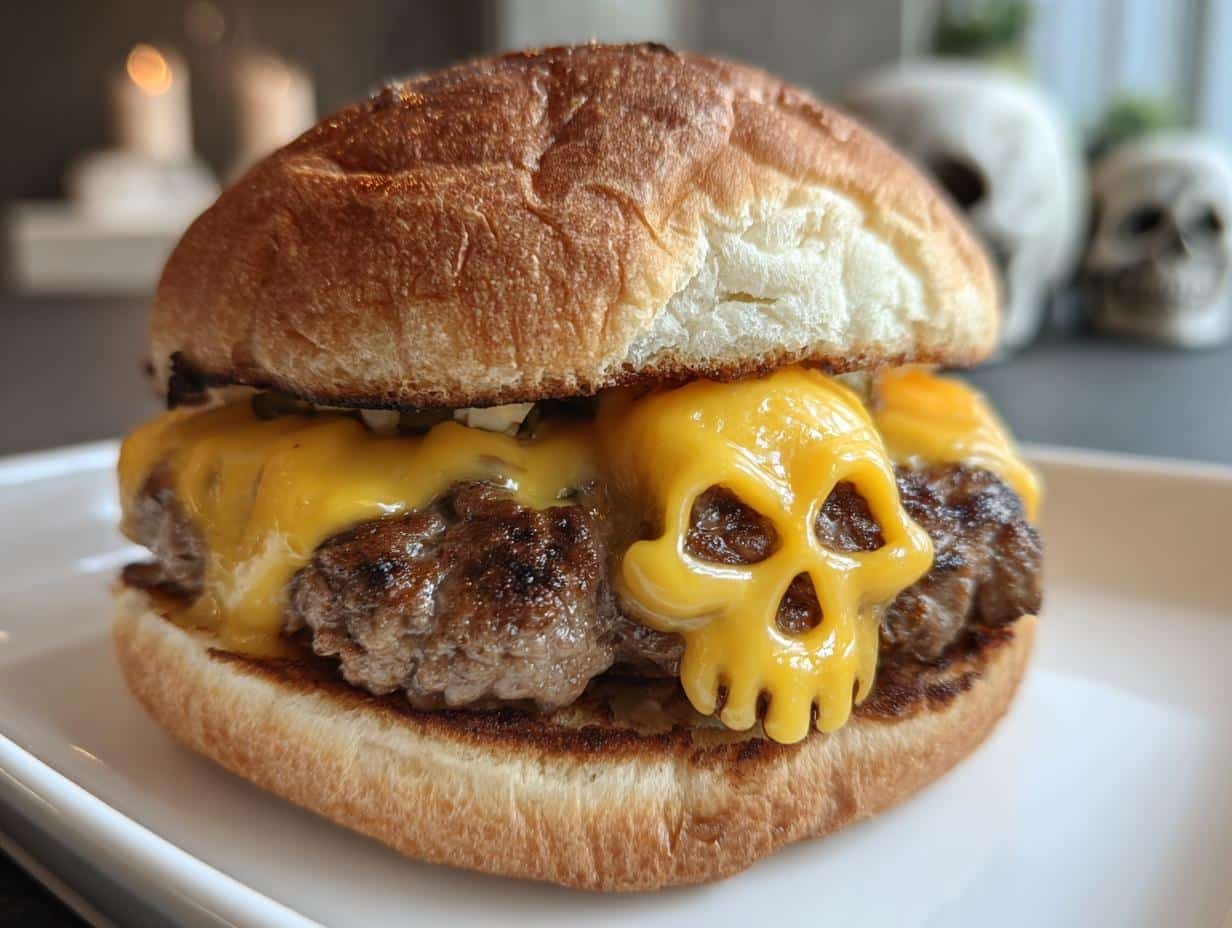
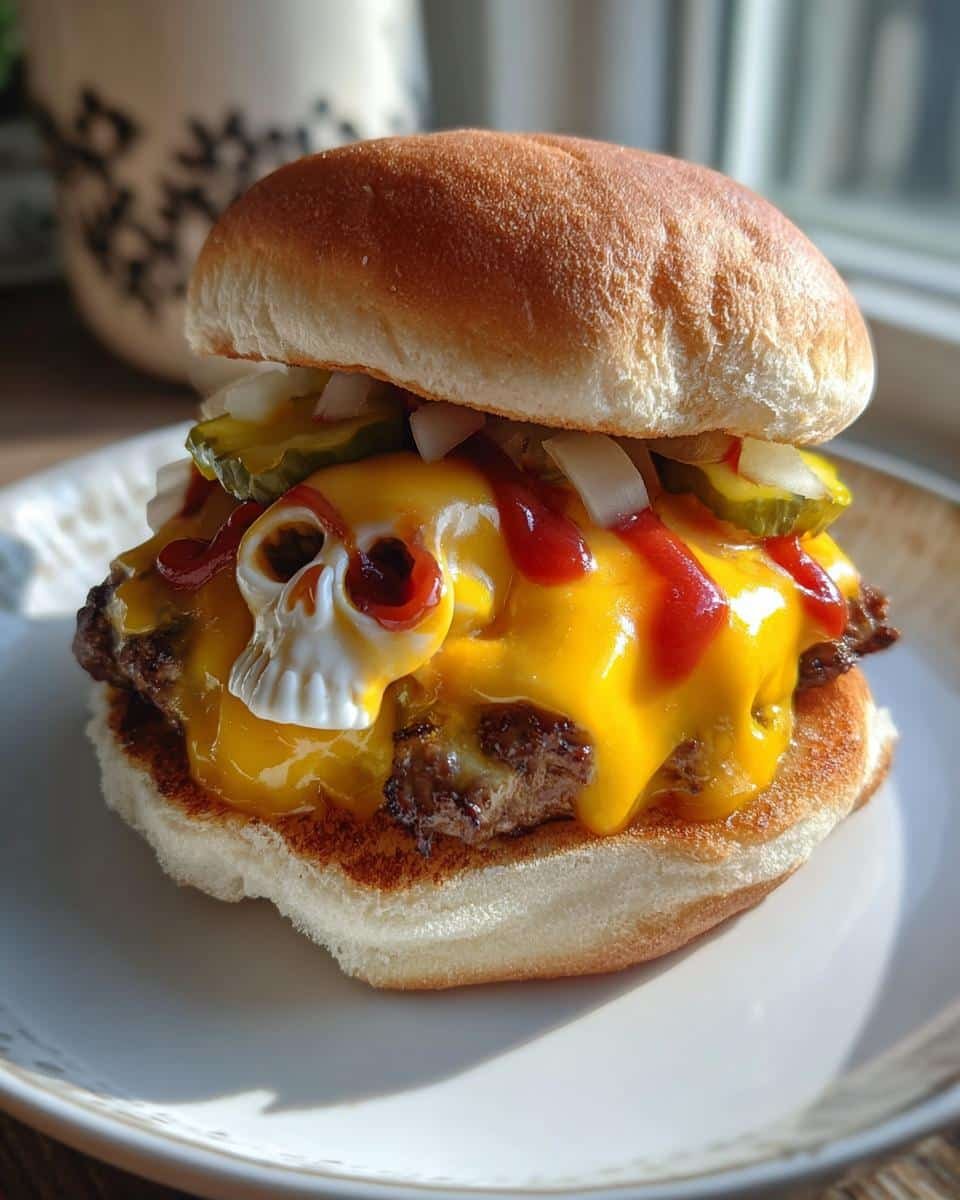
Halloween dinners should be as fun as the costumes, right? That’s why I’m obsessed with these Cheeseburger Skulls Halloween Dinner – they’re spooky, delicious, and way easier to make than you’d think. Every year, my kids beg me to make them again after that first time I surprised them with burger patties shaped like grinning skulls. The look on their faces when those cheesy, melty “bones” peeked out from the buns? Priceless.
What I love most is how simple ingredients transform into something so festive. Ground beef gets a quick mix with pantry staples, then pressed into skull shapes (a cookie cutter helps if you’re not feeling artistic). Bake them up, add melty cheddar “skin,” and suddenly you’ve got a centerpiece that’ll have everyone snapping photos before they dig in. Trust me, these disappear faster than Halloween candy!
Ingredients for Cheeseburger Skulls Halloween Dinner
Gathering your ingredients is the first step to creating these spooky-delicious cheeseburger skulls. I’ve learned that using the right ingredients makes all the difference – trust me, you don’t want your skulls falling apart or losing their shape! Here’s exactly what you’ll need:
- 1 lb ground beef (80/20 lean/fat) – The slight fat content keeps them juicy while baking
- 1/2 cup breadcrumbs (plain, unseasoned) – Panko works great too for a bit more crunch
- 1 large egg, beaten – Our binding agent to hold everything together
- 1 tsp salt – Simple table salt does the trick
- 1/2 tsp black pepper – Freshly ground if you have it
- 1 tsp garlic powder – My secret flavor booster
- 1 tsp onion powder – Adds that classic burger taste
- 4 slices cheddar cheese (thinly sliced) – American cheese works too for extra meltiness
- 4 burger buns – Brioche buns make these extra special
- 1 tbsp ketchup – For that classic burger flavor and “blood” detailing
- 1 tbsp mustard – Yellow or Dijon, your choice!
- 1 tbsp mayonnaise – Makes everything creamier
- 1/4 cup diced onions – Red onions add nice color
- 1/4 cup pickles, sliced – Bread and butter pickles add sweetness
Pro tip from my kitchen: Measure everything before you start – it makes the process so much smoother when you’re shaping those skulls. And if you’re feeling extra creative, grab some extra ketchup for “dripping blood” effects when plating!
How to Make Cheeseburger Skulls Halloween Dinner
Now for the fun part – transforming that bowl of ingredients into spooky, cheesy perfection! These steps are foolproof, whether you’re a Halloween cooking pro or just starting out. Follow along, and soon you’ll have burger skulls that look straight out of a monster movie (but taste way better).
Shaping and Baking the Skull Patties
First, preheat your oven to 375°F (190°C) – this gives you time to shape while it heats up. In a big bowl, mix together the ground beef, breadcrumbs, egg, and all those seasonings. I like to get my hands right in there – the squishier the better for shaping!
Now comes the creative part: If you’ve got a skull-shaped cookie cutter (about 4 inches wide works best), press it onto a baking sheet lined with parchment paper. Pack your meat mixture inside, smoothing the top with your fingers. No cutter? No problem! Just shape them by hand into oval patties, then use the handle end of a spoon to carve out eye sockets and a toothy grin.

Bake for 20-25 minutes until they reach 160°F inside (a meat thermometer is your best friend here). In the last 2 minutes, drape each skull with cheese and let it melt into creepy perfection.
Assembling the Cheeseburger Skulls
While those bake, toast your buns lightly – just enough for crunch but not so much they crumble. Now the magic happens! Spread your bottom buns with ketchup, mustard, and mayo (I go heavy on the mayo – it makes the “brains” effect when you bite in).
Place your cheesy skull patty on top, then pile on onions and pickles. For extra Halloween flair, drizzle more ketchup around the plate like blood splatters or add pickle slice “fingernails” poking out. The final touch? Gently place the top bun at a crooked angle, like it’s barely hanging on. Spooky and delicious!
Why You’ll Love This Cheeseburger Skulls Halloween Dinner
This recipe has become my family’s must-have Halloween tradition for so many reasons:
- Instant Halloween spirit: Nothing gets everyone giggling like biting into a cheesy skull burger
- Kid-approved fun: My little monsters love helping shape the patties (messy hands = happy memories)
- Easy customization: Swap toppings to make them as scary or mild as you want
- Perfect party food: They look impressive but take less effort than carving pumpkins
- Leftovers taste amazing: The flavors meld even better the next day (if they last that long!)
Seriously, these disappear faster than trick-or-treaters at my door!
Tips for Perfect Cheeseburger Skulls
After making these spooky burgers year after year, I’ve picked up some tricks that take them from good to ghoulishly great. These little secrets make all the difference when you’re aiming for picture-perfect (and tasty!) cheeseburger skulls.
Chill your patties before baking: After shaping, pop those skulls in the fridge for 15-20 minutes. This helps them hold their creepy shape while baking – no sagging jawbones or melting eye sockets! I learned this the hard way after my first batch came out looking more like blobs than bones.
Food-safe brush for details: Want those dramatic bloody drips? Use a clean pastry brush to streak ketchup “blood” down the buns or plate. For extra creep factor, mix a bit of water with your ketchup to make it runnier – perfect for gruesome drizzle effects.
Double cheese for melty goodness: Sometimes I sneak an extra slice of cheese between the patty and bottom bun. It melts into gooey deliciousness that looks like oozing… well, use your imagination! Kids go wild for this extra-cheesy version.
Bake on parchment paper: This prevents sticking and makes cleanup a breeze. Nothing ruins Halloween fun like scrubbing baked-on cheese off your baking sheet. Trust me, I’ve been there!
Toast buns separately: Don’t assemble until right before serving. This keeps the buns from getting soggy under all those tasty toppings. I like to toast them just enough for a slight crunch – it mimics the sound of crunching bones (in the best way possible).
One last tip from my kitchen: Have fun with it! These cheeseburger skulls are meant to be playful. If your eye sockets aren’t perfectly symmetrical or your cheese melts a little too much, just call it “extra spooky” and dig in. After all, Halloween is about creativity and delicious scares!
Ingredient Substitutions for Cheeseburger Skulls
One of the best things about this recipe? It’s super flexible! Whether you’re dealing with dietary restrictions or just ran out of something, here are my tried-and-true swaps that keep the Halloween fun going without sacrificing flavor or those perfect spooky shapes.
Ground turkey or chicken instead of beef works beautifully – just add 1 extra tablespoon of olive oil to keep it moist. I’ve even used plant-based crumbles for vegetarian friends (chill them longer before baking so they hold shape).
Gluten-free breadcrumbs or crushed gluten-free crackers are my go-to when needed. The texture comes out nearly identical – just avoid super fine crumbs or your skulls might get dense.
Dairy-free cheese slices melt surprisingly well these days! Look for brands that specifically say “good for melting.” Or skip the cheese entirely and brush patties with BBQ sauce before baking for a “burnt bone” effect.
Flax egg (1 tbsp ground flax + 3 tbsp water) can replace the regular egg if needed. Let it thicken for 5 minutes first – it won’t bind quite as firmly, so handle those patties gently.
Pretzel buns or lettuce wraps make great bun alternatives. The pretzel’s saltiness contrasts wonderfully with sweet ketchup “blood,” while lettuce keeps it low-carb.
Small warning from experience: Go light on watery veggies if substituting. Things like tomatoes or fresh mushrooms can make your skulls soggy. Stick to pickles and onions for that perfect creepy crunch!
Storing and Reheating Cheeseburger Skulls
Now, I know what you’re thinking – “Do these spooky burgers keep well?” Absolutely! Though between you and me, they rarely last long enough to store at my house. But when they do, here’s how I keep them tasting fresh-from-the-oven delicious.
Fridge storage is a breeze: Just separate the components – store patties in an airtight container for up to 3 days (any longer and they start losing their creepy charm). Keep the buns in their original bag or a ziplock to prevent staleness. Pro tip: Wrap each cheese-topped patty individually in parchment paper so they don’t stick together.
Reheating like a pro: For the best texture, pop those skull patties on a baking sheet at 350°F for about 8 minutes. The microwave works in a pinch (30-second bursts), but the cheese gets a bit rubbery. Whatever you do, don’t reheat them assembled unless you want soggy “grave” buns!
Freezing for later scares: Unbaked shaped patties freeze beautifully for up to a month. Lay them flat on parchment in a single layer, freeze solid, then transfer to freezer bags. Bake straight from frozen – just add 5 extra minutes. The buns? Those I always keep fresh – frozen then thawed buns turn into hockey pucks.
One last storage secret from my kitchen: If you’ve got leftover assembled burgers (unlikely, but possible), wrap them tightly in foil and reheat in a 300°F oven for 10 minutes. The foil keeps the buns from drying out while the filling warms through. Just don’t tell my kids I shared this trick – they think I always make them fresh!
Cheeseburger Skulls Halloween Dinner FAQs
Over the years, I’ve gotten all sorts of questions about these spooky burgers – here are the ones that pop up most often with my tried-and-true answers!
Can I grill the skull patties instead of baking?
Absolutely! Just make sure to chill them extra well first (at least 30 minutes) so they hold their shape on the grill. Use medium heat and a well-oiled grate – those detailed faces can stick if you’re not careful. And don’t flip too often – one good turn is all they need.
How can I make these cheeseburger skulls spicier?
Oh, I love this question! Mix 1/2 teaspoon cayenne pepper into your meat mixture, or add diced jalapeños to the onions. For serious heat lovers, brush the patties with sriracha before adding cheese – it creates this awesome “lava” effect when it melts. Just warn your guests first!
What if I don’t have a skull-shaped cookie cutter?
No worries – I’ve used all sorts of creative solutions! A round biscuit cutter works if you carve out eyes and mouth after shaping. Or go freehand – kids especially love helping sculpt “scary faces” with their fingers. Pro tip: Look for plastic Halloween cookie cutters at dollar stores this time of year!
Can I prepare the patties ahead of time?
You bet! Shape them up to 24 hours in advance and keep refrigerated (covered tightly). The flavors actually develop more overnight. Just add 1-2 extra minutes to the baking time since they’ll be extra cold going in.
What sides go best with cheeseburger skulls?
My family goes wild for “bone” fries (just cut potatoes into stick shapes) or “eyeball” potato salad (add sliced olives to hard-boiled eggs). A simple green salad with “bloody” cherry tomatoes makes a great balance too. Really, anything vaguely creepy works!
Nutritional Information for Cheeseburger Skulls
Okay, let’s be real – we’re not eating skull-shaped burgers for their health benefits! But I know some folks like to keep track, so here’s the nutritional breakdown per serving (that’s one fully-loaded cheeseburger skull). Remember, these are estimates – your exact numbers will vary depending on your specific ingredients and how generous you are with the cheese!
Per serving:
- 450 calories – Perfect fuel for trick-or-treating
- 25g fat (10g saturated) – Mostly from that delicious melted cheese
- 30g carbohydrates – The bun does most of the work here
- 25g protein – Thanks to our hearty beef patty
- 800mg sodium – Seasoning and toppings add up
- 5g sugar – Mostly from the ketchup and pickles
A little kitchen confession: I don’t actually count calories on Halloween (where’s the fun in that?). But if you’re watching your intake, easy swaps like leaner meat, light cheese, or lettuce wraps can trim things down. Personally? I say enjoy the holiday – those skull faces burn extra calories from all the screaming they’ll cause at your dinner table!
Share Your Cheeseburger Skulls Creations
Nothing makes me happier than seeing your spooky burger masterpieces! I still remember the first photo a reader sent me – their daughter grinning ear-to-ear with ketchup “blood” dripping down her chin. Now I want to see your Halloween dinner creations too!
Snap a pic of your cheeseburger skulls before they disappear (which they will – fast!). Tag me on Instagram or Facebook so I can cheer you on. Maybe yours will have pickle slice “fangs” or a particularly gruesome cheese melt. Extra points for creative plating – I once saw someone serve these on a black slate with drawn-on spiderwebs!
Cooking should be fun, especially on Halloween. Whether your skulls turn out picture-perfect or adorably lopsided, I want to see them all. Who knows – your version might inspire next year’s recipe tweak!
For more spooky and delicious recipes, check out our Pinterest page!
Print
Spooky Cheeseburger Skulls Halloween Dinner in 30 Minutes
- Total Time: 40 minutes
- Yield: 4 servings 1x
- Diet: Low Lactose
Description
A fun and spooky Halloween dinner idea featuring cheeseburgers shaped like skulls. Perfect for a festive meal that’s both delicious and creative.
Ingredients
- 1 lb ground beef
- 1/2 cup breadcrumbs
- 1 egg
- 1 tsp salt
- 1/2 tsp black pepper
- 1 tsp garlic powder
- 1 tsp onion powder
- 4 slices cheddar cheese
- 4 burger buns
- 1 tbsp ketchup
- 1 tbsp mustard
- 1 tbsp mayonnaise
- 1/4 cup diced onions
- 1/4 cup pickles, sliced
Instructions
- Preheat the oven to 375°F (190°C).
- Mix ground beef, breadcrumbs, egg, salt, pepper, garlic powder, and onion powder in a bowl.
- Shape the mixture into skull-shaped patties using a skull-shaped mold or by hand.
- Bake the patties for 20-25 minutes until fully cooked.
- Place a slice of cheddar cheese on each patty and bake for another 2 minutes to melt.
- Toast the burger buns lightly.
- Assemble the burgers with ketchup, mustard, mayonnaise, onions, and pickles.
- Serve immediately.
Notes
- Use a skull-shaped cookie cutter for perfect patty shapes.
- Add hot sauce for extra spice.
- Substitute ground turkey for a lighter option.
- Prep Time: 15 minutes
- Cook Time: 25 minutes
- Category: Dinner
- Method: Baking
- Cuisine: American
Nutrition
- Serving Size: 1 burger
- Calories: 450
- Sugar: 5g
- Sodium: 800mg
- Fat: 25g
- Saturated Fat: 10g
- Unsaturated Fat: 12g
- Trans Fat: 0g
- Carbohydrates: 30g
- Fiber: 2g
- Protein: 25g
- Cholesterol: 100mg