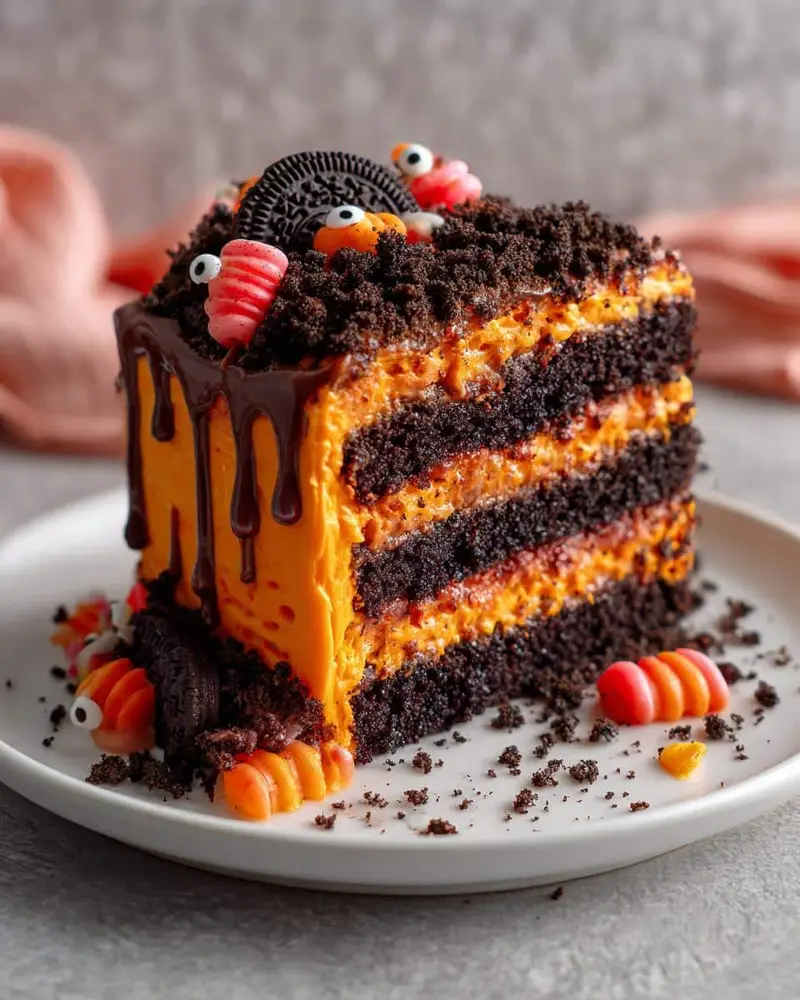
Oh my gosh – Halloween desserts are my absolute favorite thing to make! There’s just something so fun about turning ordinary sweets into spooky creations that make everyone go “Ooooh!” when you bring them out. I still remember the first time I attempted a Halloween cake – it looked more like a sad ghost than the terrifying masterpiece I’d imagined. But after years of trial and error (and plenty of candy-covered disasters), I’ve nailed down these Halloween party dessert ideas that are guaranteed crowd-pleasers.
The best part? These treats are way easier than they look. With just a few simple ingredients and some creative decorating, you can transform basic cakes and cookies into ghoulish delights that’ll have your guests snapping photos before they dare take a bite. Trust me, once you see how simple it is to make these eerie-yet-delicious desserts, you’ll want to host a Halloween party just so you can show them off!
Table of Contents
Table of Contents
Why You’ll Love These Halloween Party Dessert Ideas
Listen, I know Halloween can feel overwhelming with all the costumes and decorations – but desserts? That’s where the real magic happens! Here’s why these spooky treats will be the star of your party:
- Super simple to make – We’re starting with a boxed cake mix, people! No fancy baking skills required, just lots of creative fun with decorations.
- Instant wow factor – That moment when you unveil a cake covered in “dirt” and worms? Priceless. Your guests will think you spent hours when really, it’s just crushed Oreos doing all the work!
- Endless creativity – Candy eyes staring up at you, chocolate “webs” dripping down the sides – every bite tells a story. And the best part? You get to be the author!
- Perfect for all ages – Kids go wild for the gummy worms, while adults appreciate how delicious it actually tastes (no cardboard-flavored decorations here!).
- Budget-friendly – Most ingredients are pantry staples or inexpensive Halloween candy. No need for specialty store runs!
I’ve made these for everything from kindergarten parties to grown-up Halloween bashes – they’re always the first thing to disappear from the dessert table!
Ingredients for Spooky Halloween Cake
Alright, let’s gather our magic potion ingredients – I mean, cake ingredients! Here’s everything you’ll need to create this creepy masterpiece:
- 1 box (15.25 oz) chocolate cake mix – Devil’s food or dark chocolate works best for that extra eerie darkness
- 1 cup orange frosting – I like to use store-bought for convenience, but homemade works too (just tint white frosting with orange food coloring)
- 12 Oreo cookies, crushed into coarse crumbs – Pulse them briefly in a food processor or smash in a bag for that perfect “dirt” texture
- 1 cup melted chocolate chips – Microwave in 30-second bursts, stirring between each until smooth
- 1/2 cup candy eyes – Those wiggly ones with black dots work great!
- 1/2 cup gummy worms – Go for the sour ones if you want an extra “bite”!
Pro tip: Grab some extra Oreos and worms for “quality testing” while you bake – chef’s privilege!
Equipment You’ll Need
Before we dive into baking our spooky masterpiece, let’s round up our trusty kitchen tools:
- 9×13 inch cake pan – The perfect canvas for your Halloween creation
- Mixing bowls (one large, one medium) – For batter and melted chocolate
- Electric mixer – Hand or stand, both work great
- Spatula – For smoothing that gorgeous orange frosting
- Piping bag or plastic zip-top bag – For those creepy chocolate details
- Measuring cups and spoons – Because eyeballing measurements leads to ghostly baking disasters!
That’s it – no fancy gadgets required! Now let’s get our hands messy…
How to Make Halloween Party Dessert Ideas
Okay, witches and warlocks, let’s create some edible magic! I promise this is way easier than it looks – just follow these steps and you’ll have a showstopping Halloween dessert in no time.
Baking the Chocolate Cake
First things first – let’s bake our spooky canvas! Preheat your oven to 350°F (175°C) and grease that 9×13 inch pan really well. Nothing scarier than a cake that won’t come out of the pan, am I right?
Mix up your chocolate cake batter according to the package directions (see? Told you this was easy!). Pour it into your prepared pan and pop it in the oven for about 25-30 minutes. You’ll know it’s done when a toothpick comes out clean and the edges pull slightly away from the pan.
Here’s my big tip: Let the cake cool completely before frosting! I know it’s tempting to rush – trust me, I’ve learned the hard way that warm cake + frosting = melty mess. Give it at least an hour to cool, or speed things up by popping it in the fridge for 20 minutes.
Decorating Your Spooky Creation
Now for the fun part! Spread that vibrant orange frosting evenly over your cooled cake. No need to be perfect here – some unevenness makes it look even more “haunted.”
Next, grab those crushed Oreos and sprinkle them generously over the top. I like to leave some patches of orange frosting showing through for contrast – makes it look like worms are crawling through dirt!
Time for the dramatic finish! Melt your chocolate and pour it into a piping bag or zip-top bag with a tiny corner snipped off. Drizzle it all over in creepy web-like patterns. Then strategically place those candy eyes – some peeking out from the “dirt,” others half-buried for extra creep factor.
Finally, arrange the gummy worms so they look like they’re crawling out of the cake. Bury some halfway in, leave others draped over the sides. Step back and admire your deliciously terrifying creation!
Tips for Perfect Halloween Desserts
Want to take your spooky desserts from “cute” to “completely terrifying”? Here are my tried-and-true tricks:
- Go darker! Swap orange frosting for black if you really want that eerie graveyard vibe. Just add black gel food coloring to white frosting – liquid makes it runny.
- Chill before serving – A quick 15 minutes in the fridge helps set the decorations so they don’t slide off when you cut slices.
- Get creative with “dirt” – Try crushed chocolate cookies or even crumbled chocolate cereal for different textures.
- Add spooky sounds! Hide a Bluetooth speaker under the table playing ghostly moans – the reactions are priceless!
Remember – the messier it looks, the more authentically “haunted” it appears. Embrace the chaos!
Variations for Your Halloween Party Dessert Ideas
Who says you have to stick to just one spooky design? Here are some of my favorite twists on this Halloween cake that’ll keep your guests guessing:
- Ghostly Vanilla Version – Swap the chocolate cake for white or vanilla and use white frosting. Press whole Oreos vertically into the cake to make little ghost bodies, then pipe on eyes with black frosting!
- Spiderweb Delight – After frosting, pipe concentric white chocolate circles then drag a toothpick from center to edge to create a web pattern. Add plastic spiders for extra fright!
- Pumpkin Patch Cake – Use orange frosting to pipe little pumpkins all over, then outline them with green frosting vines. So cute for a less-scary party!
- Bloody Red Velvet – Make red velvet cake instead, then drizzle with raspberry jam “blood” and top with zombie gummy hands reaching up!
- Cookie Graveyard – Bake the cake in a square pan, frost with gray frosting, and stick in tombstone-shaped cookies with funny RIP inscriptions.
The possibilities are endless – let your Halloween spirit guide you! I’d love to hear what creepy creations you dream up. Check out more dessert ideas on Pinterest!
Serving and Storing Suggestions
When it comes to serving this Halloween cake, I love going all out with the presentation! My favorite trick? Placing it on a cake stand surrounded by plastic spiders and skeleton decorations – instant haunted dessert table centerpiece. For extra drama, serve slices with dry ice “fog” (just be careful handling it!).
Leftovers? Ha – as if there will be any! But just in case, store any uneaten cake in an airtight container at room temperature for up to 2 days (if it lasts that long). The Oreo crumbs might soften a bit, but a quick sprinkle of fresh crumbs before serving fixes that. You can also freeze individual slices wrapped tightly in plastic wrap for up to a month – perfect for satisfying those post-Halloween sugar cravings!
Nutritional Information
Okay, let’s be real – we’re not eating Halloween cake for its health benefits! But since you asked, here’s the general nutrition breakdown per slice (based on 12 servings): about 350 calories, 25g sugar, and all the spooky deliciousness you can handle. Remember, these are just estimates – your actual values may vary depending on specific ingredients used. Now go enjoy that treat without guilt – it’s Halloween!
Frequently Asked Questions
Oh, I love answering these – here are the questions I get asked most about these Halloween party desserts:
Can I make this cake ahead of time?
Absolutely! Bake the cake up to 2 days before your party – just wait to decorate until the day of. Undecorated cakes stay fresher longer. Store it wrapped tightly at room temperature, then go wild with the creepy decorations when you’re ready to serve!
Help! My candy eyes keep falling off – any tricks?
Ah, the classic eyeball dilemma! Try this: Dab a tiny bit of frosting on the back of each eye before placing it. The frosting acts like edible glue. Or, press them gently into the cake before the Oreo crumbs go on – they’ll stay put better when partially buried.
What if I can’t find orange frosting?
No problem! Make your own by mixing white frosting with orange gel food coloring (liquid makes it runny). Start with a few drops, mix well, and add more until you get that perfect pumpkin shade. Pro tip: Adding a tiny bit of yellow helps brighten store-bought orange frosting.
Can kids help decorate this?
Are you kidding – this is the perfect kid-friendly project! Let them sprinkle the Oreo “dirt” and place the worms. Just supervise the melted chocolate part. Some of my best Halloween cake memories are decorating disasters-turned-masterpieces with little helpers!
How do I transport this to a party?
Chill the cake first to set everything, then cover loosely with wax paper before putting the lid on your carrier. Bring extra decorations in baggies for quick touch-ups when you arrive. And drive carefully – nothing spookier than a cake sliding into the passenger seat!

35 Spooky Halloween Party Dessert Ideas That Will Amaze Guests
- Total Time: 50 minutes
- Yield: 12 servings 1x
- Diet: Vegetarian
Description
Delicious and spooky dessert ideas for your Halloween party that will impress your guests.
Ingredients
- 1 box of chocolate cake mix
- 1 cup of orange frosting
- 12 Oreo cookies
- 1 cup of melted chocolate
- 1/2 cup of candy eyes
- 1/2 cup of gummy worms
Instructions
- Bake the chocolate cake mix as per the package instructions.
- Let the cake cool, then frost it with orange frosting.
- Crush Oreo cookies and sprinkle them on top for a dirt-like effect.
- Drizzle melted chocolate over the cake for extra decoration.
- Add candy eyes and gummy worms to create a spooky look.
- Serve and enjoy your Halloween dessert.
Notes
- Use black frosting for a more eerie look.
- Add plastic spiders for extra creepiness.
- Store leftovers in an airtight container for up to 3 days.
- Prep Time: 20 minutes
- Cook Time: 30 minutes
- Category: Dessert
- Method: Baking
- Cuisine: American
Nutrition
- Serving Size: 1 slice
- Calories: 350
- Sugar: 25g
- Sodium: 200mg
- Fat: 12g
- Saturated Fat: 5g
- Unsaturated Fat: 6g
- Trans Fat: 0g
- Carbohydrates: 55g
- Fiber: 2g
- Protein: 4g
- Cholesterol: 10mg


