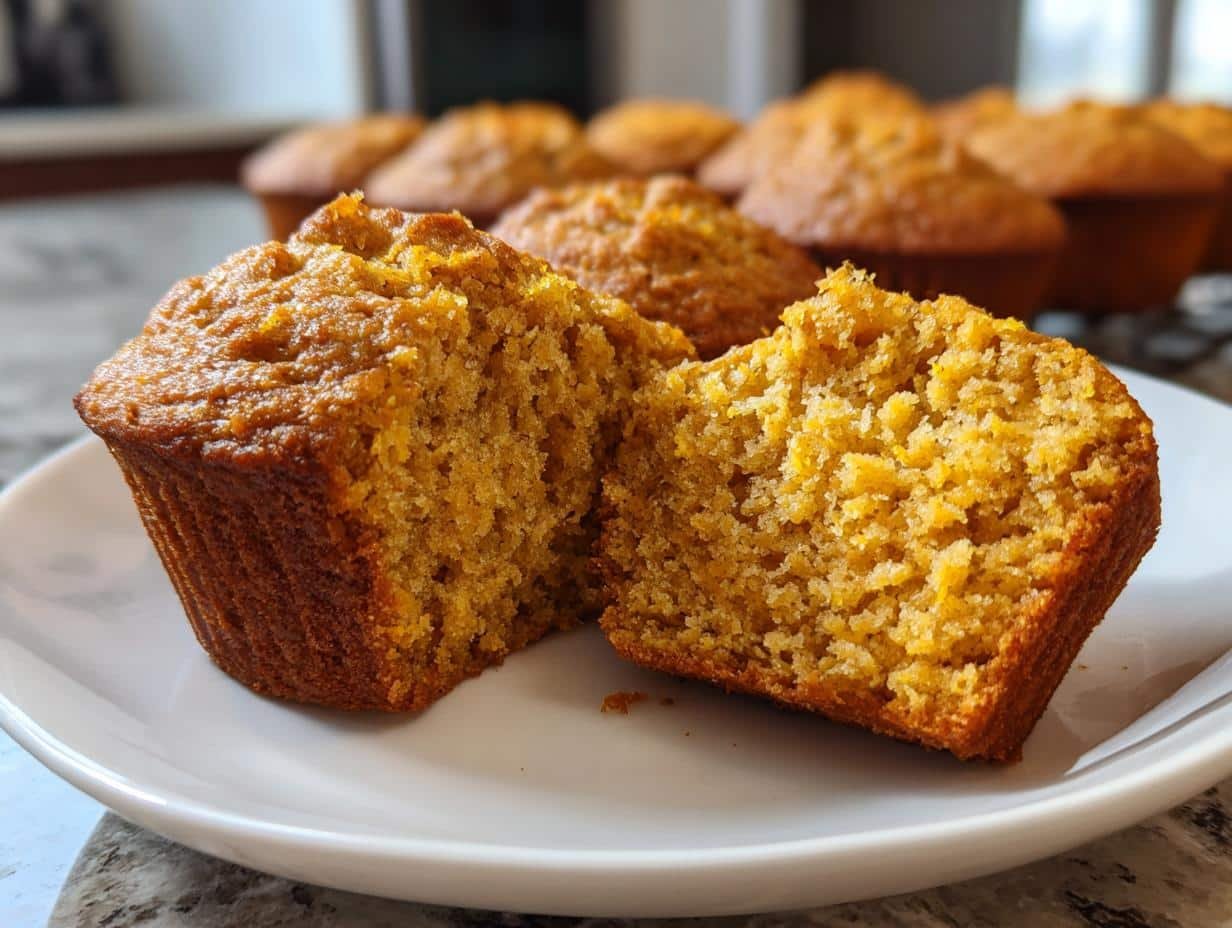
You know those mornings when you want something cozy and pumpkin-spiced but don’t want to wreck your healthy eating goals? That’s exactly why I fell in love with these clean eating pumpkin muffins. They’re my go-to for a quick breakfast or afternoon pick-me-up—packed with real ingredients like almond flour, honey, and fresh pumpkin puree (not that overly sweet canned pie stuff!). What I adore most? They’re gluten-free, naturally sweetened, and so simple to whip up. My kids devour them warm from the oven, and I feel good knowing they’re getting a treat that’s actually nourishing. Trust me, one bite of these tender, spice-kissed muffins, and you’ll forget they’re “healthy.”
Table of Contents
Table of Contents
Why You’ll Love These Clean Eating Pumpkin Muffins
These muffins aren’t just delicious—they’re downright magical. Here’s why they’ve become a staple in my kitchen:
- Wholesome ingredients: No mystery powders here! Just real pumpkin, almond flour, and honey—ingredients you can actually pronounce.
- Gluten-free goodness: Almond flour gives them the perfect tender crumb without any wheat, making them great for sensitive tummies.
- Meal prep hero: They stay moist for days, so I always double the batch for quick breakfasts all week long.
- Foolproof to make: One bowl, 10 minutes of prep, and your kitchen smells like autumn heaven. Even my baking-challenged sister can’t mess these up!
Ingredients for Clean Eating Pumpkin Muffins
What I love about this recipe is how simple the ingredient list is – everything serves a purpose, and nothing’s hiding in there to sabotage your clean eating goals. Here’s exactly what you’ll need:
- 1 cup pumpkin puree (not pumpkin pie filling – that sweetened stuff will throw everything off!)
- 2 large eggs at room temperature (they blend better when they’re not cold)
- 1/4 cup honey (local if you can get it – the flavor is incredible)
- 1/4 cup coconut oil, melted but not hot (measure it after melting)
- 1 tsp vanilla extract (the real stuff, not imitation)
- 1 1/2 cups almond flour (I use finely ground for the best texture)
- 1 tsp baking soda
- 1 tsp cinnamon
- 1/2 tsp nutmeg (freshly grated if you’re feeling fancy)
- 1/4 tsp salt
Ingredient Notes & Substitutions
Baking is science, but I’ve tested these swaps and they work beautifully:
- Out of almond flour? Try oat flour (grind rolled oats in your blender) or a gluten-free baking blend. The texture changes slightly but still tastes great.
- Prefer maple syrup? Swap it 1:1 for the honey – just know the muffins will be a tad sweeter.
- Don’t have coconut oil? Melted butter works too, though coconut oil keeps them dairy-free.
- Egg-free option: I’ve had luck with flax eggs (1 tbsp ground flax + 3 tbsp water per egg), though they’ll be denser.
- Spice lovers: Add a pinch of cloves or ginger for extra warmth!
One last tip – if your honey is super thick, warm it slightly so it mixes in smoothly. Just don’t add it hot to the eggs or you’ll get scrambled eggs in your batter (been there, not fun!).
How to Make Clean Eating Pumpkin Muffins
Okay, here’s where the magic happens! These muffins come together so easily, but there are a few tricks I’ve learned over dozens of batches to make them absolutely perfect every time. Just follow these simple steps, and you’ll be biting into warm, spiced goodness before you know it.
Step 1: Prepare the Batter
First things first – preheat that oven to 350°F (175°C). I always forget this step until the last minute, so let’s get it out of the way now! While the oven heats up, line your muffin tin with paper liners or give it a quick spritz of oil – these muffins can stick if you’re not careful.
Now, let’s make the batter. I use two bowls – one for wet ingredients, one for dry. In the first bowl, whisk together the pumpkin puree, eggs, honey, melted coconut oil, and vanilla. Don’t overmix here – just stir until everything is nicely combined. The mixture will look a bit glossy and smell like pumpkin pie in the best way.
In your second bowl, mix the almond flour, baking soda, cinnamon, nutmeg, and salt. I like to give it a quick whisk to break up any clumps in the almond flour – nobody wants a pocket of baking soda in their muffin!
Here’s the important part: add the dry ingredients to the wet ingredients and gently fold them together with a rubber spatula. I mean it when I say gently – you’re not making bread here! Just fold until you don’t see streaks of flour anymore. A few small lumps are totally fine – overmixing will make your muffins tough.
Step 2: Bake to Perfection
Now, divide that beautiful orange batter evenly among your muffin cups. I use an ice cream scoop for this – it’s way less messy than trying to spoon it in. Fill them about 3/4 full; these muffins rise but not dramatically.
Pop them in the oven and set your timer for 20 minutes. When the timer goes off, do the toothpick test – stick one in the center of a muffin. If it comes out clean or with just a few moist crumbs, they’re done. If not, give them another 2-5 minutes. Mine usually take about 22 minutes, but every oven is different!
Here’s my secret for perfect texture: let them cool in the pan for 5 minutes before transferring to a wire rack. This helps them set up without getting soggy bottoms. Resist the urge to eat them immediately (I know, it’s hard) – they’ll hold together better if you wait at least 10 minutes. But hey, if you can’t wait, I won’t judge – just know they might crumble a bit!
Tips for the Best Clean Eating Pumpkin Muffins
After making these muffins more times than I can count (my family can’t get enough!), I’ve picked up some secrets for absolute perfection. Here are my can’t-live-without tips:
- Room temp eggs are key: Cold eggs make the coconut oil solidify into little lumps – not ideal! I leave mine out for 30 minutes before baking, or if I forget (which is often), I pop them in a bowl of warm water for 5 minutes.
- Don’t skip the liners: Even if you grease the pan, these muffins love to stick. I use parchment paper liners – they peel off perfectly every time without taking half the muffin with them.
- The toothpick lie: These muffins might trick you! Sometimes the toothpick comes out clean when they’re actually underbaked in the center. Look for slightly golden edges and tops that spring back when gently pressed – that’s the real test.
- Let them breathe: As tempting as it is to cover warm muffins, don’t! Trapped steam makes the tops soggy. I cool them completely on a rack before storing in an airtight container.
One bonus trick? I always make a double batch and freeze half. Pop one in the microwave for 15 seconds, and it’s like fresh-baked all over again – perfect for those rushed weekday mornings!
Storage & Reheating Instructions
Here’s the beautiful thing about these muffins – they stay fresh and delicious for days! But you’ll want to store them right to keep that perfect texture. My foolproof method? Let them cool completely (seriously, no cheating – warm muffins create condensation that leads to sogginess), then pop them in an airtight container at room temperature. They’ll stay moist and tasty for about 3 days this way.
For longer storage, freeze them! I wrap each muffin individually in plastic wrap (this prevents freezer burn), then tuck them all into a freezer bag. They’ll keep beautifully for up to 3 months this way. When that pumpkin craving hits, just grab one and let it thaw at room temperature for about an hour.
Now, for my favorite trick – reheating! A cold muffin is good, but a warm muffin is pure magic. For that just-baked experience, microwave a muffin for 10-15 seconds (I do 10 seconds first, then check – microwaves vary). If it’s frozen, no worries – give it 20-25 seconds. The edges will get slightly crisp while the center stays tender. My kids love them this way with a smear of almond butter for breakfast – tastes like dessert but keeps them full until lunch!
Pro tip: If you’re reheating multiple muffins, arrange them in a circle on a microwave-safe plate with space between each one. This helps them heat evenly without any cold spots in the middle. And if you’ve got a toaster oven? 5 minutes at 300°F revives them perfectly with a slightly crispy top!
Clean Eating Pumpkin Muffins Variations
One of my favorite things about this recipe is how easily you can mix it up! Sometimes I’ll get wild and throw in whatever’s in my pantry – here are my go-to twists that always get rave reviews:
- Nutty crunch: Fold in 1/2 cup chopped walnuts or pecans right before baking. They add such a satisfying texture contrast to the soft muffin crumb.
- Chocolate “cheat”: Okay, not strictly clean eating, but a handful of dark chocolate chips (70% or higher) makes these feel decadent while keeping them mostly wholesome.
- Fruity surprise: Soak 1/3 cup raisins in warm water for 10 minutes, then mix them in for little bursts of sweetness. Dried cranberries work great too!
- Spice it up: Add an extra 1/2 tsp ginger and a pinch of cloves to the dry ingredients for muffins with serious autumnal warmth.
- Coconut lovers: Sprinkle unsweetened shredded coconut on top before baking – it toasts beautifully and adds tropical flair.
The beauty is that these variations all work with the base recipe – just pick one or mix and match! My husband’s favorite is the walnut version, while my daughter demands chocolate chips every time. Me? I love them all, but the spiced-up version with a smear of almond butter is my weekday breakfast obsession.
Nutritional Information
Now, I’m no nutritionist, but I do love knowing what’s going into my body – especially when it tastes this good! Here’s the breakdown per muffin (based on the recipe making 12 muffins):
- Calories: 150
- Total Fat: 10g (4g saturated, 5g unsaturated)
- Carbohydrates: 12g
- Fiber: 2g
- Sugar: 6g (all natural from honey and pumpkin)
- Protein: 4g
- Sodium: 120mg
Keep in mind these are estimates – your actual numbers might vary slightly depending on your exact ingredients (like how runny your honey is or the brand of almond flour). What I love is how balanced these muffins are – that protein and fiber from the almond flour and pumpkin means one muffin actually keeps me full, unlike those sugary store-bought ones that leave me crashing an hour later.
Quick note: If you add any mix-ins like nuts or chocolate chips, you’ll want to adjust these numbers accordingly. A handful of walnuts might add about 20 extra calories per muffin, but hey – those are good-for-you fats!
Frequently Asked Questions
I get so many questions about these muffins – seems like everyone wants to put their own spin on them! Here are the answers to the ones I hear most often:
Can I use regular flour instead of almond flour?
Absolutely! Swap in 1 cup all-purpose flour for the almond flour – the texture will be lighter and more cake-like. You might need to add an extra tablespoon or two of pumpkin puree since regular flour absorbs less moisture.
How can I make these vegan?
Easy peasy! Use flax eggs (1 tbsp ground flax + 3 tbsp water per egg) and swap the honey for maple syrup. The muffins will be slightly denser but still delicious – my vegan sister-in-law requests these every Thanksgiving!
Why are my muffins sinking in the middle?
Oh no – the dreaded muffin collapse! Usually this means they needed a few more minutes in the oven or your baking soda might be old. Next time, test with a toothpick and look for fully set edges before pulling them out.
Can I make these as mini muffins?
Yes! They’re adorable as minis – just bake for 12-15 minutes instead. They’re perfect for little hands (or for when you want to “sample” five at a time without guilt).
Is pumpkin pie filling okay to use?
Please don’t! That sweetened spiced stuff will make your muffins way too sweet and throw off all the flavors. Stick with plain pumpkin puree – it’s usually right next to the pie filling in stores, so check labels carefully.
Tender 150-Calorie Clean Eating Pumpkin Muffins Recipe
- Total Time: 35 minutes
- Yield: 12 muffins 1x
- Diet: Gluten Free
Description
These clean eating pumpkin muffins are a healthy and delicious treat. Made with simple ingredients, they are perfect for breakfast or a snack.
Ingredients
- 1 cup pumpkin puree
- 2 eggs
- 1/4 cup honey
- 1/4 cup coconut oil, melted
- 1 tsp vanilla extract
- 1 1/2 cups almond flour
- 1 tsp baking soda
- 1 tsp cinnamon
- 1/2 tsp nutmeg
- 1/4 tsp salt
Instructions
- Preheat oven to 350°F (175°C). Line a muffin tin with paper liners.
- In a bowl, mix pumpkin puree, eggs, honey, coconut oil, and vanilla.
- In another bowl, combine almond flour, baking soda, cinnamon, nutmeg, and salt.
- Add dry ingredients to wet ingredients and mix until combined.
- Divide batter evenly into muffin cups.
- Bake for 20-25 minutes or until a toothpick comes out clean.
- Let cool before serving.
Notes
- Store in an airtight container for up to 3 days.
- Substitute maple syrup for honey if preferred.
- Add chopped nuts or raisins for extra texture.
- Prep Time: 10 minutes
- Cook Time: 25 minutes
- Category: Baked Goods
- Method: Baking
- Cuisine: American
Nutrition
- Serving Size: 1 muffin
- Calories: 150
- Sugar: 6g
- Sodium: 120mg
- Fat: 10g
- Saturated Fat: 4g
- Unsaturated Fat: 5g
- Trans Fat: 0g
- Carbohydrates: 12g
- Fiber: 2g
- Protein: 4g
- Cholesterol: 30mg