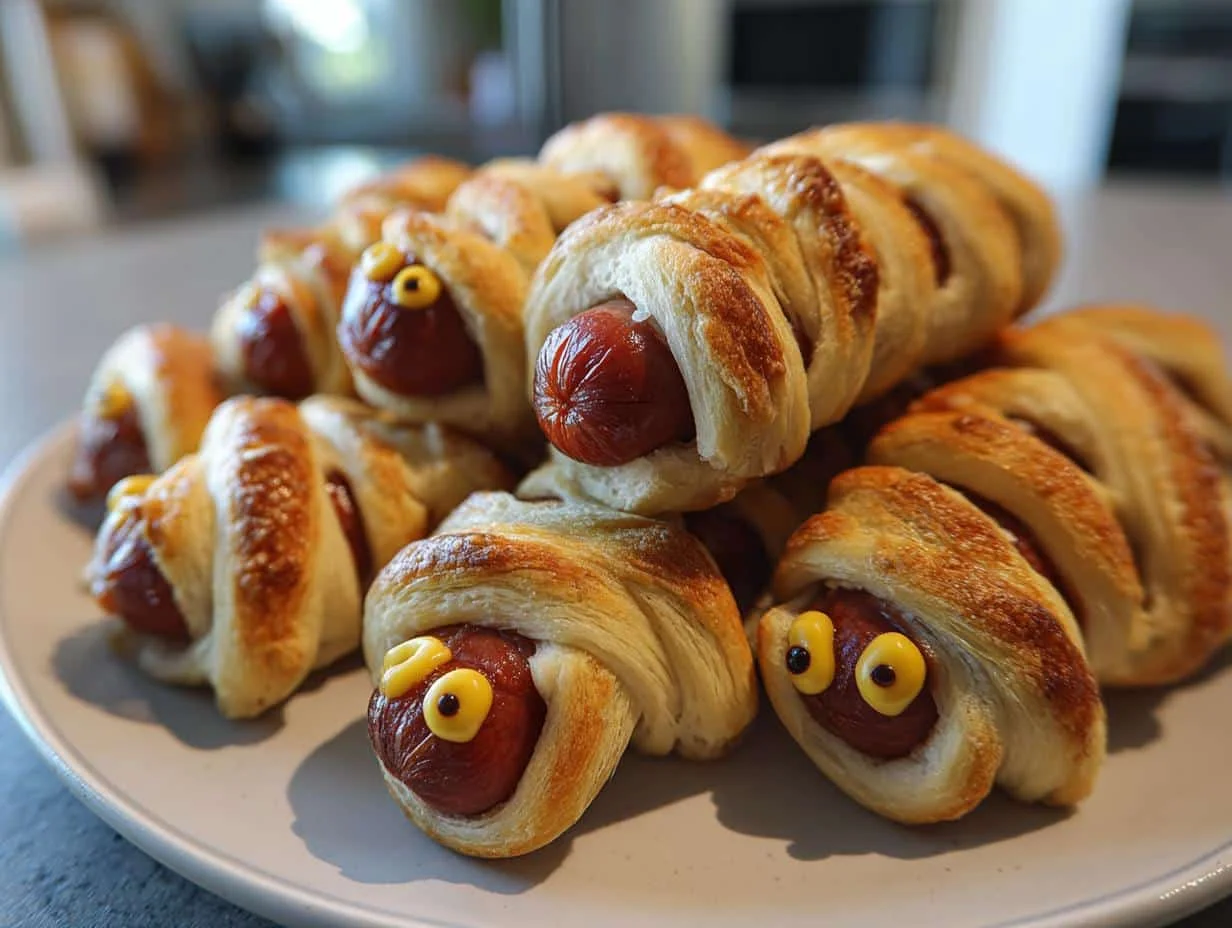
Oh my gosh, do I have the perfect Halloween snack for you! Mummy Hot Dogs have been my go-to party trick for years – ever since my then-5-year-old declared them “the coolest food EVER” at his first Halloween bash. There’s just something magical about how these little guys transform ordinary hot dogs into the cutest edible mummies. And trust me, they’re so easy even if you’re in a last-minute Halloween panic (we’ve all been there). After making these for countless classroom parties and neighborhood gatherings, I can tell you they’re always the first snack to disappear from the plate. Just wait until you see the kids’ faces light up when you bring these spooky-but-adorable treats to the table!
Table of Contents
Table of Contents
Why You’ll Love These Mummy Hot Dogs
Listen, I know Halloween recipes can get complicated – but these little guys are different! Here’s why they’re absolutely perfect:
- Super fast – Seriously, you’ll have them ready in under 30 minutes (even with kids “helping”)
- Kid-approved – Little hands love wrapping the dough and adding the creepy eyes
- Party star – They disappear faster than ghosts at sunrise at any Halloween gathering
- Pantry-friendly – Only 4 ingredients you probably have right now
- Customizable – Make them as spooky or silly as you want!
Honestly, after one batch, you’ll be hooked just like we were!
Ingredients for Mummy Hot Dogs
Here’s the beautiful part – you only need four simple ingredients to make these adorable little mummies! I always keep these basics on hand during October because you never know when a Halloween snack emergency might strike (like when my neighbor called last minute about her son’s classroom party…).
- 8 standard hot dogs – Your favorite brand works great, but I find the classic beef ones hold their shape best
- 1 can refrigerated crescent roll dough (8 oz) – That magical tube from the dairy aisle saves the day again!
- 1 tbsp mustard or ketchup – For those all-important creepy eyes (I let the kids choose which we use)
cooking spray – Just a quick spritz keeps our mummies from sticking to the pan
See? Told you it was simple! Now let’s get wrapping…
Equipment You’ll Need
Don’t worry – you don’t need any fancy gadgets for these little mummies! Just grab:
- A basic baking sheet
- Sharp knife or pizza cutter
- Parchment paper (my secret for no-stick success)
- Cooling rack (optional but helps keep them crisp)
That’s it – now let’s make some magic!
How to Make Mummy Hot Dogs
Okay, let’s get to the fun part – transforming those basic ingredients into the most adorable Halloween treats! I’ve made these so many times I could probably do it in my sleep (and honestly, I’ve come pretty close during those marathon Halloween prep nights). Here’s exactly how we bring these little mummies to life:
Step 1: Prepare the Dough and Hot Dogs
First things first – preheat that oven to 375°F (190°C). While it’s heating up, unroll your crescent dough on a lightly floured surface. This next part is key – use a pizza cutter or sharp knife to slice the dough into thin strips, about ¼-inch wide. Don’t worry if they’re not perfect – mummy bandages aren’t uniform either! Leave about an inch at the top of each hot dog uncovered – that’s where our mummy’s “face” will peek out later.
Step 2: Assemble the Mummies
Now the fun begins! Starting at the bottom of each hot dog, wrap those dough strips around in a slightly overlapping spiral pattern. Work your way up toward the uncovered “face” area – think of it like wrapping a really tiny present! Pro tip: don’t pull the dough too tight or it might break during baking. A little messy is totally fine – it actually makes them look more authentically mummy-like!
Step 3: Bake and Decorate
Place your wrapped mummies on a parchment-lined baking sheet (trust me, this saves so much cleanup). Pop them in the oven for 12-15 minutes until they’re golden brown and the dough is puffed up. Let them cool just slightly before the final magic touch – dab on little dots of mustard or ketchup for eyes using a toothpick. Watch out – they’ll disappear fast once the kids see them!
Tips for Perfect Mummy Hot Dogs
After making these for way too many Halloween parties, I’ve picked up some tricks that’ll take your mummy dogs from good to “BOO-tiful!” Here are my can’t-live-without tips:
- Puff pastry magic – Swap crescent dough for puff pastry if you want extra crispiness (just cut baking time by 2 minutes)
- Chill out – Make ahead and refrigerate for up to 4 hours before baking – perfect for party prep!
- Wrap wisely – Leave small gaps between dough strips so they puff up properly (no blanket-wrapped mummies!)
- Eye spy – Use mustard for yellow eyes or get creative with sesame seeds or tiny cheese bits
- Size matters – For kid portions, cut hot dogs in half before wrapping (mini mummies are adorable!)
Trust me, these little tweaks make all the difference between “cute” and “OMG I need this recipe!”
Variations of Mummy Hot Dogs
Once you master the basic recipe, the spooky fun really begins! Here are my favorite ways to mix things up:
- Veggie twist – Use meatless hot dogs for a vegetarian version (my niece swears they taste just as good!)
- Cheesy surprise – Wrap cheese-stuffed hot dogs for an extra gooey center that’ll wow everyone
- Eye alternatives – Swap condiment eyes for black sesame seeds or tiny bits of olive for a different look
- Sweet version – Try wrapping mini sausages in cinnamon roll dough with icing eyes – spooky breakfast!
The best part? Kids love helping brainstorm new variations – let their imaginations run wild!
Serving Suggestions for Mummy Hot Dogs
These little mummies love to party! I always serve them with a trio of dipping sauces – ketchup, mustard, and a creepy black “witch’s brew” (just mix mayo with a bit of black food coloring). For sides, try Halloween-shaped chips, bloody finger carrots (carrot sticks with almond “nails”), or a graveyard-themed veggie tray. The creepier the presentation, the more the kids go wild for it!
Storing and Reheating Mummy Hot Dogs
These little mummies stay fresh in an airtight container for up to 2 days – if they last that long! To bring back their crispy magic, pop them in a 350°F (175°C) oven for 5-7 minutes. The microwave works in a pinch, but trust me, the oven keeps that perfect golden-brown crispness we all love. Pro tip: add fresh “eyes” after reheating for maximum cuteness!
Nutritional Information for Mummy Hot Dogs
Now, I’m no nutritionist (as my Halloween candy stash will prove), but here’s the basic breakdown per mummy hot dog – these are estimates, of course, since brands vary. Each one runs about 220 calories with 15g fat (5g saturated) and 7g protein. They’ve got 480mg sodium, so maybe balance them with some veggies! Remember, Halloween’s all about fun – and these little guys are totally worth it for a spooky treat now and then.
Frequently Asked Questions About Mummy Hot Dogs
I get so many questions about these little wrapped wonders every Halloween! Here are the answers to the ones people ask me most:
Can I freeze mummy hot dogs?
Absolutely! Wrap unbaked mummies tightly in plastic wrap, then freeze for up to 1 month. Bake straight from frozen—just add 3-5 extra minutes. The dough might not puff quite as much, but they’ll still taste delicious.
What dough works best?
I swear by crescent roll dough for its perfect texture and ease of use, but puff pastry gives an extra crispy bite. Avoid biscuit dough—it’s too thick and bakes up doughy instead of light.
How do I keep the eyes from running?
Wait until the baked mummies cool slightly before adding eyes. If using ketchup/mustard, make thick little dots—thin liquid spreads too much. For foolproof eyes, try tiny dots of cream cheese or small cheese cubes!
Can I make these ahead?
You bet! Assemble them up to 4 hours before baking and refrigerate (covered) until party time. The dough might brown slightly less, but they’ll still be adorable.

**Scary-Good Mummy Hot Dogs in 30 Magical Minutes**
- Total Time: 25 minutes
- Yield: 8 servings 1x
- Diet: Low Lactose
Description
A fun and easy Halloween-themed snack, Mummy Hot Dogs are perfect for parties or a festive family meal.
Ingredients
- 8 hot dogs
- 1 can refrigerated crescent roll dough
- 1 tbsp mustard or ketchup
- Cooking spray
Instructions
- Preheat oven to 375°F (190°C).
- Unroll crescent dough and cut into thin strips.
- Wrap strips around each hot dog, leaving a small space uncovered for the “mummy face”.
- Place on a baking sheet sprayed with cooking spray.
- Bake for 12-15 minutes until golden brown.
- Use mustard or ketchup to add eyes to the uncovered part of the hot dog.
Notes
- For crispier results, use puff pastry instead of crescent dough.
- You can prepare these ahead and refrigerate before baking.
- Prep Time: 10 minutes
- Cook Time: 15 minutes
- Category: Appetizer
- Method: Baking
- Cuisine: American
Nutrition
- Serving Size: 1 mummy hot dog
- Calories: 220
- Sugar: 2g
- Sodium: 480mg
- Fat: 15g
- Saturated Fat: 5g
- Unsaturated Fat: 8g
- Trans Fat: 0g
- Carbohydrates: 14g
- Fiber: 0g
- Protein: 7g
- Cholesterol: 20mg


