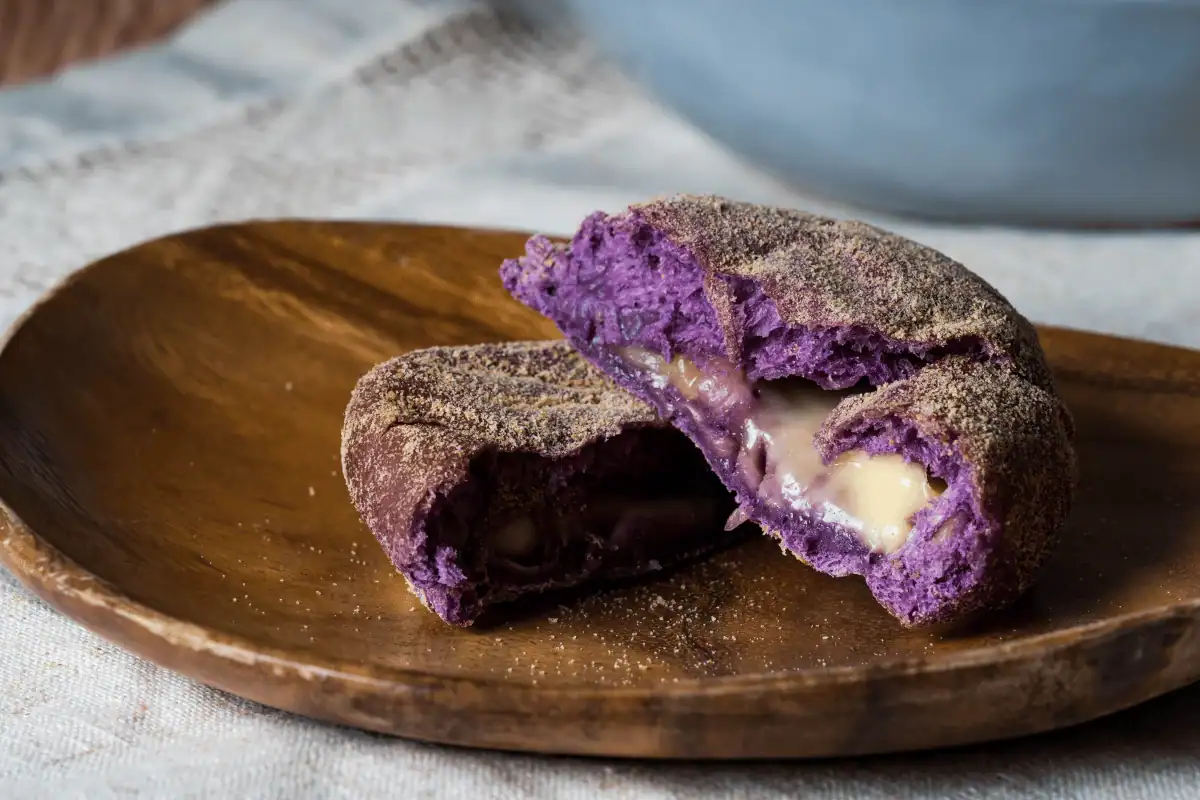
In the vibrant world of baking, one ingredient has risen to fame for its unique color, flavor, and versatility – ube. This purple yam, native to the Philippines, has taken the culinary world by storm, finding its way into a myriad of desserts. Among these, Ube Cookies Guide that combines the traditional Filipino flavor with the universal love for cookies. In this article, we’ll embark on a journey to explore the ins and outs of making ube cookies, from the basics of ube to the secrets behind baking the perfect batch. Whether you’re a seasoned baker or a curious newbie, this guide promises to equip you with everything you need to know to whip up these purple-hued delights. So, let’s dive in and discover the magic of ube cookies.
Part 1: Introduction to Ube Cookies
What is Ube?
Ube, pronounced “oo-beh,” is a vibrant purple yam that hails from the Philippines. It’s not only cherished for its striking color but also for its sweet, slightly nutty flavor. Ube is a staple in Filipino desserts, such as ube halaya, a jam-like concoction that’s often used as a spread or filling. Its popularity has skyrocketed, making ube a beloved ingredient in cakes, ice cream, and, you guessed it, cookies!
Why Ube is Popular in Baking
The allure of ube in baking is twofold. Firstly, its natural purple color adds a visually stunning element to desserts, making them Instagram-worthy. Secondly, What Is Ube, and Is It Good for You? – Everyday Health brings a new dimension to sweet treats. When incorporated into cookies, ube transforms the ordinary into something extraordinary, offering a taste that’s both exotic and comforting.
The Rise of Ube Cookies
The journey of ube cookies from a niche Filipino treat to a global sensation is a testament to the power of cultural exchange and culinary innovation. These cookies blend the traditional use of ube in Filipino cuisine with the universal appeal of baked goods, creating a fusion that’s both novel and nostalgic.
Cultural Significance
In the Philippines, ube is more than just an ingredient; it’s a part of the country’s culinary heritage. Its incorporation into cookies is a celebration of Filipino flavors, making ube cookies a bridge between cultures. They offer a taste of the Philippines to the world, inviting everyone to partake in the country’s rich culinary traditions.
As we delve deeper into the art of making ube cookies, we’ll explore the essential ingredients, step-by-step baking guides, and tips for customization. Whether you’re aiming to recreate the chewy texture of soft ube cookies or the crinkly exterior ofUbe Crinkle Cookies Recipe, this guide has got you covered. So, grab your baking tools, and let’s get ready to bake some ube cookies that are sure to impress!
Part 2: Ingredients and Tools
Ingredients for Ube Cookies
When it comes to baking ube cookies, the choice of ingredients plays a pivotal role in achieving that signature flavor and texture. Here’s what you’ll need:
- Ube Halaya Jam vs. Ube Extract: For an authentic ube flavor, using ube halaya jam is ideal. It not only imparts a rich, concentrated ube taste but also adds moisture to your cookies. Alternatively, ube extract can be used for a more subtle flavor and vibrant color. It’s all about finding the right balance that suits your palate.
- Key Ingredients Breakdown:
- All-purpose flour forms the base of your cookie dough, providing structure.
- Cornstarch is the secret to achieving that tender, melt-in-your-mouth texture.
- Baking powder gives your cookies the perfect lift.
- Salt enhances the flavors, making the ube taste more pronounced.
- Butter, sugar, and eggs are essential for creating a rich and chewy texture.
Essential Baking Tools
Having the right tools can make the baking process smoother and more enjoyable. Here’s what you’ll need:
- Mixing Bowls, Whisks, and More: A set of mixing bowls and a sturdy whisk are crucial for combining your ingredients thoroughly. Don’t forget a spatula for folding in the ube halaya or extract evenly throughout the dough.
- Importance of Quality Baking Sheets: Investing in good-quality baking sheets can make a world of difference in how your cookies bake and brown. Look for non-stick surfaces or use parchment paper to ensure your cookies come off the tray easily and bake evenly.
With your ingredients and tools ready, you’re all set to start the exciting process of Ube Cookies Recipe. Remember, the key to great baking is not just following the recipe but understanding how each ingredient and tool contributes to the final product. So, let’s move on to the heart of the matter – preparing the dough and shaping your cookies into delightful treats that are as pleasing to the eye as they are to the palate. Stay tuned for the next part, where we’ll dive into the step-by-step guide to baking the perfect ube cookies.
Part 3: Step-by-Step Baking Guide
Preparing the Dough
The journey to delicious ube cookies begins with the dough. It’s where the magic starts, blending flavors and textures into a base that will rise into soft, chewy delights.
- Mixing Dry and Wet Ingredients: Start by whisking together your dry ingredients—flour, cornstarch, baking powder, and salt—in one bowl. In another, cream together butter and sugar until light and fluffy. This process incorporates air into the butter, making your cookies tender. Beat in the eggs one at a time, ensuring each is fully incorporated before adding the next. Now, the star of the show—ube halaya jam or ube extract. Mix it into your wet ingredients until the color is uniform.
- Tips for Incorporating Ube Flavor: For a robust ube flavor, opt for the jam over the extract. If using the extract, a little goes a long way; too much can lead to a bitter aftertaste. Gently fold the dry ingredients into the wet, mixing just until combined to avoid overworking the dough, which can lead to tough cookies.
Shaping and Baking
Once your dough is ready, it’s time to shape and bake. This stage is crucial for achieving the perfect texture and appearance.
- Achieving the Perfect Cookie Shape: Use a cookie scoop or spoon to portion the dough onto your prepared baking sheets. For uniform cookies, roll each portion into a ball with lightly floured hands. This not only ensures even baking but also gives your cookies a nice, round shape.
- Baking Time and Temperature Tips: Preheat your oven to the right temperature before sliding your cookies in. Baking at 350°F (175°C) for about 10-12 minutes works well for most ube cookies. They’re done when the edges start to slightly brown, but the center still looks a bit soft. Remember, cookies continue to cook on the baking sheet after being removed from the oven, so don’t overbake them.
Patience is key when baking ube cookies. Let them cool on the baking sheet for a few minutes before transferring to a wire rack. This resting period allows them to set, preventing them from breaking apart when moved.
With your cookies baked to perfection, you’re now ready to explore the endless possibilities of variations and customizations. Whether you’re a fan of the classic ube crinkle cookies or the innovative brown butter white chocolate ube cookies, the next part of our guide will inspire you to experiment and find your new favorite ube cookie recipe. Stay tuned!
Part 4: Variations and Customizations
Variations of Ube Cookies
The beauty of ube cookies lies in their versatility. Here are a couple of variations that have captured the hearts of bakers and dessert lovers alike:
- Ube Crinkle Cookies: These cookies are known for their distinctive cracked surface and soft, cake-like interior. To achieve the crinkle effect, roll your cookie dough balls in powdered sugar before baking. The contrast between the vibrant purple and the white sugar not only makes them visually appealing but also adds a sweet, crunchy exterior to the soft, chewy middle.
- Brown Butter White Chocolate Ube Cookies: Elevate your ube cookies by browning the butter before mixing it with the sugar. This adds a nutty, caramelized flavor that pairs wonderfully with the sweet, floral notes of ube. Stir in white chocolate chips for a creamy texture and a flavor that complements the ube without overpowering it.
Customizing Your Ube Cookies
Personalizing your ube cookies can turn baking into an exciting adventure. Here are some ideas to get you started:
- Mix-ins and Toppings: Beyond white chocolate chips, consider adding nuts for crunch, coconut flakes for a tropical twist, or even a sprinkle of sea salt on top to enhance the ube flavor. The possibilities are endless, and each addition can create a whole new flavor profile.
- Gluten-Free and Vegan Options: For a gluten-free version, substitute all-purpose flour with your favorite gluten-free blend. To make your cookies vegan, use plant-based butter and a flax egg (1 tablespoon flaxseed meal mixed with 3 tablespoons water, left to thicken for about 5 minutes) in place of regular butter and eggs.
Experimenting with these variations and customizations not only allows you to cater to different dietary needs and preferences but also helps you discover new and exciting ways to enjoy ube cookies. Whether you stick to the traditional recipes or venture into creating your unique twist, the key is to have fun and enjoy the process.
In the next part of our guide, we’ll discuss the best ways to serve and store your ube cookies, ensuring they remain as delightful and delicious as the moment they came out of the oven. Stay tuned for practical tips that will help you savor your baking creations to the fullest!
Part 5: Serving and Storage
Best Ways to Serve Ube Cookies
Serving ube cookies in the best possible way can enhance the overall experience of enjoying these delightful treats. Here are some tips to make your ube cookies the star of any gathering or a cozy night in:
- Pairing with Drinks: Ube cookies pair wonderfully with a variety of beverages. For a morning treat, try them with a hot cup of coffee or tea, which can help to accentuate the cookies’ sweet, nutty flavors. For a non-caffeinated option, a glass of milk is a classic choice that complements the richness of the cookies.
- Presentation Tips: When it comes to serving, presentation matters. Arrange your cookies on a colorful plate or a rustic wooden board for a touch of elegance. You can also stack them in a clear jar tied with a ribbon for a charming display that invites everyone to grab a cookie.
Storing Ube Cookies
Proper storage is key to maintaining the freshness and texture of your ube cookies. Here’s how to keep them tasting great for days:
- How to Keep Them Fresh: Once completely cooled, store your cookies in an airtight container at room temperature. If you’ve made a large batch, you might consider layering them with parchment paper to prevent sticking. This method can keep your cookies fresh for up to a week.
- Freezing and Reheating Tips: For longer storage, ube cookies freeze beautifully. Place them in a single layer on a baking sheet to freeze individually, then transfer to a freezer-safe bag or container. They can last for up to 3 months frozen. When you’re ready to enjoy, let them thaw at room temperature or gently warm them in the oven for a few minutes to revive that just-baked taste and texture.
Whether you’re serving them fresh out of the oven or enjoying a leftover treat, these serving and storage tips will ensure your ube cookies are always at their best. With the right presentation and care, these cookies can be a delightful addition to any occasion or a special treat for yourself.
Next, we’ll dive into the FAQs section, addressing common questions and providing additional tips to help you perfect your ube cookie baking skills. Stay tuned for helpful insights that will make your baking journey even more rewarding!
Part 6: FAQs
Frequently Asked Questions
Can I use fresh ube instead of ube extract?
- Absolutely! Fresh ube can be boiled, peeled, and then grated or mashed into a puree to use in your cookie dough. It gives a more authentic flavor and texture to the cookies. However, keep in mind that fresh ube might not provide as vibrant a color as the extract, so your cookies might be a bit lighter in hue.
How do I achieve the perfect crinkle effect?
- The secret to the perfect crinkle effect lies in the temperature contrast between the cold dough and the hot oven. Chill your dough balls in the refrigerator for at least an hour before rolling them in powdered sugar. This not only helps the sugar stick better but also ensures that the exterior of the cookie sets quickly in the oven, creating those beautiful cracks as the interior continues to expand.
Are ube cookies healthy?
- While ube cookies contain the nutritional benefits of ube, such as vitamins and minerals, they are still cookies and should be enjoyed as a treat. You can make them healthier by reducing the sugar, using whole wheat flour, or incorporating nuts and seeds for added fiber and nutrients.
Additional Tips
- Experiment with Flavors: Don’t be afraid to add a dash of cinnamon or a sprinkle of nutmeg to your dough for an extra flavor dimension that complements the ube.
- Monitor Your Oven: Oven temperatures can vary, so it’s a good idea to use an oven thermometer to ensure accurate baking temperatures. This can make a big difference in achieving the perfect bake.
- Let Them Cool: As tempting as it might be to enjoy your cookies right out of the oven, letting them cool on the baking sheet for a few minutes helps them set properly and enhances their texture.
With these FAQs and tips, you’re well-equipped to tackle any challenges that come your way in the kitchen. Baking ube cookies is not just about following a recipe; it’s about embracing the process, learning from each batch, and enjoying the delicious results of your efforts.
In the concluding part of our guide, we’ll wrap up with some final thoughts and encouragement to inspire your baking adventures. Stay tuned for the sweet conclusion to our ube cookie journey!
Part 7: Conclusion
As we wrap up our comprehensive journey through the world of ube cookies, it’s clear that these delightful treats are more than just a baking project. They’re a celebration of flavor, culture, and the joy of baking. From the vibrant hue of ube to the comforting warmth of a freshly baked cookie, every aspect of ube cookies invites bakers and eaters alike to explore and enjoy.
Summing Up
We’ve traversed the essentials of ube, from its cultural significance to the practical tips on baking the perfect ube cookies. Whether you’re drawn to the classic ube crinkle cookies, intrigued by the brown butter white chocolate ube cookies, or inspired to create your own variations, the possibilities are endless. The key ingredients and tools, along with step-by-step guides, have equipped you with the knowledge to embark on your ube cookie baking adventures.
Baking is an art and a science, a blend of precision and creativity. With ube cookies, you have the opportunity to experiment with flavors, textures, and presentations, making each batch unique. Remember, the journey is as rewarding as the destination. Each tray of cookies is a testament to your creativity and passion for baking.
Encouragement to Experiment
So, don your apron, preheat your oven, and let your culinary creativity flow. Embrace the mistakes as much as the successes, for they are all part of the learning process. Share your creations with friends and family, and let the unique flavor of ube bring a smile to their faces.
As you continue to explore the vast world of baking, let ube cookies be a reminder of the joy and satisfaction that comes from creating something with your own hands. Whether you’re a seasoned baker or just starting out, the world of ube offers a delightful adventure that’s waiting to be explored.
Thank you for joining us on this delicious journey. Happy baking, and may your ube cookies be as delightful to make as they are to eat!