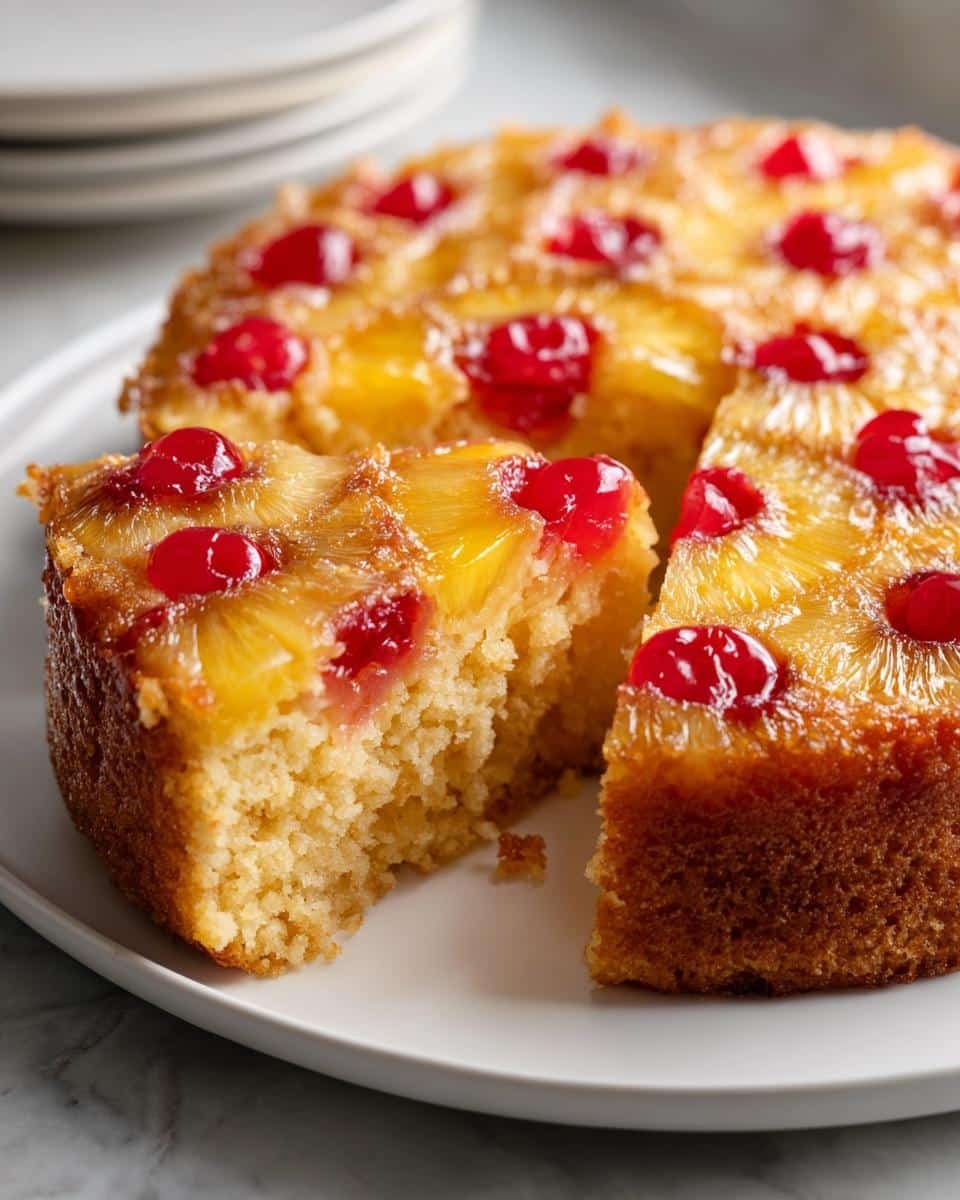
I’ll never forget the first time my grandma pulled her pineapple upside-down cobbler from the oven – that magical moment when she flipped it to reveal glossy pineapple rings nestled in a caramelized brown sugar crust. That sweet, buttery aroma still takes me back to her sunny kitchen every time I bake this comforting dessert. This pineapple upside-down cobbler is my modern twist on the classic – easier than the traditional cake version but with all that nostalgic flavor. The juicy fruit bakes right into a golden, buttery topping that’s crisp at the edges and tender in the middle. It’s the kind of simple, homespun dessert that disappears faster than you can say “seconds please!”
Why You’ll Love This Pineapple Upside-Down Cobbler
Trust me, this isn’t just another dessert—it’s the kind of recipe that’ll have everyone begging for seconds. Here’s why it’s a forever favorite in my kitchen:
- Effortless magic: No fancy techniques—just layer, pour, and bake. Even if you’re a beginner, you’ll look like a pro when you flip that golden beauty onto a plate.
- Sweet-tart perfection: The caramelized pineapple and brown sugar balance the buttery crust so well, your spoon will keep diving back in.
- Crowd-pleaser charm: Serve it warm with ice cream melting into the cracks, and watch it vanish before the coffee’s even poured.
It’s nostalgia and simplicity baked into one irresistible dish—exactly how dessert should be.
Ingredients for Pineapple Upside-Down Cobbler
Gathering the right ingredients is half the magic – and luckily, this cobbler keeps things simple with pantry staples you probably already have. Here’s what you’ll need to create that perfect balance of caramelized fruit and buttery crust:
- 1 can (20 oz) pineapple slices in juice – Don’t drain them! That sweet juice adds moisture and flavor. I like to save a tablespoon of the juice to mix into the batter for extra pineapple punch.
- 1/2 cup unsalted butter, melted – Real butter only, please! It creates that rich, golden crust that makes this dessert so irresistible. Microwave it in 15-second bursts to avoid splattering.
- 1 cup granulated sugar – The workhorse of our batter, giving the cobbler its classic sweetness without overpowering the fruit.
- 1 cup all-purpose flour – Spoon it into your measuring cup and level it off – no packing it down or your cobbler might turn out dense.
- 2 tsp baking powder – Our leavening agent that gives the cobbler its perfect lift. Make sure yours is fresh (test it by mixing 1/2 tsp with hot water – it should bubble vigorously).
- 1/4 tsp salt – Just a pinch to balance all that sweetness and enhance the flavors.
- 3/4 cup milk – Whole milk gives the richest texture, but 2% works in a pinch. Room temperature blends best.
- 1 tsp vanilla extract – The secret background note that makes everything taste more… well, everything! Splurge on the good stuff if you can.
- 1/4 cup brown sugar – Pack it firmly when measuring for that deep caramel flavor under the pineapple. Dark brown sugar gives more molasses flavor if you have it.
- Maraschino cherries (optional) – Because what’s a pineapple upside-down anything without those ruby-red centers? Pat them dry with a paper towel so they don’t bleed too much.
See? Nothing fancy, just real ingredients that work together beautifully. Now let’s turn them into something magical!
How to Make Pineapple Upside-Down Cobbler
Okay, let’s dive into the fun part – turning those simple ingredients into a showstopper dessert! I’ll walk you through each step just like I learned from my grandma, with all the little tricks that make this cobbler foolproof.
Step 1: Prep the Pineapple and Butter Base
First things first – grab your baking dish (a 9×13-inch works perfectly) and pour in that melted butter. Tip the dish around so the butter coats the bottom completely – this creates our golden foundation. Now arrange those pineapple slices like you’re creating edible artwork! I usually get about 12 slices from a can, placing them in neat rows. If you’re using cherries (and really, why wouldn’t you?), nestle one right in the center of each pineapple ring. Finally, sprinkle the brown sugar evenly over everything – this is what’ll caramelize into that dreamy, sticky-sweet glaze. Trust me, your future self will thank you when you see that gorgeous caramel color later!
Step 2: Make the Batter
Time for the cobbler’s crowning glory – that buttery, golden crust! In a medium bowl, whisk together the flour, granulated sugar, baking powder and salt. Now here’s the key: make a well in the center and pour in the milk and vanilla all at once. Stir just until the batter comes together – some small lumps are totally fine! Overmixing is the enemy here; it makes the cobbler tough instead of tender. If the batter seems too thick, add a tablespoon of that reserved pineapple juice to loosen it up. The consistency should be like pancake batter – thick but pourable.
Step 3: Bake and Invert
Carefully pour the batter over your pineapple arrangement, using a spatula to spread it evenly to the edges. Pop it in your preheated 350°F oven and resist the urge to open the door for at least 30 minutes! You’ll know it’s done when the top is golden brown and the edges pull slightly away from the pan – about 40-45 minutes total. Now comes the hardest part: waiting. Let the cobbler rest for exactly 5 minutes – this lets everything set so it won’t fall apart when you flip it. Run a knife around the edges, place your serving platter upside down over the pan, and with oven mitts (hot pan alert!), flip it with confidence! Lift the pan slowly to reveal your masterpiece. That first glimpse of those caramelized pineapple rings peeking through is pure baking magic!
Tips for the Perfect Pineapple Upside-Down Cobbler
After making this cobbler more times than I can count (and eating even more slices than that!), I’ve picked up some foolproof tricks to guarantee success every time. Here are my absolute can’t-live-without tips:
1. The pineapple juice trick: Don’t drain that can completely! Save about 2 tablespoons of the juice to mix into your batter. It adds an extra hit of pineapple flavor that makes all the difference. Just reduce the milk by the same amount to keep the consistency perfect.
2. The toothpick test isn’t enough: Sure, your toothpick should come out clean, but the real test is watching the edges. When they pull away from the pan slightly and the center barely jiggles (like set gelatin), it’s done. Overbaking dries out the magic!
3. Fresh pineapple works too: If you’re using fresh, cut it into 1/2-inch slices and simmer them in simple syrup (equal parts sugar and water) for 5 minutes first. This softens them just enough so they bake up tender, not tough.
4. The golden rule of flipping: Wait those full 5 minutes after baking – no cheating! Too soon and it’ll fall apart; too long and the caramel sets too hard. Set a timer if you have to. When you flip, do it with confidence in one smooth motion – hesitation leads to pineapple landslides!
These little secrets took me years to figure out, but now they’re your instant shortcuts to cobbler perfection. Happy baking!
Pineapple Upside-Down Cobbler Variations
Once you’ve mastered the classic version, try these fun twists that’ll make this dessert feel brand new! My family goes wild for these variations – they’re like getting several desserts in one recipe.
Tropical twist: Stir 1/2 cup toasted coconut flakes into the batter and sprinkle another 1/4 cup over the pineapple before adding the brown sugar. The toasty coconut flavor pairs perfectly with the caramelized fruit.
Maple magic: Swap the brown sugar for pure maple syrup (about 1/3 cup) drizzled over the pineapple. It gives a deeper, almost smoky sweetness that’s incredible with vanilla ice cream.
Spiced-up version: Add 1/2 teaspoon cinnamon and a pinch of nutmeg to the dry ingredients. For extra warmth, sprinkle a little cinnamon over the pineapple layer too – it smells heavenly while baking!
Berry burst: Tuck fresh raspberries or blackberries between the pineapple slices before adding the batter. The tart berries cut through the sweetness beautifully.
The best part? You can mix and match these ideas! My personal favorite is the coconut-maple combo – tastes like a tropical vacation in every bite.
Serving Suggestions
Oh, let me tell you – this cobbler is good straight from the pan (not that I’d know from personal experience… okay, maybe I do), but a few simple additions take it over the top. Here’s how I love to serve it:
Vanilla ice cream is non-negotiable in my house. That moment when the cold cream hits the warm cobbler and starts melting into all those caramel crevices? Pure dessert heaven. I always use the good stuff – real vanilla bean makes all the difference.
For breakfast (don’t judge!), I’ll dollop on some Greek yogurt instead. The tang balances the sweetness perfectly, and I can almost pretend it’s healthy. Almost.
At dinner parties, I go fancy with freshly whipped cream flavored with a splash of dark rum or bourbon. Just whip it to soft peaks right before serving – the adults always appreciate this little upgrade!
And here’s my secret weapon: a drizzle of caramel sauce right before serving. It takes maybe 30 seconds to warm up store-bought sauce, but looks like you slaved over a homemade batch. Your guests will never know!
Really though, this cobbler shines brightest when it’s still slightly warm from the oven, with whatever topping makes you happiest. Even plain is perfection – just don’t forget to share!
Storing and Reheating Pineapple Upside-Down Cobbler
Here’s the good news – if by some miracle you have leftovers (it’s rare in my house!), this cobbler keeps beautifully. Here’s how I store and revive it so every bite tastes freshly baked:
Room temp storage: Once completely cooled, cover the cobbler tightly with plastic wrap or transfer slices to an airtight container. It’ll stay delicious for about 2 days on the counter – the brown sugar keeps it moist. Just avoid refrigerating unless absolutely necessary, as the fridge tends to dry it out.
Oven revival magic: To bring back that just-baked warmth, pop individual slices on a baking sheet in a 300°F oven for 8-10 minutes. The low heat gently reheats without over-crisping the edges. If the top looks dry, I’ll lightly tent it with foil.
Microwave shortcut: When I’m impatient (which is often), 15-20 seconds in the microwave per slice works in a pinch. Place a damp paper towel over the top to keep it from drying out. It won’t be quite as perfect as oven-reheated, but still delicious!
Freezing tip: You can freeze unbaked cobbler (wrap the assembled dish tightly in plastic and foil) for up to 3 months. Bake straight from frozen, adding 10-15 extra minutes. Leftover baked cobbler freezes well too – just thaw overnight at room temp before reheating.
Pro tip from many, many tests: The caramelized pineapple layer actually gets better on day two as the flavors meld. So don’t be afraid to make it ahead for your next gathering!
Pineapple Upside-Down Cobbler FAQs
Over the years, I’ve gotten so many questions about this beloved recipe – here are the ones that pop up most often, along with my tried-and-true answers!
Can I use fresh pineapple instead of canned?
Absolutely! Just peel and slice a ripe pineapple into 1/2-inch rings, then simmer them in simple syrup (equal parts sugar and water) for 5 minutes to soften slightly. This prevents them from staying too firm during baking. Pat them dry before arranging in your pan.
How do I prevent a soggy bottom?
Two secrets: First, don’t skip letting the baked cobbler rest for those crucial 5 minutes before flipping – this lets the caramel set. Second, make sure your oven is fully preheated so the batter starts cooking immediately. If your oven runs cool, grab an oven thermometer to check!
Can I make this gluten-free?
Yes! I’ve had great results swapping the all-purpose flour for a 1:1 gluten-free baking blend (like King Arthur’s or Bob’s Red Mill). Just add 1/4 teaspoon xanthan gum if your blend doesn’t include it already.
Why did my cherries bleed into the batter?
Those sneaky little cherries love to stain everything! The trick is to pat them completely dry with paper towels before placing them. If they still bleed, try using halved cherries instead of whole – less juice means less mess.
Can I prepare this ahead and bake later?
You sure can! Assemble everything in the baking dish (except the batter), cover tightly, and refrigerate for up to 24 hours. Mix the dry ingredients separately and store at room temp. When ready to bake, whisk the wet ingredients into the dry, pour over your chilled pineapple layer, and add 5-10 minutes to the baking time.
Nutritional Information
Okay, let’s be real – we’re not eating pineapple upside-down cobbler for its health benefits! But since some folks like to know what they’re indulging in (or need to track for dietary reasons), here’s the breakdown per serving. Remember, these are estimates – your actual numbers might vary slightly depending on your exact ingredients.
Per serving (1/8 of the cobbler):
- Calories: 320 (worth every single one!)
- Fat: 12g (7g saturated – hello, glorious butter)
- Carbohydrates: 52g (35g sugars – it is dessert after all)
- Protein: 3g (surprise protein boost from the milk and flour!)
- Sodium: 120mg (not bad for such a sweet treat)
- Fiber: 1g (thank you, pineapple!)
A little disclaimer from my kitchen to yours: These numbers are ballpark figures based on standard ingredients. If you use low-fat milk or sugar substitutes, your counts will change. Same goes if you add extra pineapple or go heavy on the ice cream topping (no judgment here!).
The way I see it? Life’s too short to stress over dessert calories – especially when it comes to this nostalgic, buttery masterpiece. Enjoy every bite!
Print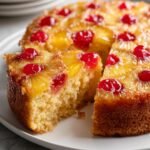
Irresistible Pineapple Upside-Down Cobbler in 5 Steps (Grandma’s Secret)
- Total Time: 1 hour
- Yield: 8 servings 1x
- Diet: Vegetarian
Description
A delicious twist on classic pineapple upside-down cake, this cobbler combines juicy pineapple with a buttery, golden crust for a comforting dessert.
Ingredients
- 1 can (20 oz) pineapple slices in juice
- 1/2 cup unsalted butter, melted
- 1 cup granulated sugar
- 1 cup all-purpose flour
- 2 tsp baking powder
- 1/4 tsp salt
- 3/4 cup milk
- 1 tsp vanilla extract
- 1/4 cup brown sugar
- Maraschino cherries (optional)
Instructions
- Preheat oven to 350°F (175°C).
- Pour melted butter into a 9×13-inch baking dish.
- Arrange pineapple slices over the butter, and place cherries in the center of each slice if using.
- Sprinkle brown sugar evenly over the pineapple.
- In a bowl, whisk flour, granulated sugar, baking powder, and salt.
- Stir in milk and vanilla until just combined.
- Pour batter over the pineapple, spreading evenly.
- Bake for 40-45 minutes until golden brown and set.
- Let cool for 5 minutes, then invert onto a serving plate.
Notes
- For extra flavor, add a pinch of cinnamon to the batter.
- Serve warm with vanilla ice cream.
- Use fresh pineapple if preferred.
- Prep Time: 15 minutes
- Cook Time: 45 minutes
- Category: Dessert
- Method: Baked
- Cuisine: American
Nutrition
- Serving Size: 1 slice
- Calories: 320
- Sugar: 35g
- Sodium: 120mg
- Fat: 12g
- Saturated Fat: 7g
- Unsaturated Fat: 4g
- Trans Fat: 0g
- Carbohydrates: 52g
- Fiber: 1g
- Protein: 3g
- Cholesterol: 30mg