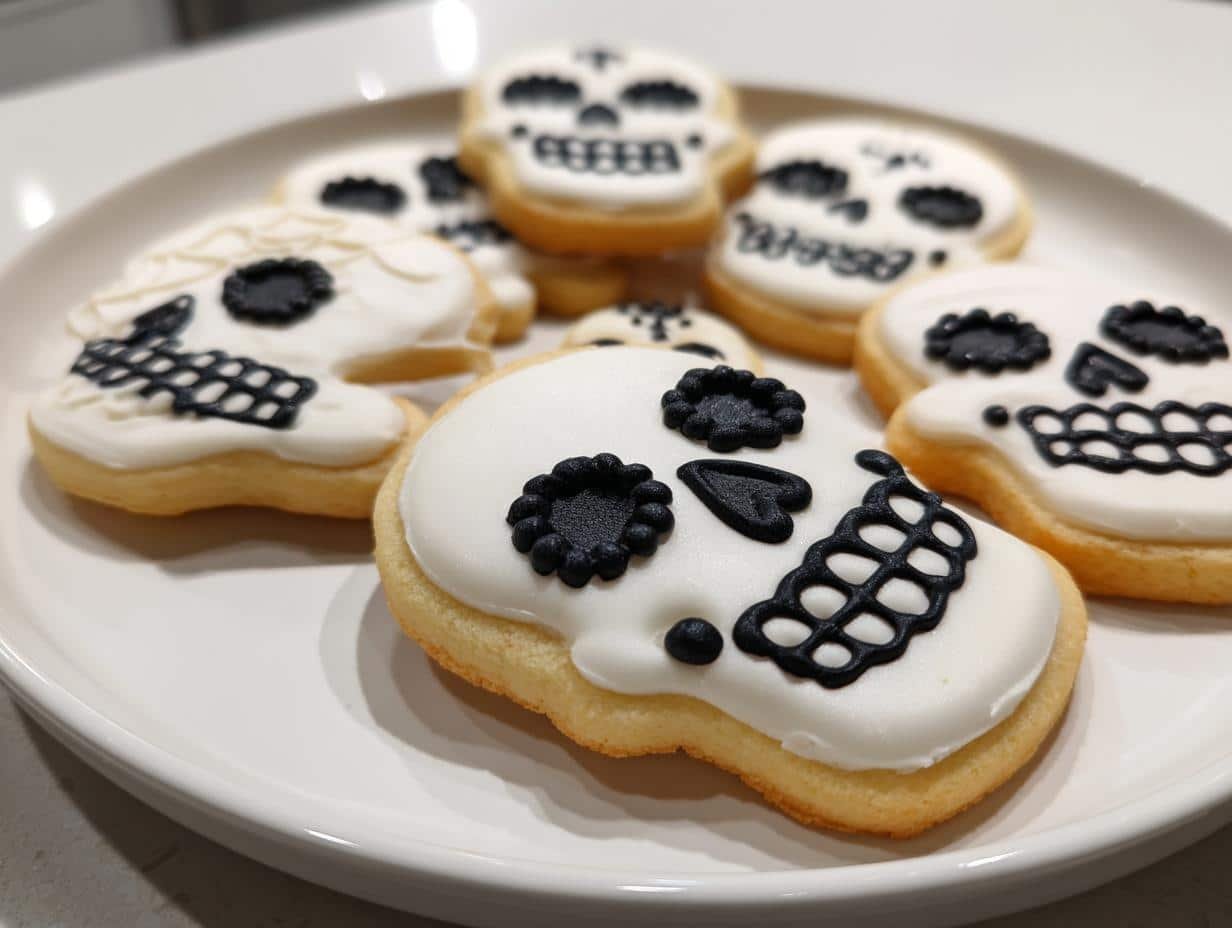
Oh my gosh, you have to try these skull sugar cookies! They’re my absolute favorite Halloween treat to make—so easy, yet they always get the biggest reactions at parties. I remember the first time I made them for my nephew’s spooky birthday bash; the kids went wild decorating them with crazy icing designs. The best part? You don’t need to be a professional baker to pull these off. Just a simple sugar cookie dough, a skull-shaped cutter (I’ve got a collection of different sizes now), and your imagination. Whether you go for creepy cracked skulls or cute candy-coated versions, these cookies are guaranteed to be the hit of any Halloween spread.
Ingredients for Skull Sugar Cookies

Alright, let’s gather everything you’ll need for these spooky treats! I’ve learned through many Halloween baking sessions that having your ingredients prepped makes all the difference. Here’s exactly what you’ll want to have ready:
- 2 3/4 cups all-purpose flour – Spoon and level it, don’t scoop! This keeps the cookies from getting too dense
- 1 teaspoon baking soda – Make sure yours is fresh for maximum rise
- 1/2 teaspoon baking powder – The little lift that helps our skulls keep their shape
- 1 cup unsalted butter, softened – Leave it out for 30-60 minutes until it gives slightly when pressed
- 1 1/2 cups white sugar – Regular granulated works perfectly here
- 1 large egg – Room temperature blends better with the butter
- 1 teaspoon vanilla extract – The good stuff, not imitation!
- 1/2 teaspoon salt – Just enough to balance the sweetness
Pro tip from my many skull-cookie disasters: measure everything before you start mixing. There’s nothing worse than realizing you’re short on butter when your dough is half-mixed! I keep my butter wrapped in wax paper while softening – keeps it from picking up fridge smells.
How to Make Skull Sugar Cookies
Okay, let’s get to the fun part! I’ve made enough batches of these cookies to know exactly how to get perfect results every time. Follow these steps, and you’ll have a tray of spooky skulls ready to decorate in no time.
- Preheat your oven to 375°F (190°C) – Do this first! Nothing worse than dough ready to go with a cold oven.
- Whisk together your dry ingredients – In a medium bowl, mix the flour, baking soda, baking powder, and salt until they’re fully combined. I like to give mine a quick sift to prevent lumps.
- Cream butter and sugar like crazy – Use a stand mixer or hand mixer to beat the softened butter and sugar for 2-3 minutes until light and fluffy. This step gives your cookies that perfect texture!
- Add egg and vanilla – Beat them in one at a time until just combined. Don’t overmix here!
- Gradually add dry ingredients – Mix on low speed until a soft dough forms. The dough should pull away from the sides of the bowl when it’s ready.
- Chill the dough (optional but recommended!) – If your kitchen is warm or you want super-sharp skull shapes, wrap the dough in plastic and chill for 30 minutes.
- Roll and cut your skulls – On a lightly floured surface, roll dough to about 1/4 inch thick. Press your skull cutter straight down – no twisting! Twisting makes the cookies spread unevenly.
- Bake for 8-10 minutes – Until the edges are just barely golden. They’ll firm up as they cool, so don’t overbake!
- Cool completely – Transfer to a wire rack before decorating. Warm cookies = melty icing disasters!

Decorating Your Skull Sugar Cookies
Now for the part where your cookies really come to life (or… afterlife?). My favorite is royal icing – it dries hard and gives you perfect control for details.
Royal icing tips:
- Use piping bags with small round tips (#2 or #3) for outlining
- Thin some icing with water to “flood” fill larger areas
- Let base layers dry completely before adding details (about 1 hour)
- Food coloring gels work better than liquid – more vibrant colors!
Get creative with your skulls! I’ve done:
- Classic white skulls with black icing details
- Day of the Dead sugar skulls with bright colors
- “Glow in the dark” skulls using edible glitter
- Cracked skull effects by dragging a toothpick through wet icing
Pro tip: If you mess up, just scrape off the icing and start over! The cookies are sturdy enough for a do-over. And remember – imperfect decorations often look the spookiest!
Why You’ll Love These Skull Sugar Cookies
Oh, where do I even start? These cookies have become my go-to for so many reasons:
- Super simple – Just basic ingredients mixed together (no fancy skills needed!)
- Endlessly customizable – Make them creepy or cute depending on your mood
- Perfect for parties – Kids and adults both go crazy for them
- Great make-ahead treat – The dough freezes beautifully for last-minute baking
- So much fun to decorate – Let your inner artist go wild with icing and sprinkles
Tips for Perfect Skull Sugar Cookies
After making more skull cookies than I can count (and yes, plenty of mistakes along the way), I’ve picked up some game-changing tricks that’ll save you from the common pitfalls. Trust me, these tips will take your cookies from “okay” to “oh wow!”
Chill that dough! I know it’s tempting to skip this step when you’re excited, but 30 minutes in the fridge makes all the difference. Cold dough holds its shape better, giving you those crisp skull outlines instead of puffy blobs. If your kitchen’s warm, I’ll even chill the rolled-out dough for 10 minutes before cutting.
Parchment paper is your best friend. No more stuck cookies or uneven browning! A quick sheet of parchment means easy removal and cleanup. Bonus tip: If you’re making multiple batches, let your baking sheets cool between uses – hot pans make the next batch spread too much.
Watch that oven like a hawk. These cookies go from perfect to overdone in what feels like seconds. Look for just the slightest golden tinge around the edges – the centers should still look soft when you pull them out. They’ll finish setting as they cool, I promise.
Flour your cutter between cuts. This little trick prevents the dough from sticking to the cutter, keeping your skull shapes sharp and clean. Just dip the cutter in flour and tap off the excess before each press.
Don’t twist when cutting! Press straight down firmly, then lift straight up. Twisting seals the edges and can make your cookies rise unevenly. If the dough sticks, wiggle the cutter gently side-to-side – don’t twist!
Space them out properly. These cookies spread a bit, so give them about 2 inches of breathing room on the baking sheet. I learned this the hard way with a tray of conjoined skulls that looked like some kind of cookie monster!
Let them cool completely before decorating. I know, the wait is torture, but warm cookies will melt your icing into a sad puddle. Set them on a wire rack for at least 30 minutes – perfect time to mix up your icing colors!
Storing and Serving Skull Sugar Cookies
Here’s the thing about these skull sugar cookies – they never last long in my house! But when you do need to store them (or hide them from sneaky snackers), here’s how to keep them fresh and looking their spooky best.
Airtight is the way to go! Once your decorated cookies are completely dry, stack them between layers of parchment paper in an airtight container. They’ll stay crisp and delicious for up to a week at room temperature. If you used royal icing decorations, the icing actually helps preserve them – it’s like edible armor!
Want to make them ahead of time? The dough freezes beautifully for up to 3 months. Just wrap it tightly in plastic wrap, then pop it in a freezer bag. When you’re ready to bake, let it thaw overnight in the fridge. And get this – already baked cookies can be frozen too! Just make sure they’re completely cooled first.
Now for the fun part – serving! I love arranging these on a black platter with some dry ice for a foggy graveyard effect. Or go for a Day of the Dead theme with bright colored plates and marigolds. For kids’ parties, I’ll sometimes set up a “decorate your own skull” station with bowls of different colored icings and sprinkles – messy but so much fun!
Pro tip: If you’re transporting these to a party, pack them in a single layer with wax paper between layers, and handle gently – those icing details can chip if they get jostled too much. And don’t forget to snap pictures before they disappear – these edible works of art deserve to be remembered!
Skull Sugar Cookies Variations
Okay, let’s get creative! While I adore the classic version of these skull sugar cookies, sometimes I love shaking things up with fun flavor twists. Here are my favorite variations that still keep that perfect cookie texture – because let’s be honest, no one wants a crumbly skull!
Chocolate Skull Cookies
For my fellow chocoholics, try replacing 1/2 cup of the flour with unsweetened cocoa powder. The deep brown color makes for extra-spooky skulls! I like to add a pinch of cinnamon too – it gives them this mysterious warmth that pairs perfectly with the chocolate. Just remember – cocoa powder absorbs more moisture, so you might need to add an extra tablespoon of butter.
Zesty Citrus Skulls
When I want something brighter, I’ll add the zest of one orange or lemon to the dough. The citrus oils make the whole kitchen smell amazing! For an extra kick, I sometimes swap the vanilla extract for orange blossom water – it gives these cookies such a unique, almost floral flavor that’s perfect for Day of the Dead celebrations.
Spiced Chai Skulls
My secret winter version! Mix in 1 teaspoon cinnamon, 1/2 teaspoon cardamom, and 1/4 teaspoon each of ginger and cloves. The warm spices make these taste like Halloween and Christmas had a delicious baby. Pro tip: Brush the baked cookies with a simple syrup glaze (equal parts sugar and water) for extra shine and spice flavor.
Gluten-Free Skull Cookies
For my gluten-sensitive friends, I’ve had great success using a 1:1 gluten-free flour blend (look for ones with xanthan gum already added). The texture comes out slightly more delicate, so I always chill the dough for at least an hour before rolling. And here’s my trick – roll them slightly thicker (about 1/3 inch) to prevent breakage when decorating.
The best part? All these variations work with the same decorating techniques! Whether you’re going for creepy or cute, the skull shape makes any flavor look fantastic. Just promise me you’ll try at least one fun variation – your taste buds will thank you!
Skull Sugar Cookies Nutritional Information
Now, I’m no nutritionist (and let’s be honest – we’re not eating sugar cookies for their health benefits!), but I know some folks like to keep track of what they’re enjoying. Here’s the scoop on what’s in each of these spooky treats. Just remember – these numbers are estimates based on standard ingredients, and your exact count might vary depending on your decorations and exact measurements.
Per cookie (based on recipe yielding 24 cookies):
- Calories: 150 – Perfect for a sweet little pick-me-up!
- Sugar: 10g – It is a sugar cookie after all
- Sodium: 85mg – Not too shabby for a dessert
- Fat: 6g – That rich, buttery goodness we all love
- Saturated Fat: 4g – From all that delicious real butter
- Carbohydrates: 22g – Mostly from the flour and sugar
- Fiber: 0.5g – Hey, every little bit counts!
- Protein: 2g – Thanks to the egg and flour
A quick heads up – these numbers don’t include any icing or decorations! If you’re watching your intake, you can reduce the sugar by using less icing or trying sugar-free decorating options. But honestly? Halloween only comes once a year – I say enjoy your spooky creations to the fullest!
Alright, my fellow cookie monsters, it’s time to put all this spooky knowledge to use! Grab that skull-shaped cutter and get baking – I can’t wait to see what terrifyingly tasty creations you come up with. Whether you go for classic creepy or day-of-the-dead dazzling, these cookies are your blank (edible) canvas. Snap a pic of your favorite design and tag me – nothing makes me happier than seeing your baking adventures! Now who’s ready to make some magic in the kitchen? Try this recipe and share your spooky creations with us! Find more delicious recipes.
Print
Chillingly Delicious 6-Ingredient Skull Sugar Cookies
- Total Time: 30 minutes
- Yield: 24 cookies 1x
- Diet: Vegetarian
Description
Skull sugar cookies are a fun and spooky treat perfect for Halloween or themed parties. These cookies are easy to make and can be decorated in creative ways.
Ingredients
- 2 3/4 cups all-purpose flour
- 1 teaspoon baking soda
- 1/2 teaspoon baking powder
- 1 cup unsalted butter, softened
- 1 1/2 cups white sugar
- 1 egg
- 1 teaspoon vanilla extract
- 1/2 teaspoon salt
Instructions
- Preheat your oven to 375°F (190°C).
- In a bowl, mix flour, baking soda, baking powder, and salt.
- In another bowl, cream together butter and sugar until smooth. Beat in egg and vanilla.
- Gradually blend in the dry ingredients.
- Roll out the dough and cut into skull shapes using a cookie cutter.
- Place cookies on a baking sheet and bake for 8-10 minutes.
- Allow cookies to cool before decorating.
Notes
- Use royal icing for detailed decorations.
- Store cookies in an airtight container to keep them fresh.
- Prep Time: 20 minutes
- Cook Time: 10 minutes
- Category: Dessert
- Method: Baking
- Cuisine: American
Nutrition
- Serving Size: 1 cookie
- Calories: 150
- Sugar: 10g
- Sodium: 85mg
- Fat: 6g
- Saturated Fat: 4g
- Unsaturated Fat: 2g
- Trans Fat: 0g
- Carbohydrates: 22g
- Fiber: 0.5g
- Protein: 2g
- Cholesterol: 20mg